How to set up Notion’s Ship OS to run your product development cycle
Learn how to set up Ship OS, connect its agents, and watch a feature go from a Slack request to ship.
Uh-oh! It looks like your ad blocker is preventing the video from playing.
Please watch it on YouTube

AI is changing how software gets built, and agents are becoming an extension of the product team. They draft PRDs, write code, and move work forward in minutes instead of days. As agents take on more of the work, the opportunity shifts to designing a system that keeps the entire product development cycle connected. Without that shared context, even the fastest workflows start to fragment.
Ship OS is that system. It's a ready-to-use Notion setup for running your product development cycle from end to end.
When you install Ship OS, everything arrives pre-configured. This guide walks you through connecting the Custom Agents that power the workflow.

If you haven’t already, click the button below to install Ship OS and get access to its databases and Custom Agents.
A few things to keep in mind before you install:
Plan: Ship OS uses Notion AI and Custom Agents, so your workspace needs to be on the Business plan or higher. Learn more about our plans→
Admin access: If Slack or GitHub isn’t already connected to your workspace, you’ll need an admin to connect them. If you’re not an admin, loop one in. (See the toggle below for how to find yours.)

How to find your workspace admin
When you install Ship OS, a parent page lands in your workspace with:
Databases for your backlog, tasks, docs, meetings, status updates, launches, and release readiness checks.
Custom Agent templates that handle triage, planning, task generation, coding, status reporting, and go/no-go decisions.
You can place the parent page anywhere in your workspace. Ship OS doesn’t need its own teamspace.
Each Custom Agent ships with instructions already written, so setup is mostly linking agents to the right databases and turning on triggers. You can edit those instructions at any time to match your team’s voice, workflows, or conventions.
Set them up in the order below, which mirrors how work moves through Ship OS. Tools and access is preset for each agent by the template. Your job is to verify it looks right, configure Triggers, and swap a couple of placeholders in each agent's instructions.
Each Custom Agent also has its own setup instructions on the parent page for more detail.
New to Custom Agents?
1. Product Feedback Triager (Triage)
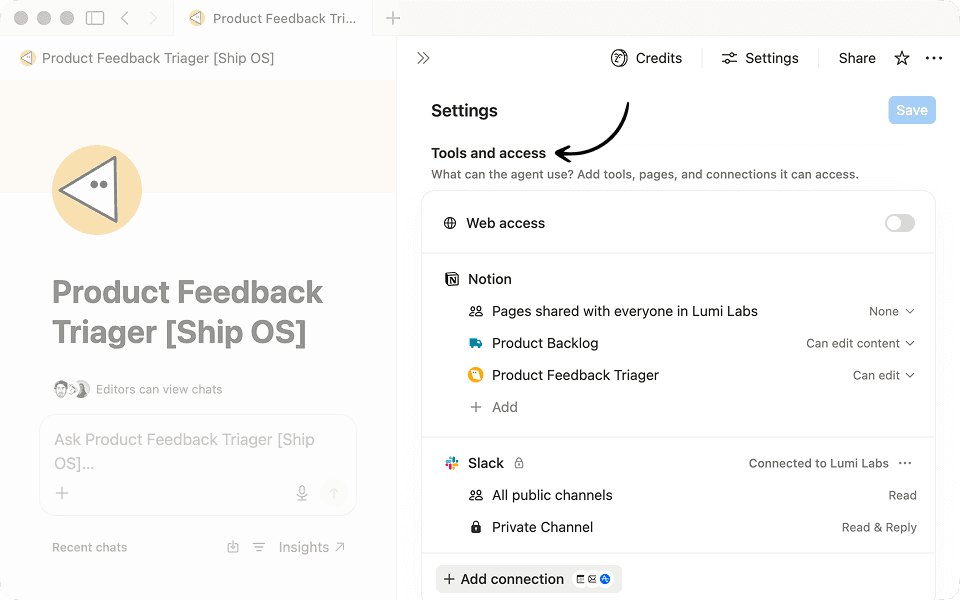
The Product Feedback Triager is a Custom Agent that captures actionable product feedback from Slack into your Product Backlog, creates a new item in the Triage column, and replies in the Slack thread with a link. It runs every time someone posts in your designated feedback channel.
Set it up
Select the Product Feedback Triager agent from the parent page.
Under Tools and access, confirm the agent has
Can edit contentaccess to your Product Backlog database.In the agent's instructions, replace the Product Backlog placeholder with your workspace's copy of the database (type
@, search for the database, and select it).Under Triggers, connect your Slack workspace and select the channel you want the agent to monitor. Any channel your team uses for product feedback works (e.g.,
#ship-os-product-feedback).Under Triggers, connect your Slack workspace and select the feedback channel you want the agent to monitor. Any Slack channel works.
Click Save.
How to confirm it's working
First time connecting Slack to a Custom Agent?
2. PRD Drafter (Plan)
The PRD Drafter is a Custom Agent that turns a backlog item into a first-pass PRD in the Docs database, links it back to the backlog item, and leaves an audit-log comment. It runs whenever a Product Backlog item's Status changes to Plan.
Set it up
Open the PRD Drafter agent.
Under Tools and access, give the agent
Can edit contentaccess to the Docs and Product Backlogdatabases.
In the agent's instructions, replace each database placeholder with your workspace's copy of the
Docs and Product Backlog databases (type
@and select each one).Under Triggers, set the trigger to When a Product Backlog item's Status changes to
Plan.Click
Save.
How to confirm it's working
3. Engineering Task Generator (Build)
The Engineering Task Generator is a Custom Agent that reads the PRD(s) linked to a backlog item and creates a set of tasks in the Tasks database, each related back to the backlog item and PRD. It runs whenever a Product Backlog item's Status changes to Build.
Set it up
Open the Engineering Task Generator agent.
Under Tools and access, give the agent
Can edit contentaccess to the Tasks, Docs, and Product Backlog databases.In the agent's instructions, replace each database placeholder with your workspace's copy of the
Tasks, Docs, and Product Backlog databases (type
@and select each one).Under Triggers, set the trigger to When a Product Backlog item's Status changes to
Build.Click
Save.
How to confirm it's working
4. Claude Coding Agent (Build)
The Claude Coding Agent is an External Agent (a Claude-powered agent that runs alongside your Notion workflow) that takes a well-scoped task and returns a code change. When it has GitHub write access, it opens a PR. When it doesn't, it drops a patch and instructions for you to open the PR yourself. It runs whenever a task's Status changes to Build.
Set it up
Open the Claude Coding Agent.
Connect your GitHub account and select the repositories you want the agent to work in.
Under Tools and access, give the agent
Can edit contentaccess to the Tasks database.Under Triggers, set the trigger to When a Task's Status changes to
Build.Click
Save.
How to confirm it's working
First time connecting GitHub to a Custom Agent?
Going further with Claude on your task board
5. Weekly Eng Status Reporter (Weekly, on demand)
The Weekly Eng Status Reporter reads the Product Backlog and drafts your team's weekly status update, covering what shipped, what's in flight, and what's blocked. It runs automatically Every Friday at 7:00 AM, and you can invoke it any time by @-mentioning it or chatting with it directly.
Set it up
Open the Weekly Eng Status Reporter.
Under Tools and access, give the agent
Full accessto the Status Updates database andCan viewaccess to the Product Backlog database.In the agent's instructions, replace each database placeholder with your workspace's copy of the Status Updates and Product Backlog databases (type
@and select each one).Under Triggers, confirm the schedule is set to Every Friday at 7:00 AM, then choose your preferred time zone.
Click
Save.
How to confirm it's working
6. Ship Ops Agent (Review and Ship, on demand)
The Ship Ops Agent answers "is this ready to ship?" by reading the Product Backlog, Tasks, Docs, and Meetings databases, then flagging what's blocked, unowned, or still open for decision. It runs on demand, so invoke it by @-mentioning it on a page or chatting with it directly.
Set it up
Open the Ship Ops Agent.
Under Tools and access, give the agent
Can edit contentaccess to the Release Readiness database andCan viewaccess to the Product Backlog, Tasks, Docs, and Meetings databases.Note : Ship Ops needs edit access to Release Readiness because it creates the readiness record when making a go/no-go decision.
In the agent's instructions, replace each database placeholder with your workspace's copy of the corresponding database (type
@and select each one).Click
Save.
How to confirm it's working
Here's the path the Dashboard views example request takes from a Slack message to a shipped feature.
Triage: A customer request lands in
#ship-os-product-feedback; "My customer wants dashboard views to monitor usage across their teams." The Product Feedback Triager creates a Product Backlog item inTriageand replies in the Slack thread with a link.Plan: Drag the item to
Plan. The PRD Drafter creates a linked draft in the Docs database with the original Slack message attached. Your team can then refine the PRD and move the work toBuild.Build: The Engineering Task Generator creates tasks linked to the PRD. When engineers move a task into
Build, the Claude Coding Agent opens a GitHub PR for it. Review and merge as they land.Review and Ship: @-mention the Ship Ops Agent and ask, "Is dashboard views ready to ship?" . It generates a readiness report with links to the supporting work. Once you're ready, move the backlog item to
Ship. The Weekly Eng Status Reporter includes it in Friday's update.
Ship OS works out of the box, and most teams start customizing it within their first sprint or two. Here are a few common next moves:
Add more agents on your codebase: Add Claude agents for PR review, triage, or post-merge follow-up. See How to set up Claude agents on your team's Notion task board for patterns.
Set up automatic release notes: Add a release-notes agent that reads items in the
Shipcolumn and drafts the changelog into the Docs database.Update the agent's instructions: If you keep rewriting its response the same way, paste those edits into the instructions, e.g. "always include customer impact in the title."
From there, the most common next steps are adding views and properties that fit how your team thinks about work, and hooking more intake channels into the Product Backlog (Zendesk, GitHub, support inboxes). The Custom Agent best practices guide goes deeper on the iteration loop.

More resources
Something we didn’t cover?