How to remove the Inbox label in Gmail: A step-by-step guide
You can remove the Inbox label in Gmail the same way you would any other—either by clicking on the corresponding button after opening an email or assigning another label to it.
Still, there’s more to the story than meets the eye, especially if you want to remove the Inbox label in bulk.
To eliminate guesswork and help you manage labels more effectively, this guide will explain:
How to remove the Inbox label in Gmail from one or more emails
How to assign other labels in Gmail
How to manage Gmail labels effectively
How to remove the Inbox label from a single email in Gmail
Removing the Inbox label from a specific email only takes two steps:
Open the email you want to remove the label from
Click the ✖ button next to the Inbox label
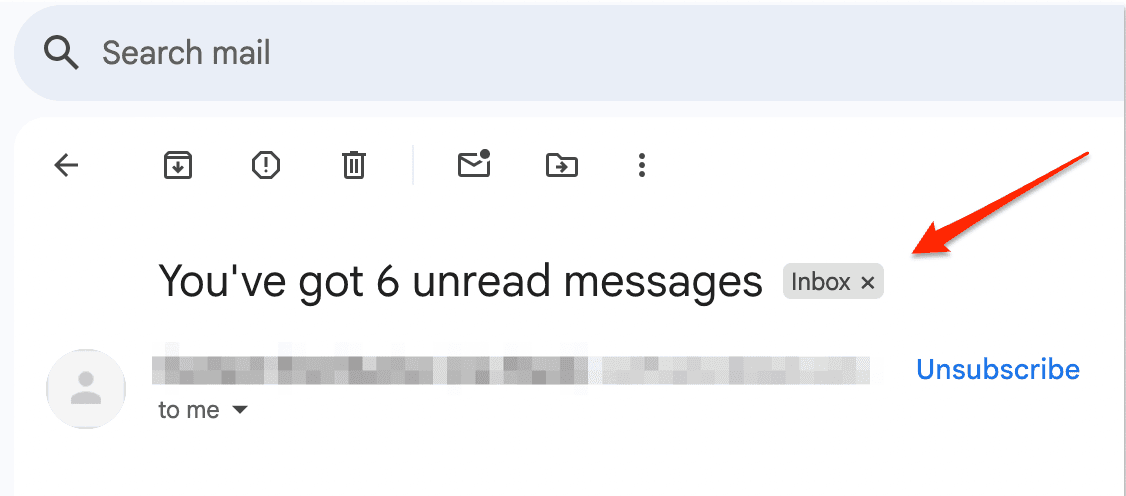
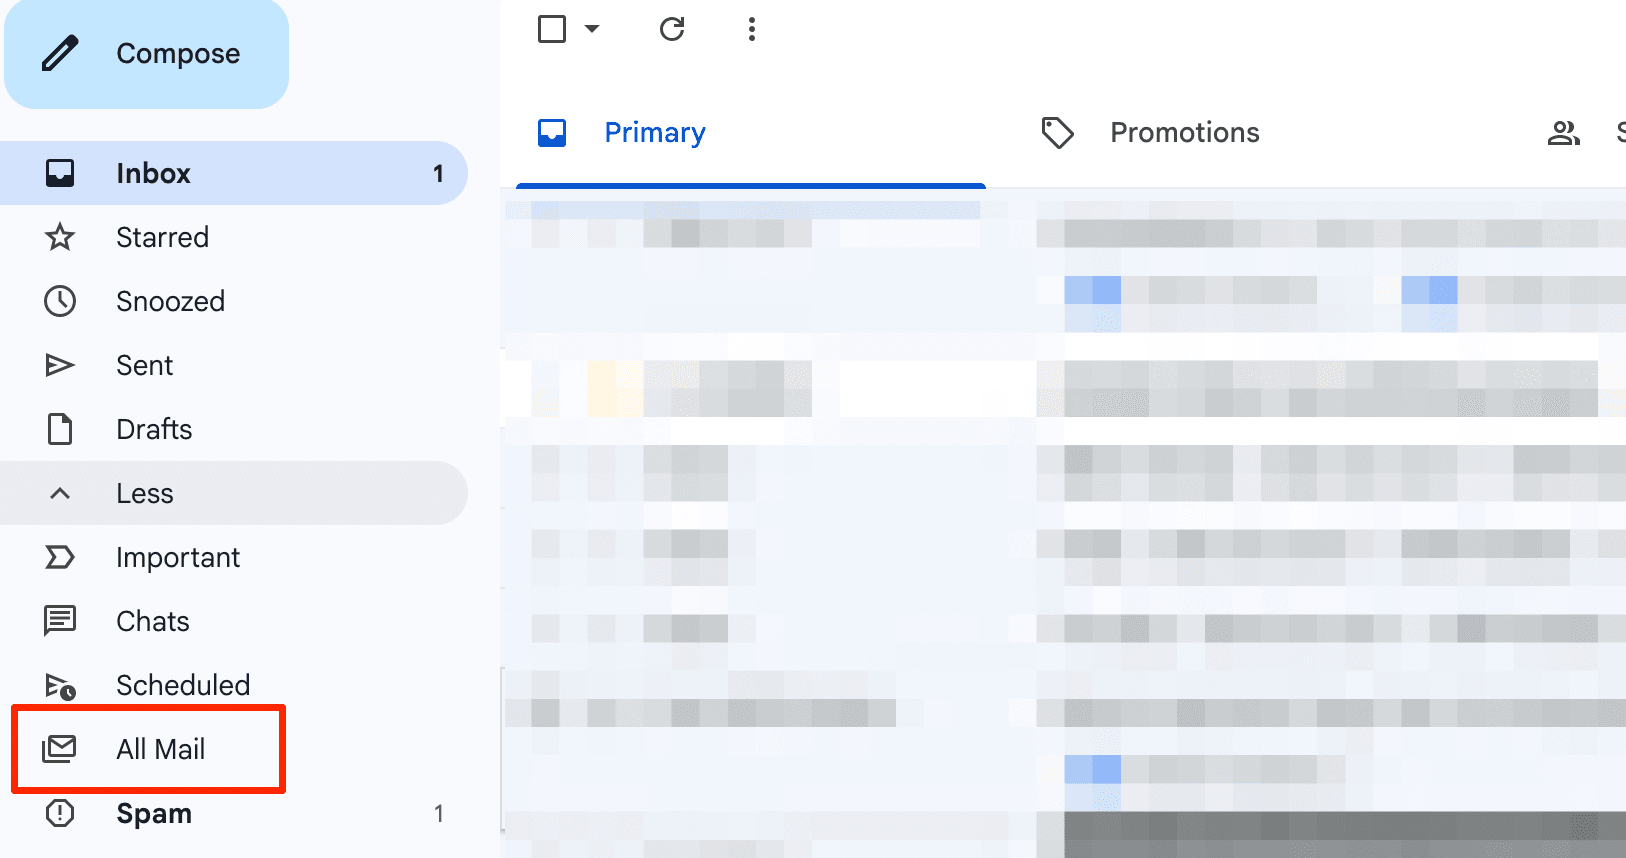
You’ll notice that the label is gone and that the email is no longer visible in your main inbox. Instead, it’s archived and only visible when you go to All Mail in the left-hand menu.
By default, there are no labels like All Mail or Archive, so the email won’t be in a specific folder. If you want to move it or assign another label, you’ll need to find it in All Mail. This category might not be immediately visible in the left sidebar, in which case you can find it by clicking More and expanding the list.
How to remove the Inbox label from multiple emails in Gmail
Unlike other labels, the Inbox label doesn’t have a direct mass removal option. Instead, you need to archive the emails from which you want to remove the label. Here’s how:
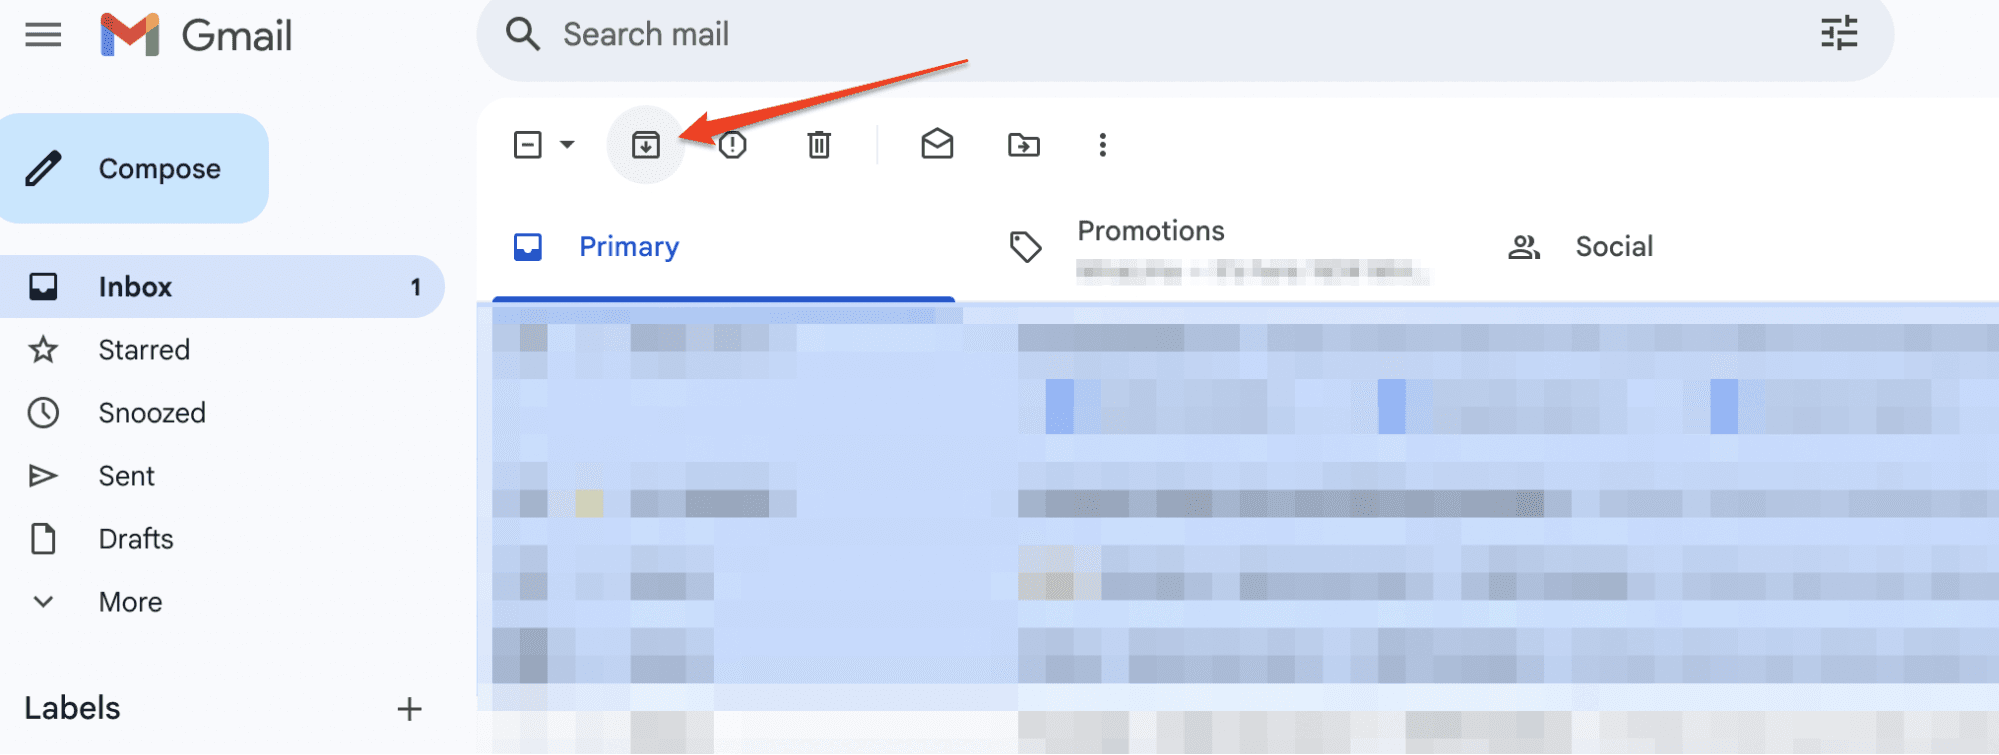
Select the emails you want to remove the label from
Click the Archive button below the search bar
As the selected emails will disappear from your main inbox, you’ll have to hunt them down in the All Mail category before applying a new label. Luckily, there’s a slightly faster alternative.
How to replace the Inbox label with custom labels in Gmail
If you want to move several emails from the Inbox label to another one, you can take these steps:
Step 1: Select the emails you wish to move
Step 2: Click the three-dot icon under the search bar
Step 3: Click Label as and choose the label(s) you wish to add
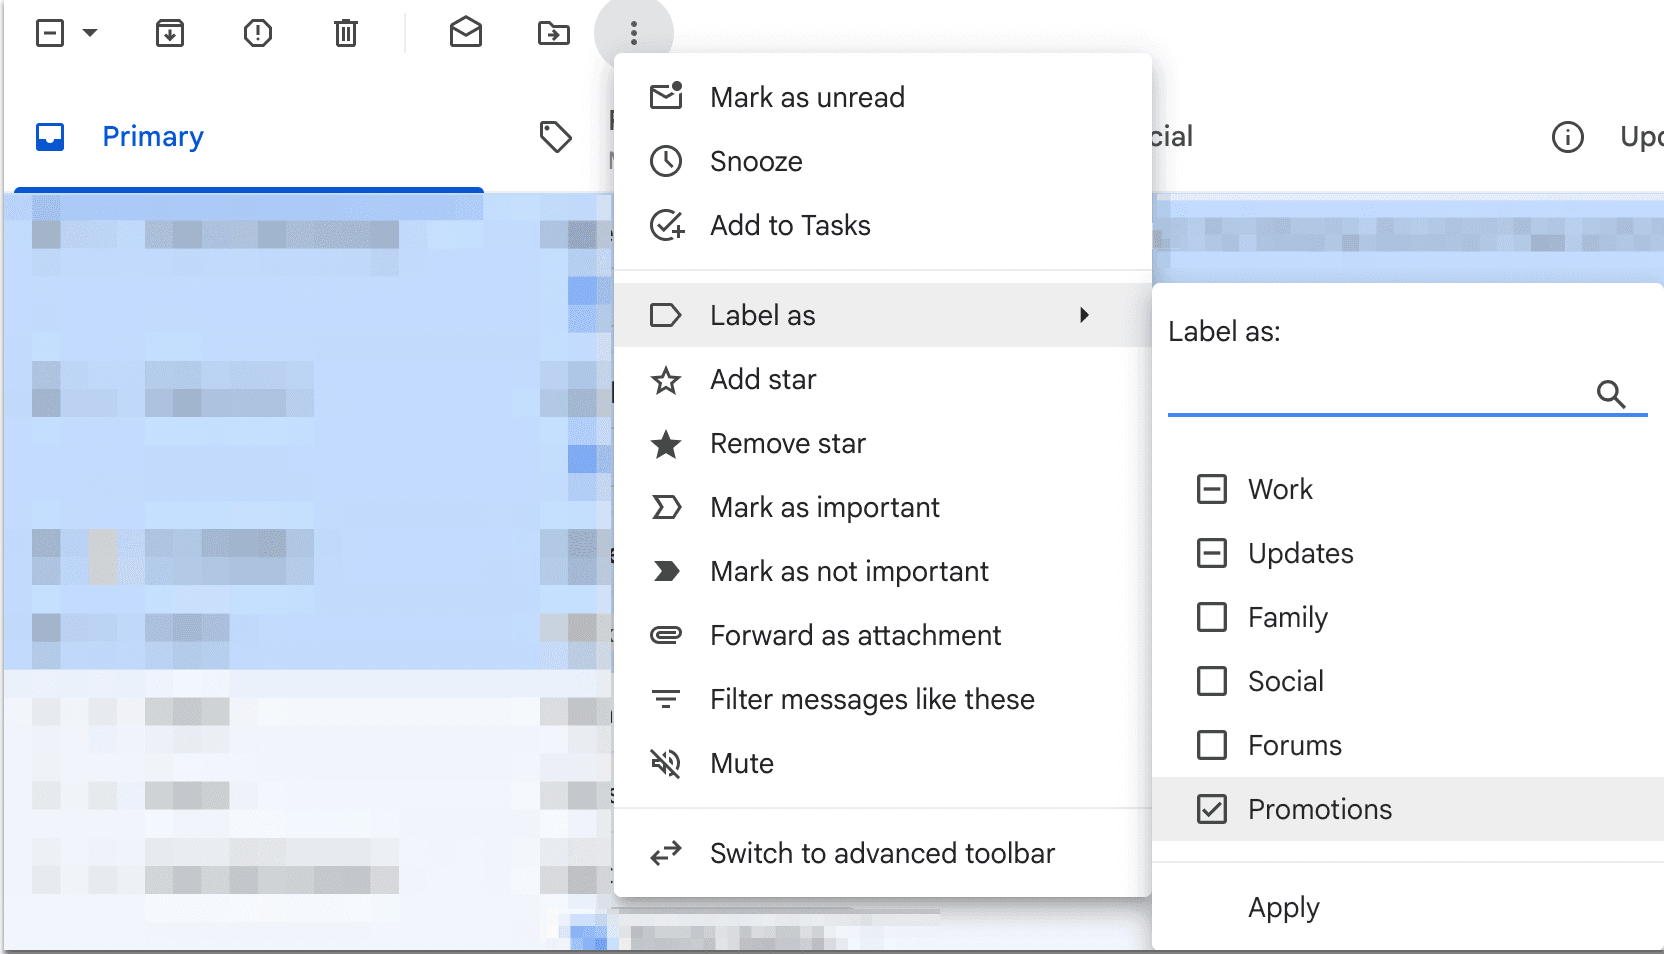
Step 4: Click Apply
Step 5: With the emails still selected, click the Archive icon to remove the Inbox label
If you don’t archive the emails after applying custom labels, they’ll retain the Inbox label on top of the new one. This might be useful if you want to keep them in the main inbox, but otherwise, archive all emails to separate them from the inbox completely.
How to automate Inbox label removal
As you can see, removing the Inbox label and adding new ones can take quite a bit of manual work. The good news is that Gmail automates the process to some extent with filters.
By setting up a filter, you can define rules for labeling future mail according to criteria like:
Keywords
Attachments and size
While setting up filters requires some legwork, it’s not too tedious—here are the steps to follow:
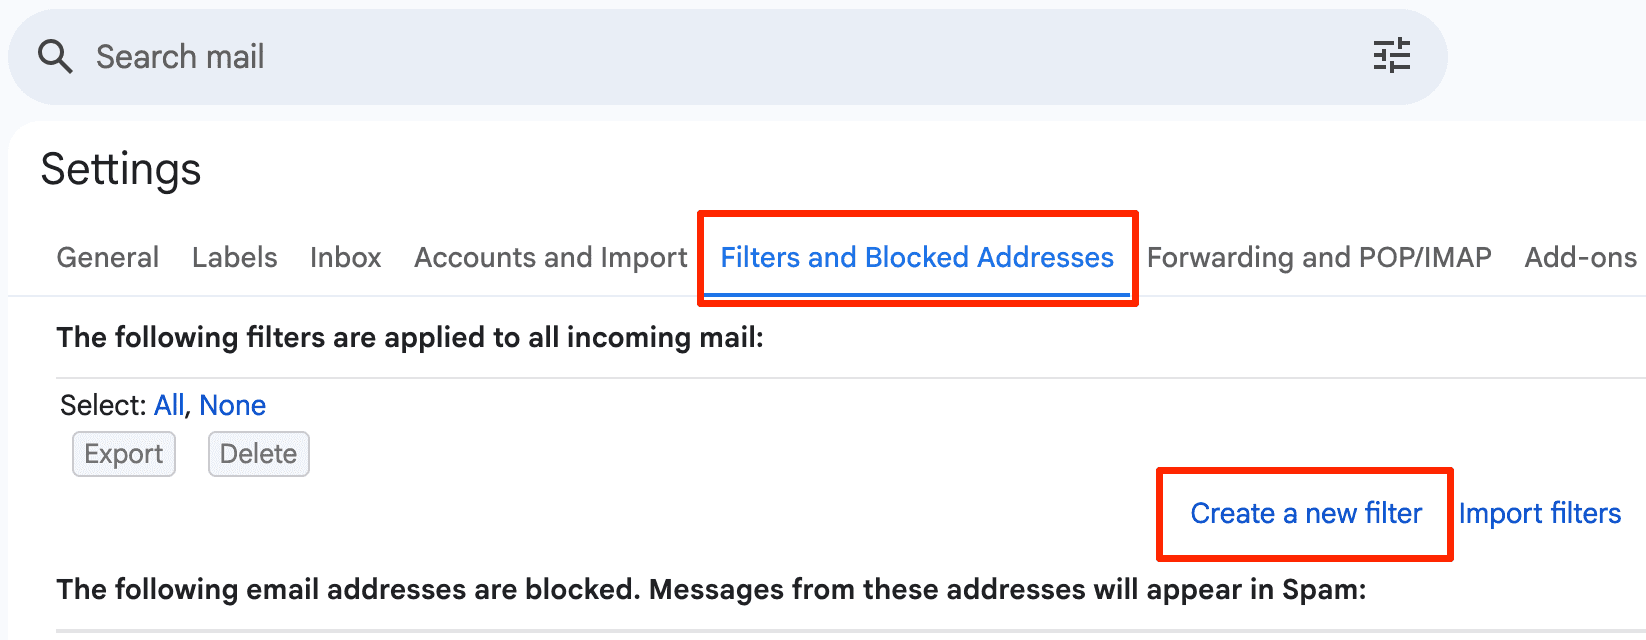
Step 1: Click the gear icon in the upper-right corner and select See all settings
Step 2: In the Filters and Blocked Addresses tab, click Create a new filter
Step 3: Define the criteria for the emails you want to filter, such as sender and subject
Step 4: Click Create filter
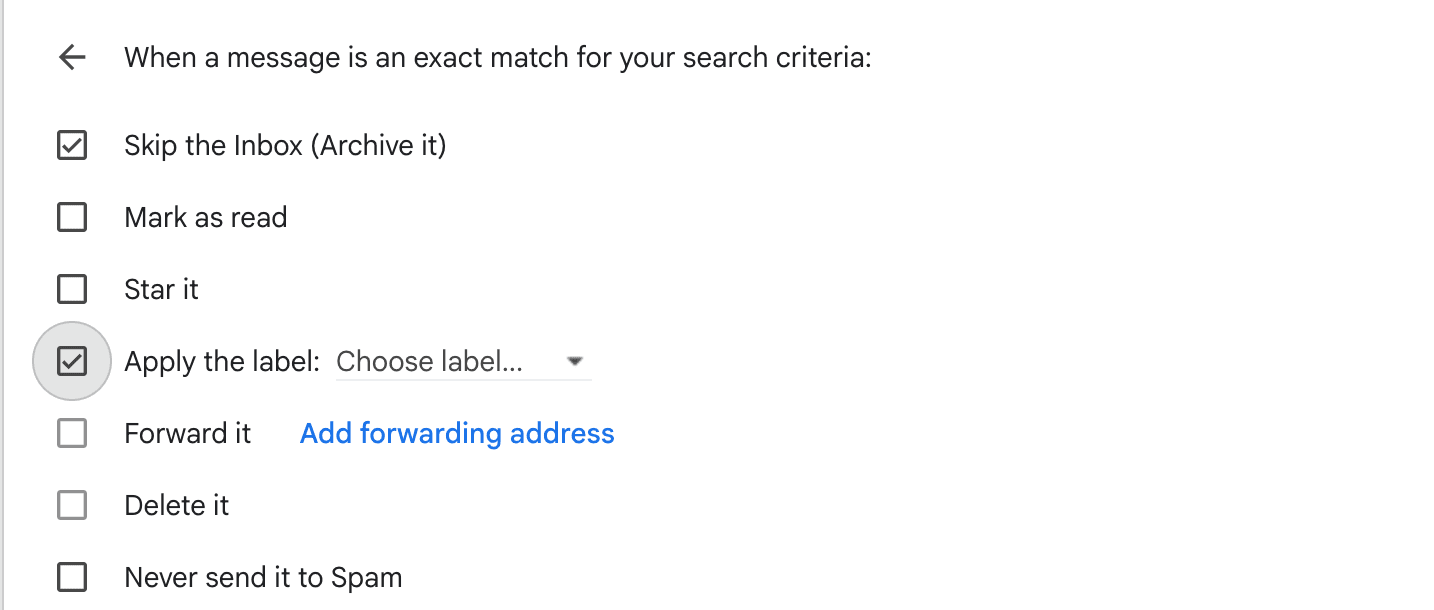
Step 5: Check the box next to Skip the Inbox (Archive it). Optionally, you can also set the label you want Gmail to apply automatically by checking the box next to Apply the label:
Step 6: Click Create filter
Once you’ve created the filter, all emails matching the specified criteria will skip your main inbox and won’t carry its label. You can find them in All Mail or under any custom labels you’ve assigned.
How to manage labels in Gmail
After removing the Inbox label and assigning other labels to the conversation, you can take label management a step further. Gmail lets you organize labels beyond the default settings for a more personalized experience.
To do this, click the gear icon > See all settings, and then navigate to the Labels tab.
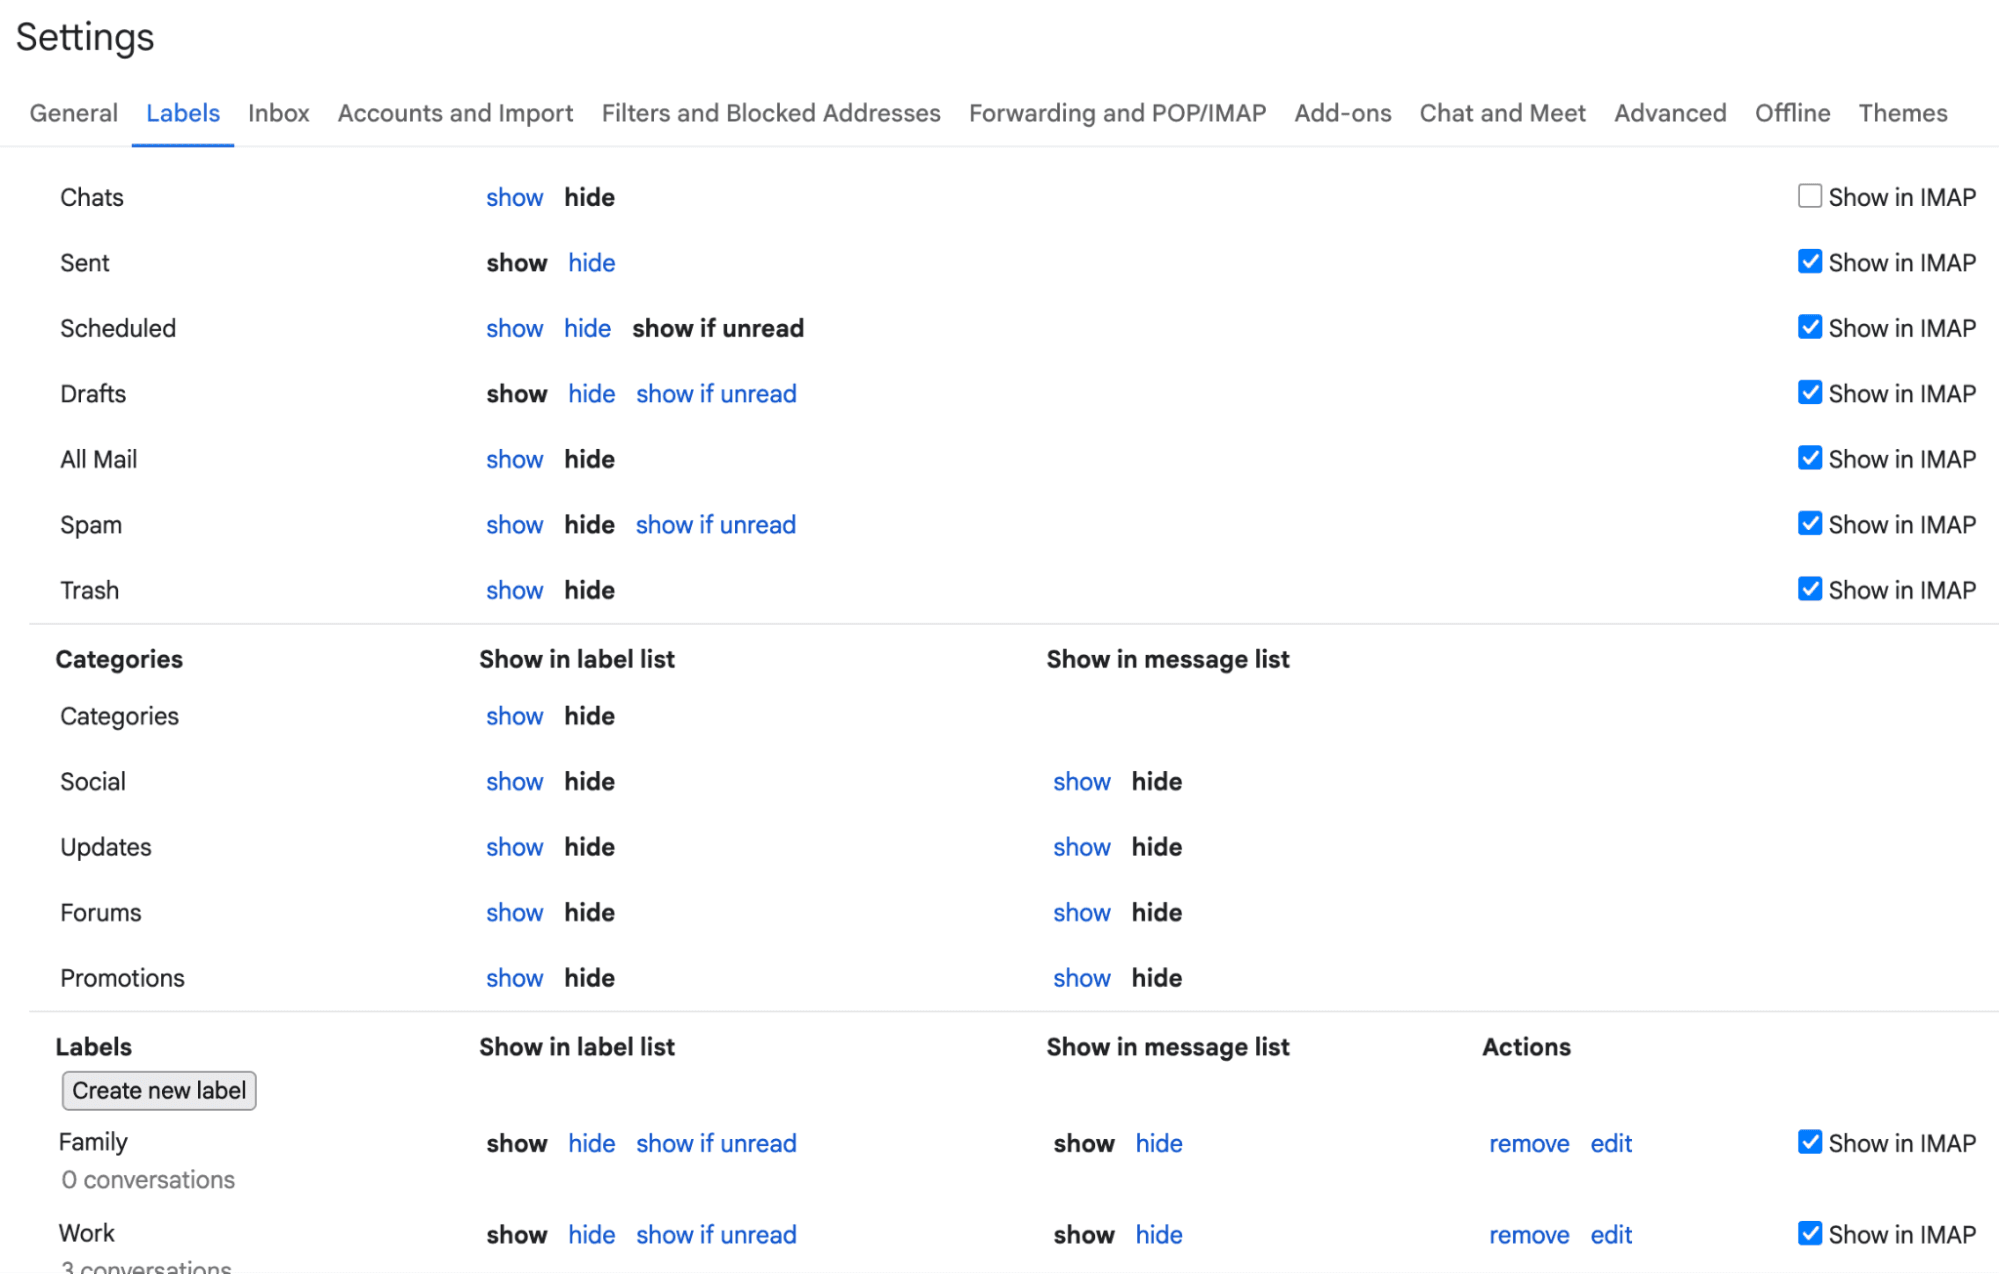
Here you’ll see three types of labels, explained below:
Label type | Explanation |
System labels | The default labels in Gmail’s interface used for basic email organization |
Tabs that Gmail uses to automatically categorize different types of mail (e.g., from social media or forums) | |
Labels | User-created labels used for customization and more granular organization |
You’ll notice that the only actions you can take with system labels and categories are showing or hiding them in the Gmail home screen. You can play around with these settings according to how frequently you use different labels to have all important mail easily accessible.
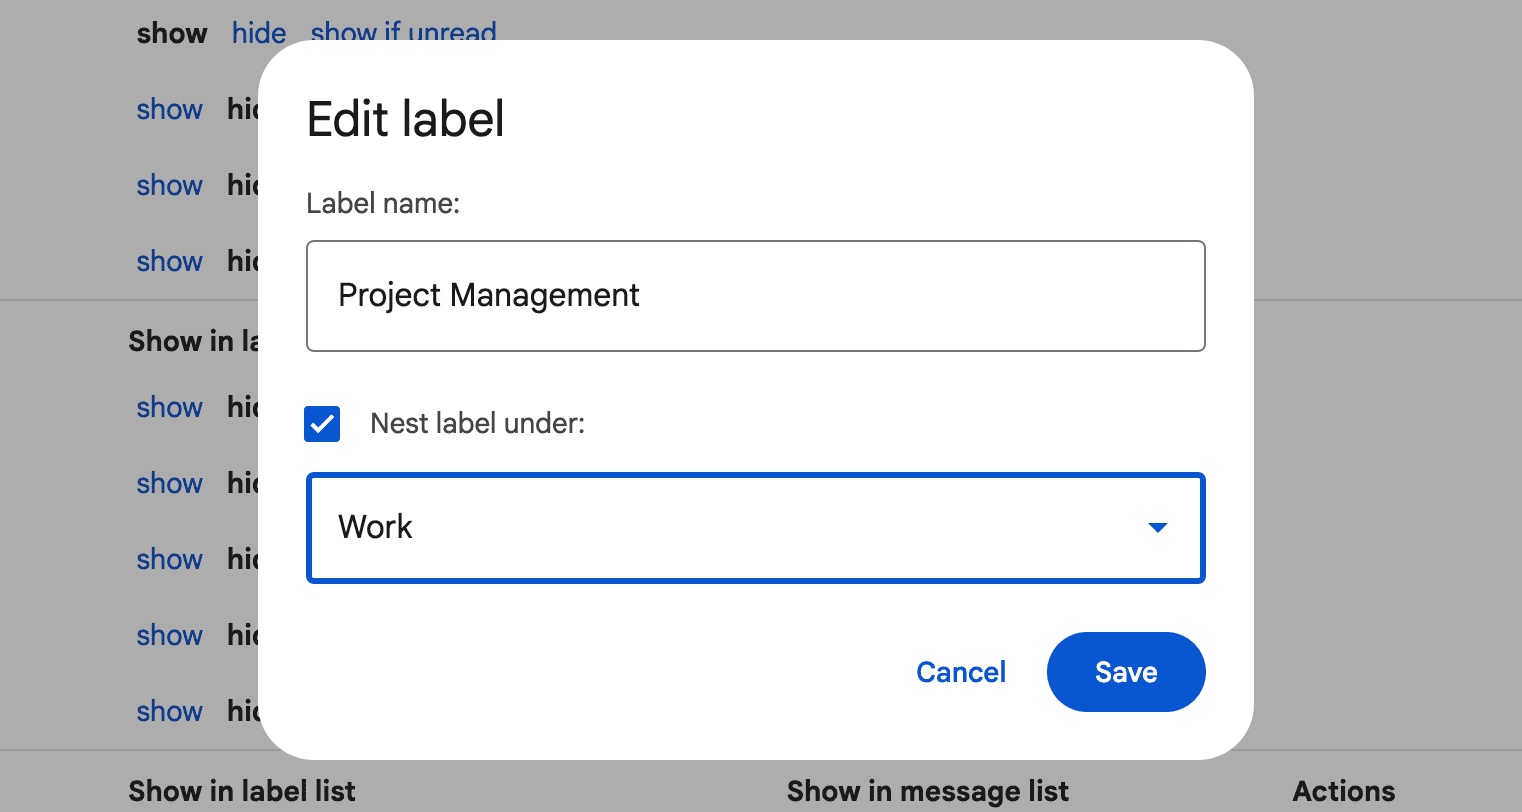
Custom labels offer two additional actions—remove and edit. The first one is self-explanatory and lets you delete labels, while the edit label option lets you change a label’s name or create a sub-label you can nest under the parent label, like in the screenshot below:
With this in mind, Gmail enables some degree of email organization that you can use to keep your inbox neatly structured. Still, label implementation leaves a lot to be desired.
Common issues with Gmail labels—and how to overcome them
One of the main problems with Gmail labels is the manual work needed to create and assign them, especially when multiple emails are involved. You need to click around quite a bit, which can be time-consuming if you need to manage a lot of mail.
The label implementation can also be quite unintuitive—and Inbox label management is a perfect example. Instead of only removing the label, you’re actually archiving emails and piling them in one “folder” from which you need to manage labels further to organize your mail.
Speaking of folders, Google’s terminology can be pretty perplexing. Users have reported confusion between labels and folders, seeing as folders don’t technically exist as a category (Gmail only uses labels that can act as folders).
What’s more, Google Contacts also uses labels, which are separate from Gmail labels but can still be used to send group emails. This adds to the overall confusion around the purpose of specific labels.
To keep things simple and enjoy more straightforward and robust organization features, consider using a Gmail client that makes staying organized easier.
How Gmail clients help you stay on top of your inbox
Gmail’s interface hasn’t received major updates in quite a while. In the meantime, we’ve seen various email clients that streamline and automate every aspect of emailing, from organization to writing and responding to emails.
With the right Gmail client, you can access at least some of the following benefits:
Benefit | Why it matters |
Intuitive email categorization | Replacing Gmail’s label-only system with additional categorization options like folders and tags gives you more control over your inbox. |
Adjustable layouts | If you use the same email for various purposes (entertainment, work, etc.), adjustable layouts help separate them to help you avoid distractions. |
AI-powered suggestions | Whether you’re composing a new email or replying to one, AI can make the process much faster and more effortless. |
Efficient subscription management | Subscriptions can become overwhelming and crowd your inbox, so getting rid of the related mail quickly makes it easier to focus on what matters. |
While the best Gmail client will largely depend on your preferences, some options come with all the organization features you need out of the box—and Notion Mail is a perfect example.
Notion Mail: A self-cleaning inbox for maximum productivity
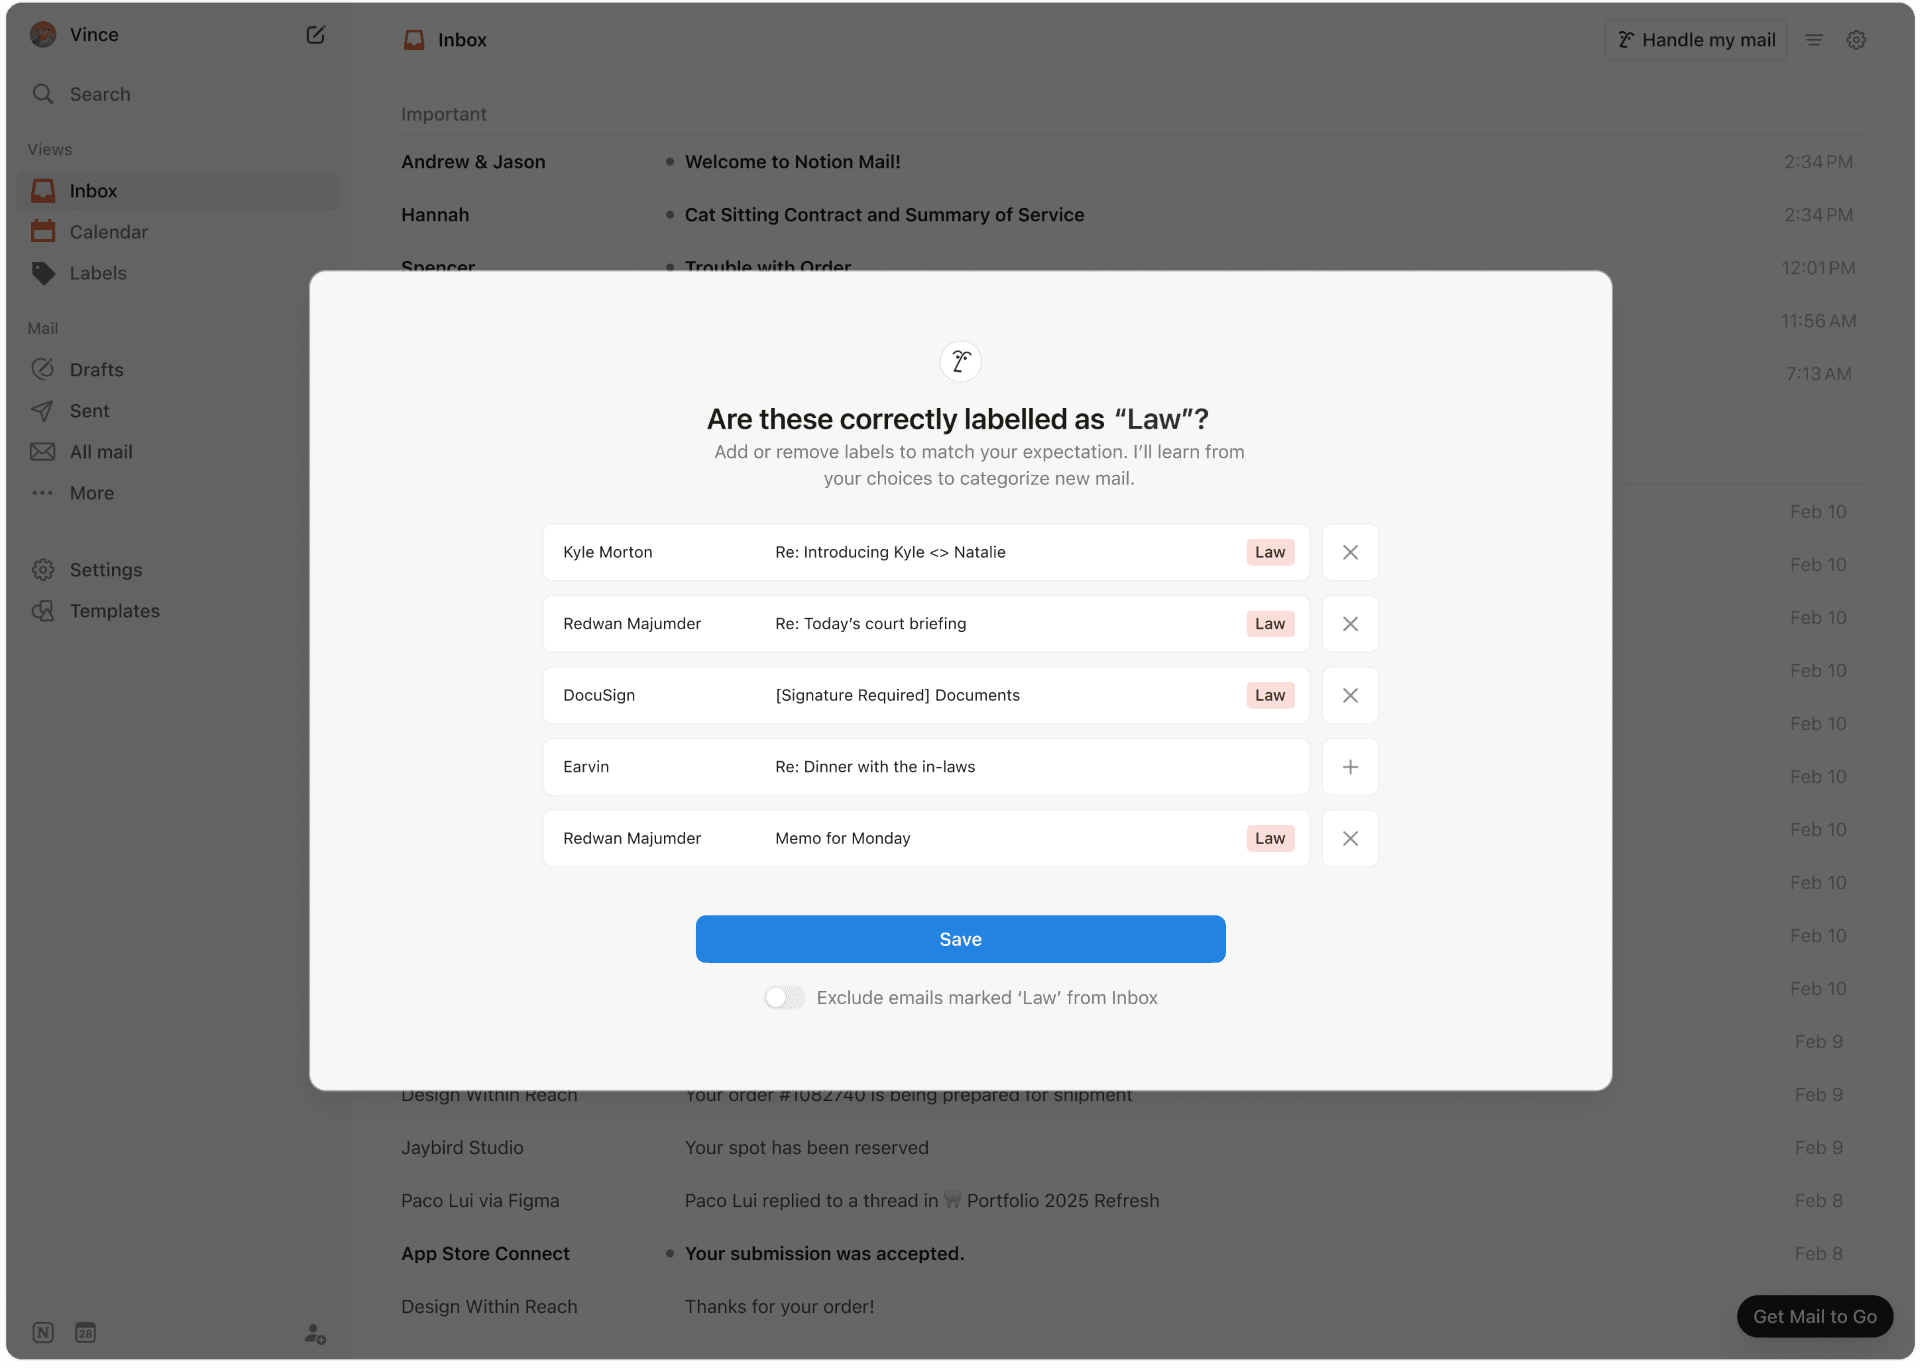
Notion Mail is an AI-native Gmail client that takes all the hassle out of email organization to help you create streamlined, automated workflows. Instead of an outdated point-and-click workflow, it lets you use AI autopilots—automated rules for intelligent email labeling, sorting, and prioritization.
Autopilots use simple prompts to tell Notion Mail what you want to do with emails. Whether you only want to label a few emails as important or extract and aggregate information from multiple conversations, you can do so in a flash.
As you use Notion Mail, it will learn from your behavior to start automatically applying labels to emails and organizing them according to your preferences.
Other Notion Mail features that make it easy to manage your mail include:
Custom layouts: With Notion Mail, you can create “inboxes within an inbox” to separate mail with different use cases and ensure clarity.
Reply assistance: Notion Mail’s AI suggests contextually relevant email responses, and you can use reusable template-based snippets for repeating conversations.
One-click unsubscribe: You can remove unnecessary subscriptions in a single click to declutter your inbox in no time.
Productivity features: Notion Mail helps boost your productivity with intuitive keyboard shortcuts and slash commands for various actions (e.g., scheduling meetings).
Enjoy smooth workflows with Notion Mail
Notion Mail is free to use—visit the signup page, and you can connect your Gmail or Google account right away.
To get the most out of Notion Mail’s intelligent features, you can get a customizable Notion AI add-on. You can tailor the specific features to purchase, which lets you make the most out of your investment.
Keep reading: Need more actionable advice on using Gmail effectively? Check out these guides:
