How to automatically label emails in Gmail: Your ultimate declutter guide
With email at the core of everyday communication, both professional and personal, our inboxes are constantly overflowing. Essential messages get buried under a barrage of newsletters, social updates, and promotional emails.
And it’s not just a minor annoyance; studies show that professionals spend a significant portion of their week manually sorting through emails, time that could be better spent on focused work. Even with diligent effort, human error and hitches could still occur, reducing productivity.
Gmail helps address this issue with the auto-labeling feature, allowing you to bring order to the chaos and reclaim your inbox. In this guide, you’ll learn exactly how to automatically label emails in Gmail. We’ll also introduce you to Notion Mail, a tool that leverages AI to make this process even more efficient.
How Gmail labels can help with inbox organization
Gmail labels are a flexible way to organize your emails. Unlike folders, they allow you to categorize your messages without removing them from your inbox. You can also apply multiple labels to a single email to categorize it within different contexts. Here’s a summary of their key benefits:
Categorization flexibility | You get the freedom to organize emails by topic, project, sender, and more relevant criteria |
Customizability | You can use your labels to filter emails based on your priorities and create a more productive routine |
Easy searching | Gmail labels speed up your search since you can directly look within them to find what you need |
Improve visual organization | You can color-code labels for easier identification; for instance, red labels for urgent emails and green for resolved ones |
How to create a new Gmail label
To auto-label emails in Gmail, you begin by creating a new label. There are several ways to do this:
Via Gmail settings
From Gmail’s Labels section
Directly from an email
Via Gmail settings
To create a label in Gmail settings, take these steps:
Step 1: Navigate to the top of your inbox and click the Settings icon, then See all settings
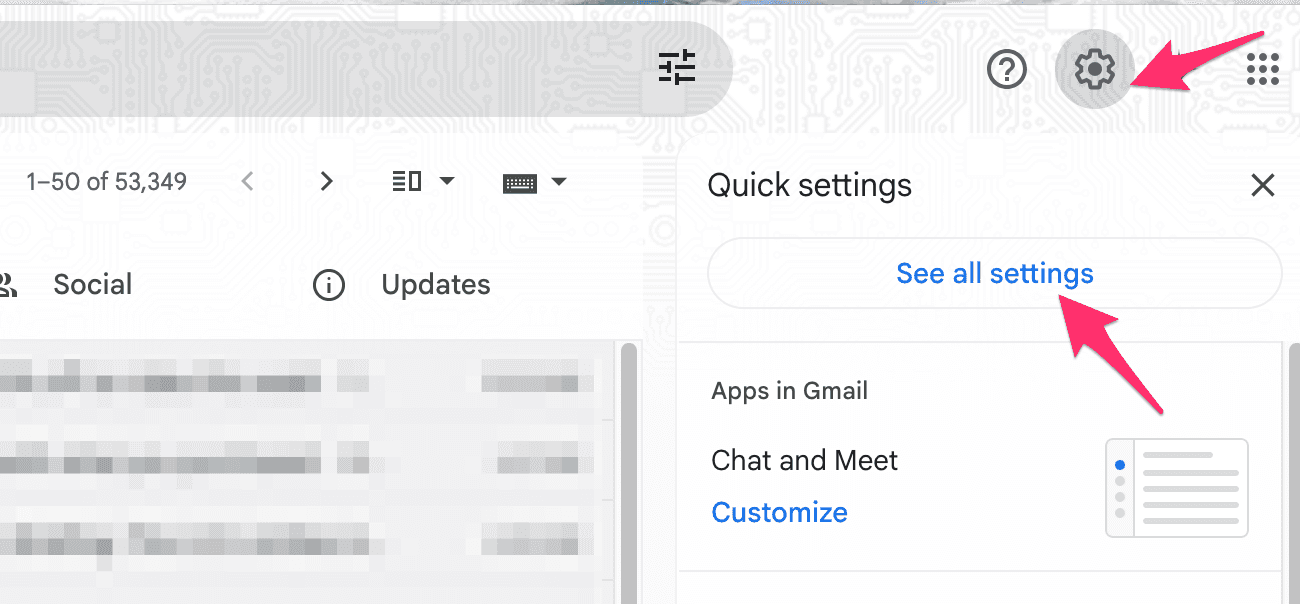
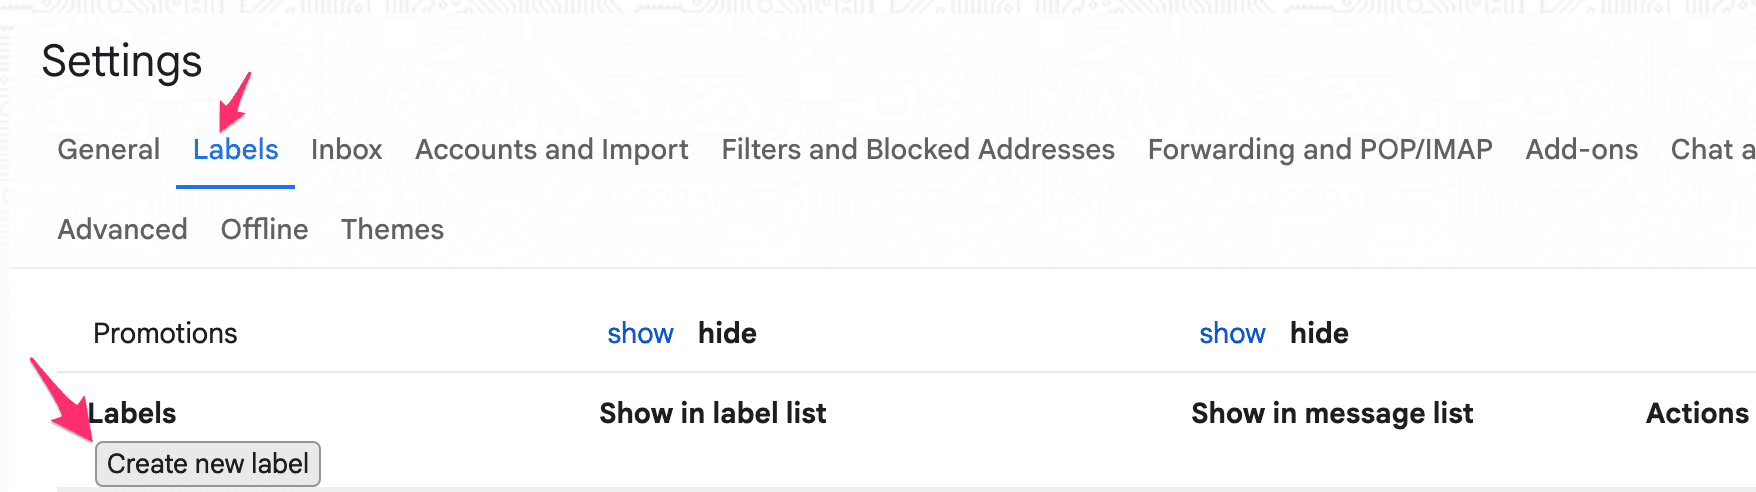
Step 2: Select the Labels tab to reveal a list of all your labels
Step 3: Scroll down to the Create new label button and click it
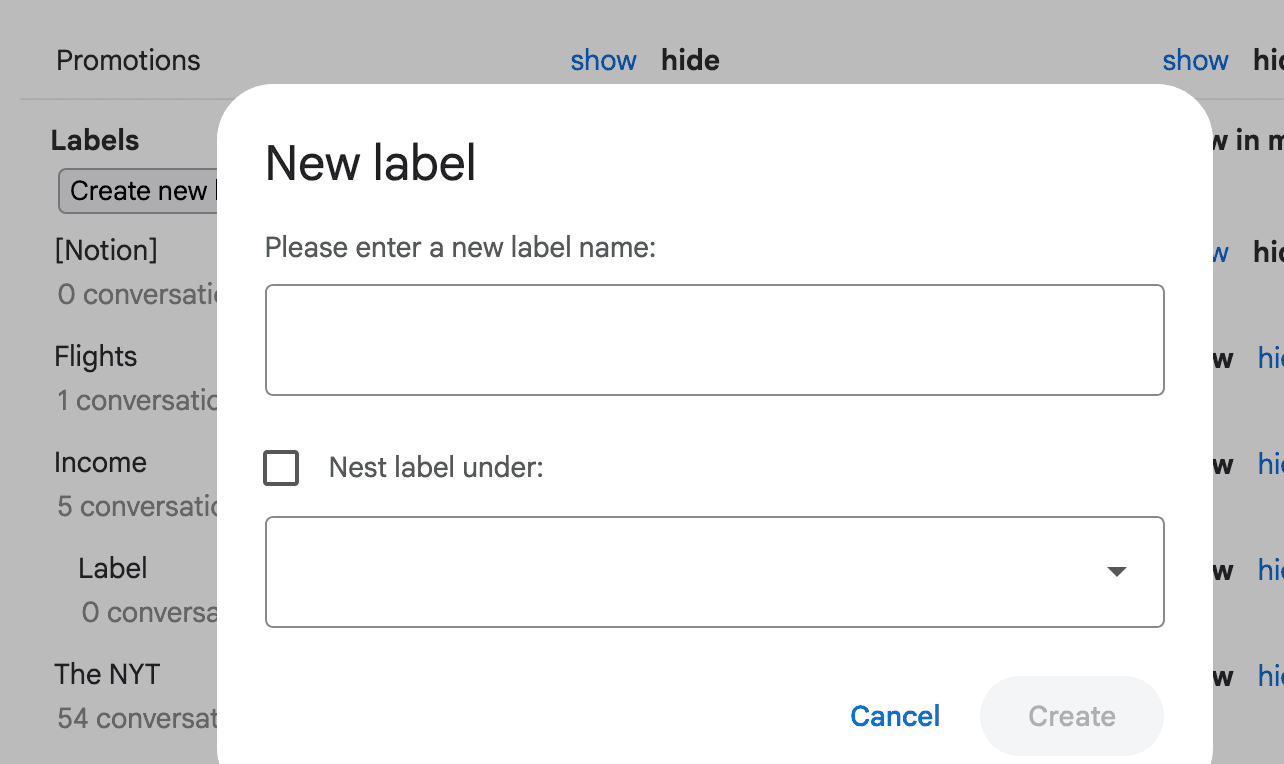
Step 4: Type a name for your label, describing what it is for
Step 5: If you wish to attach the label to an already existing one, click the checkbox beside Nest label under, then select the parent label in the empty field below it
Step 6: Once satisfied, click Create
From Gmail’s Labels section
To create a label from the main screen, take these steps:
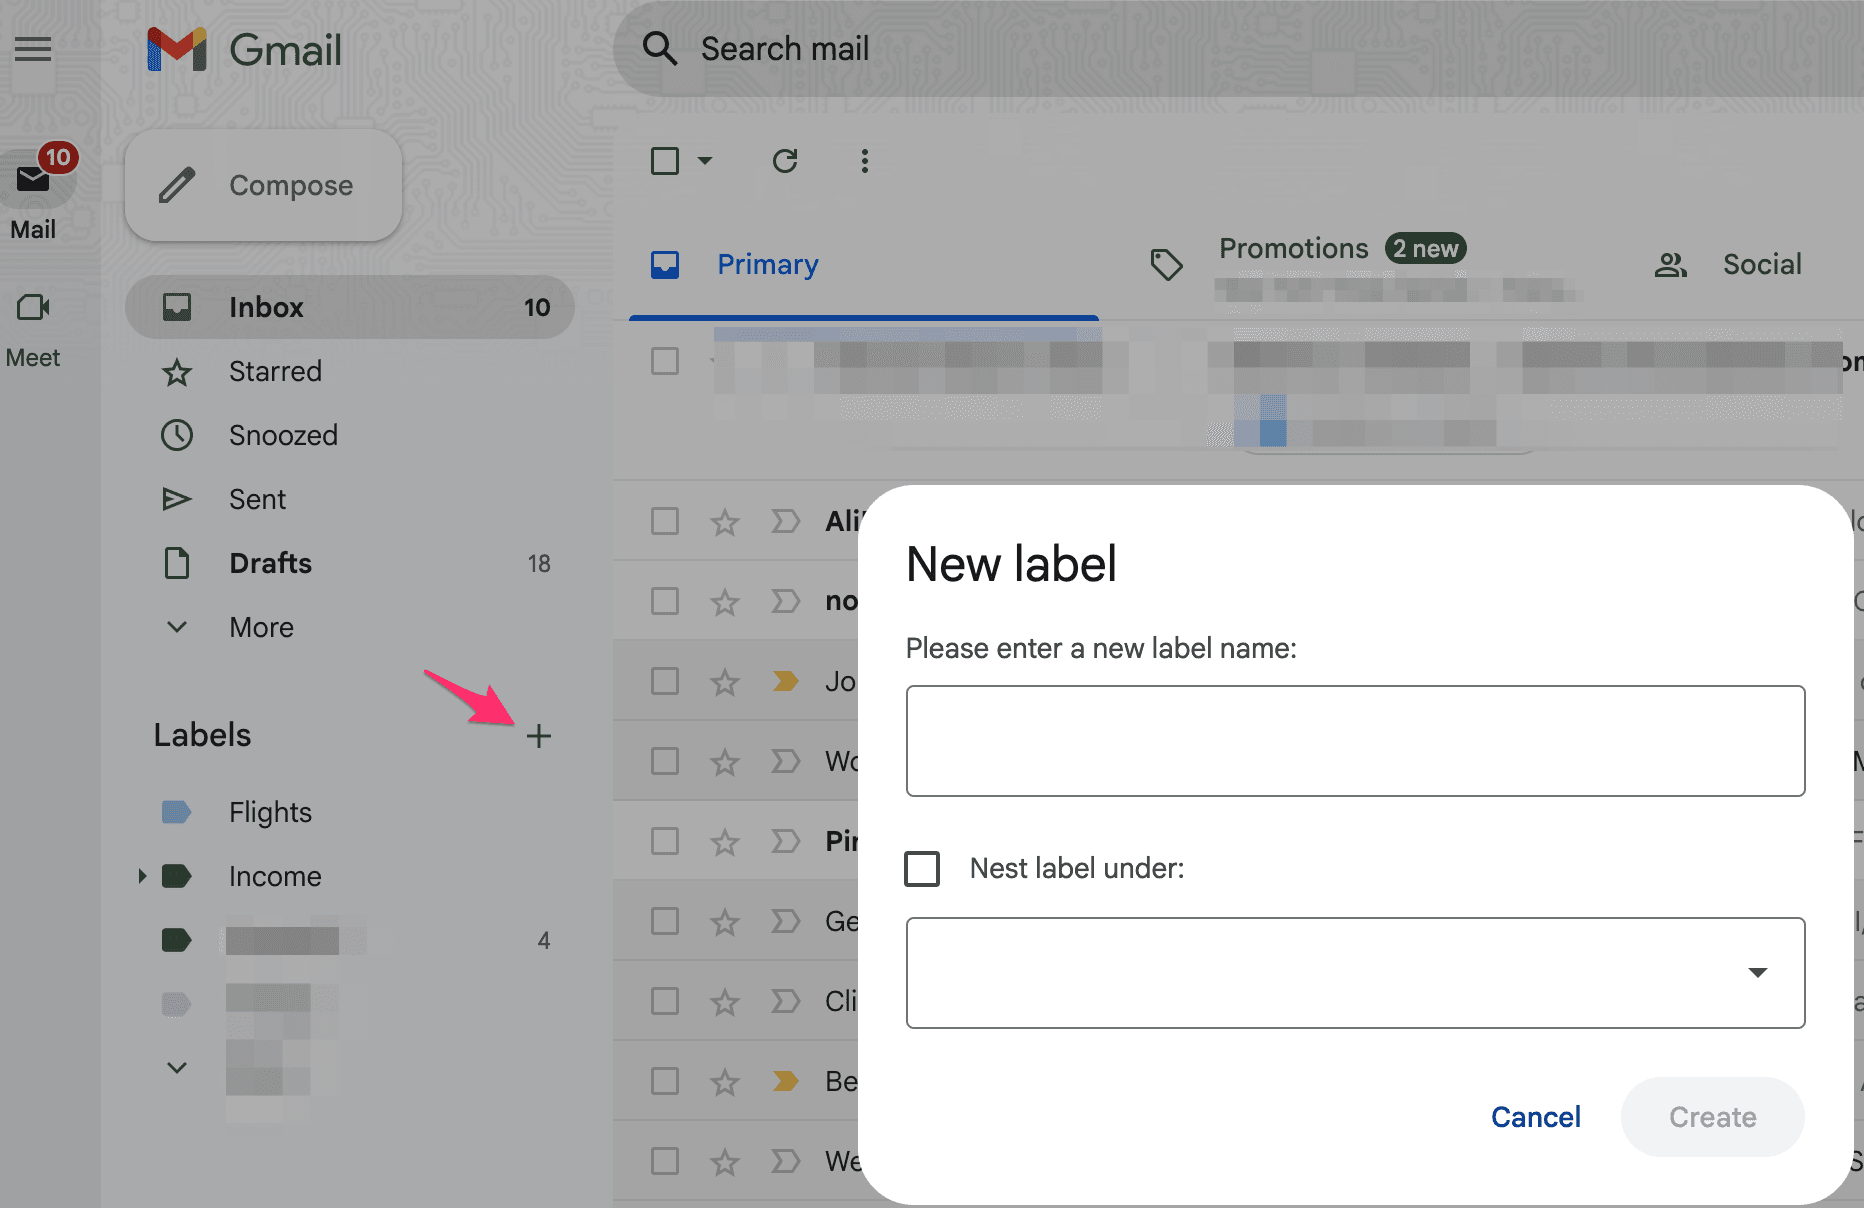
Open Gmail and navigate down, then left
In the Labels section, click the plus + icon
Enter a name for your label and click Create when done
Directly from an email
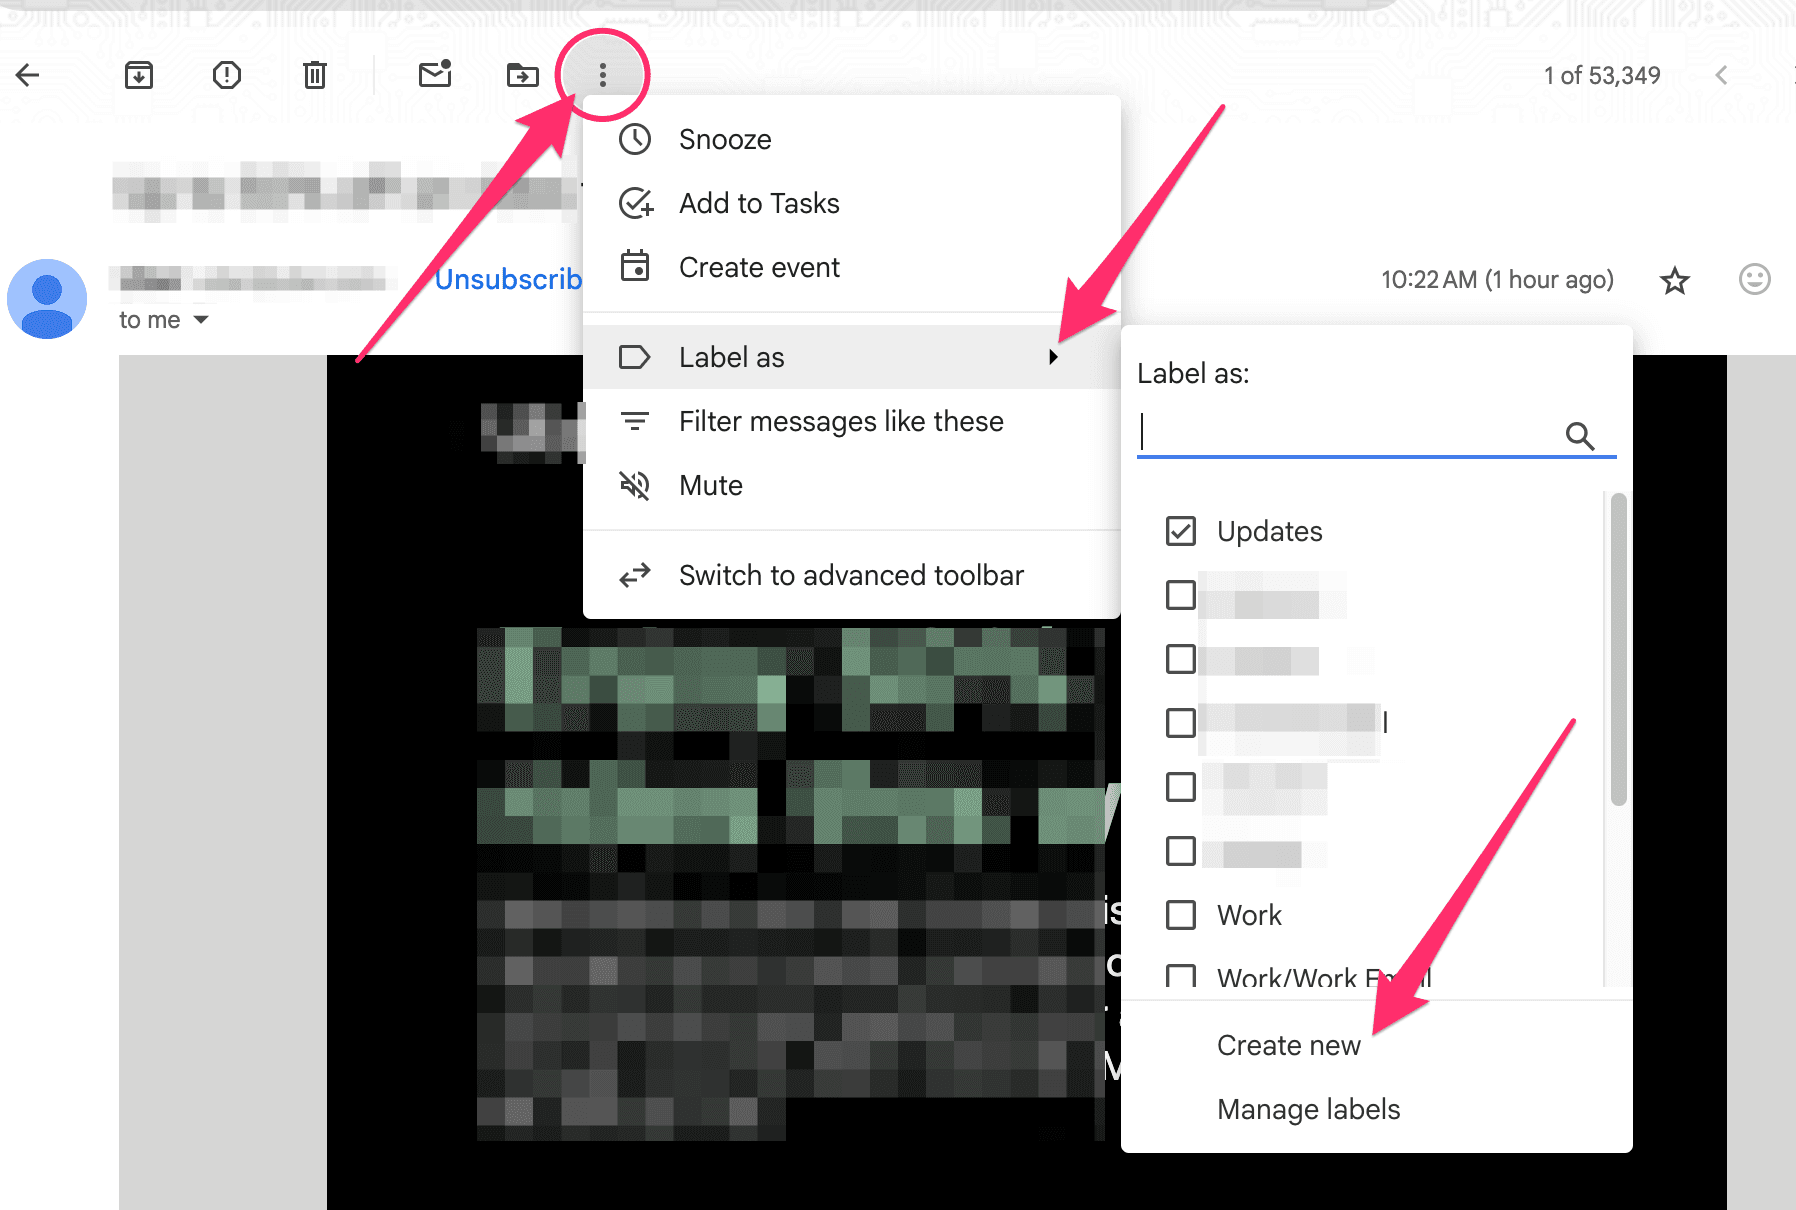
If you’re reading an email and want to add it to a new label, take these steps:
Navigate to the top of the email and click the vertical ellipsis icon
Click Label as on the pop-up menu
On the next menu, click Create new and fill in the label name
Click Create to save
How to automatically apply labels in Gmail
Automating your labels only takes a few steps. You’ll need to create rules—known as Gmail filters—that apply labels to emails automatically based on the criteria you set.
This way, instead of adding a label to emails by yourself, you teach Gmail what label you want to apply to emails matching your criteria.
Here’s how to do it:
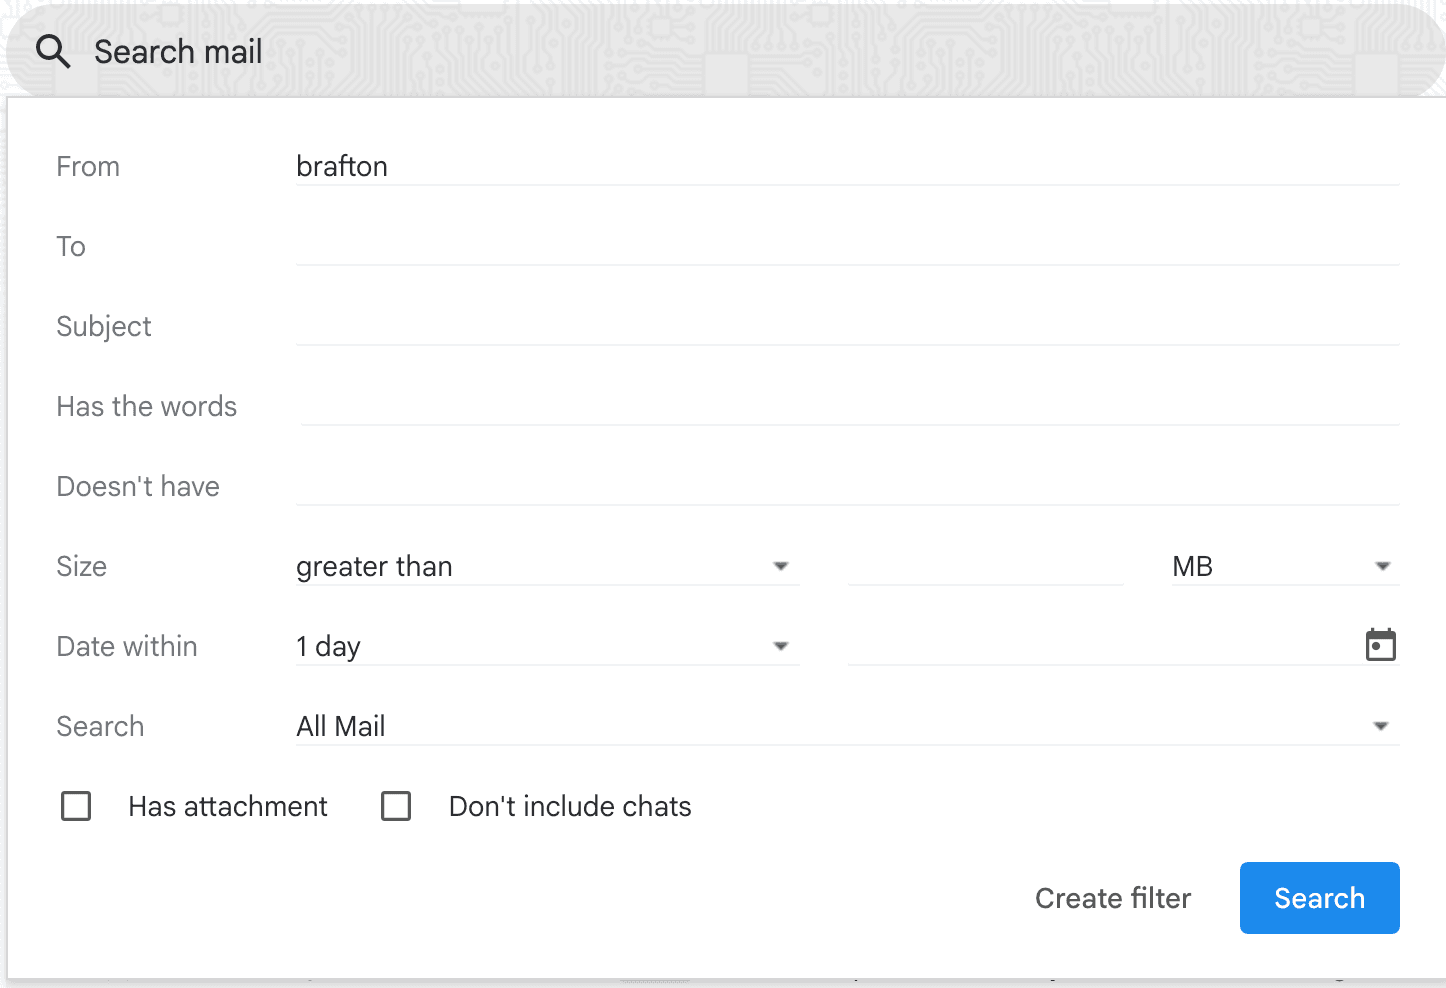
Step 1: Click the three-slider icon in the Gmail search bar

Step 2: Type in your preferred search criteria for the emails to which you want to apply the labels. For instance, you can apply labels to every email from a particular sender or to a specific recipient
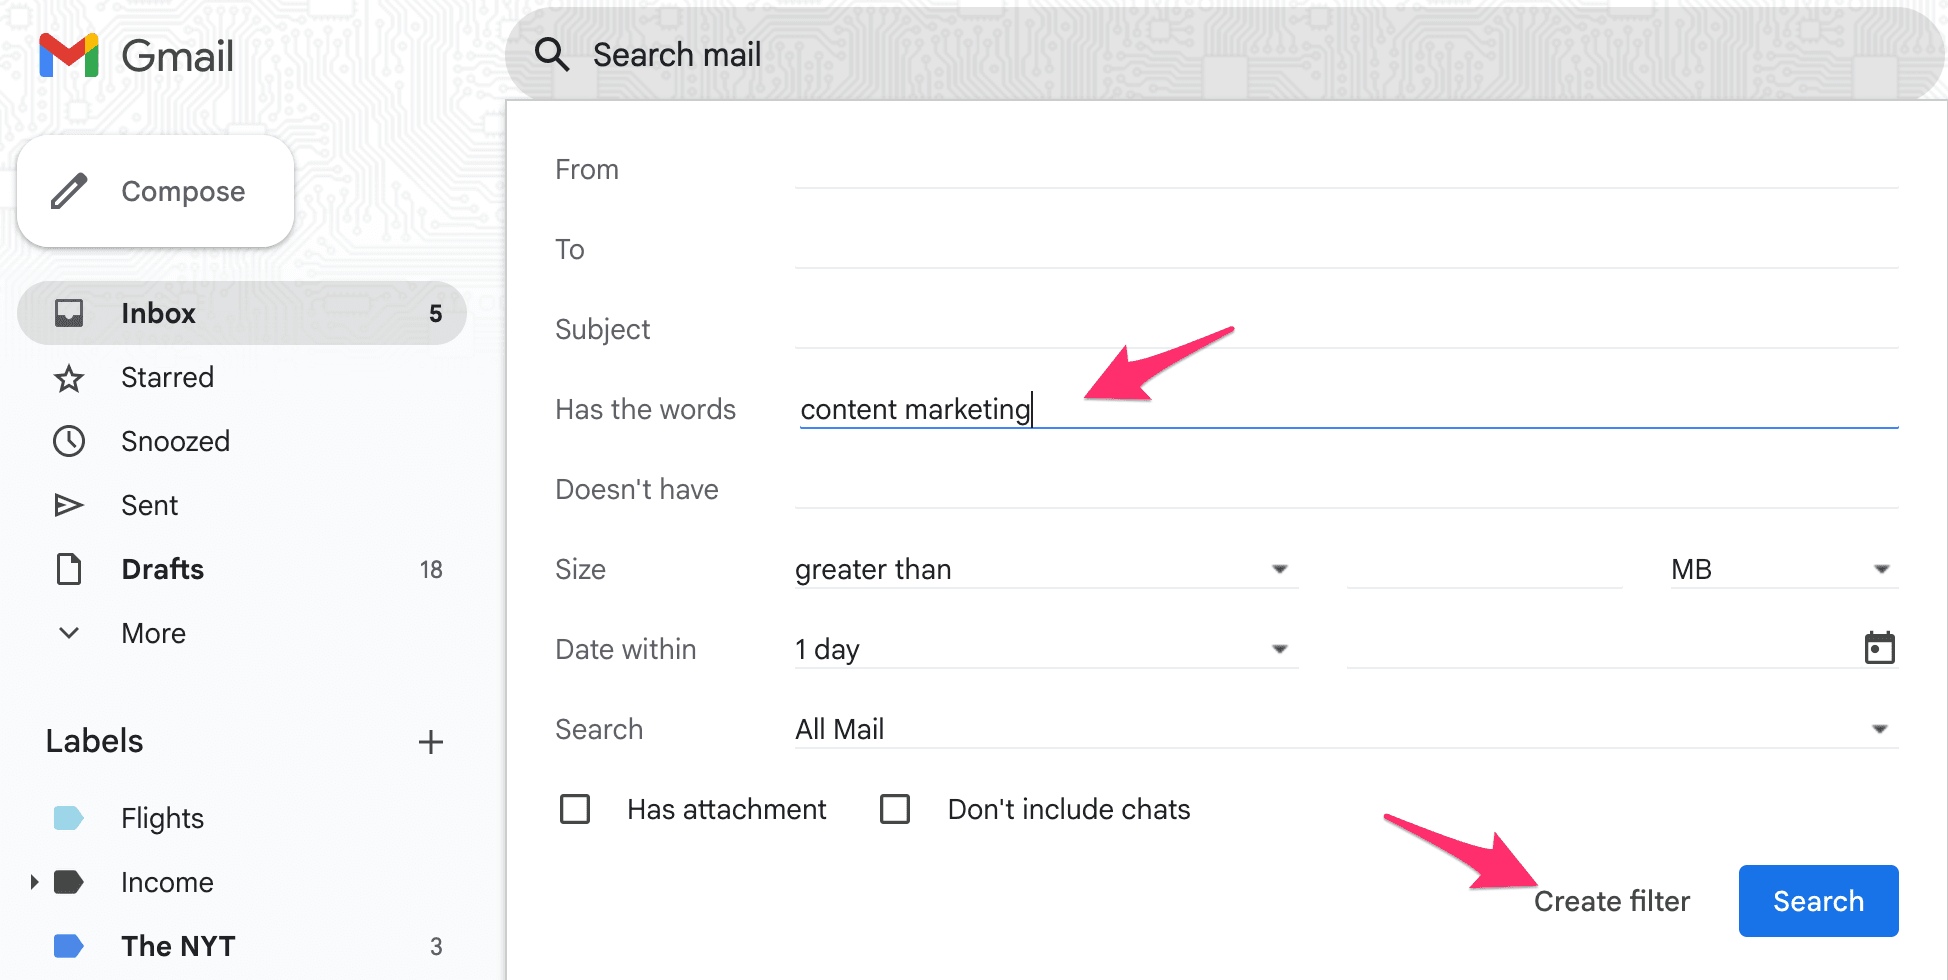
Note: You can also apply labels to emails with a certain keyword. In the image above, we’re creating a filter for all emails with the keyword “Content Marketing.”
Step 3: After you’ve specified your criteria, click Create filter
Step 4: In the new window, click the drop-down next to Apply the label and choose which label you want to auto-apply on your filtered list
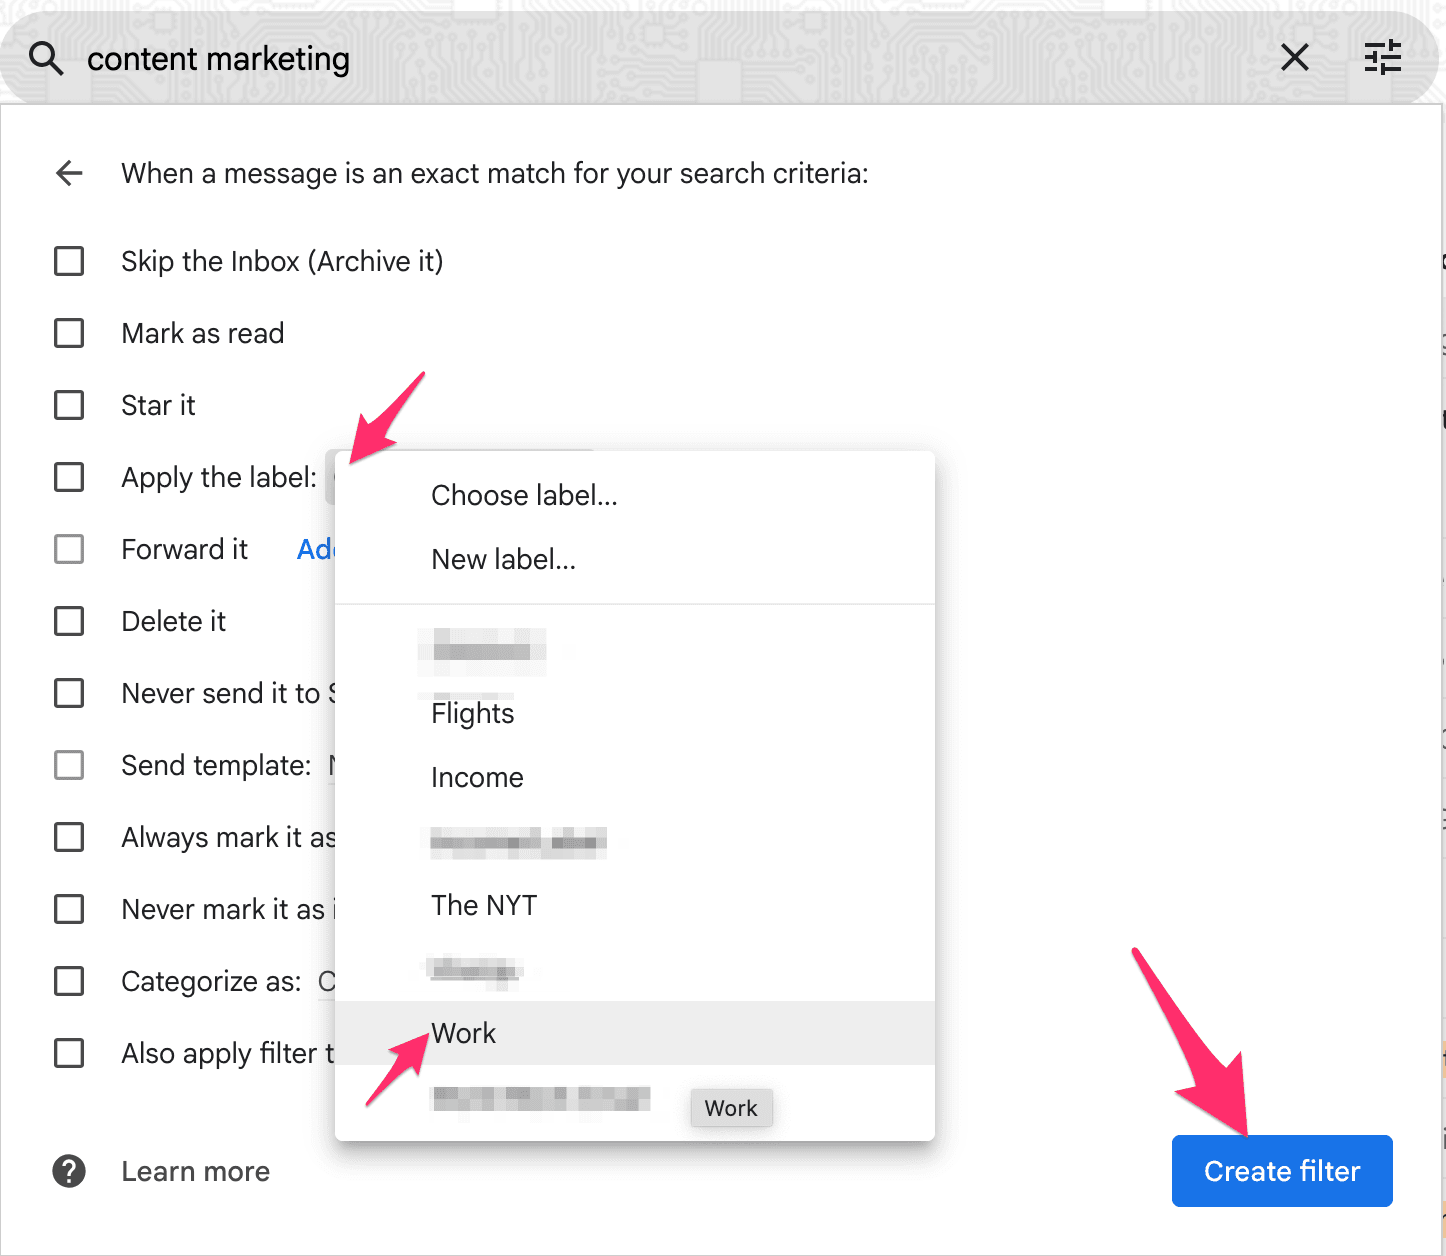
Step 5: If you already have emails in your inbox that meet the filter criteria, tick Also apply filter to matching conversations, and the label will also be applied to the emails
Step 6: Once done, click Create filter to finish up
How to automatically move emails to a label in Gmail
Unlike traditional folders, applying a label to emails doesn’t automatically move them out of your primary inbox—it only tags them.
This means the emails will be visible in your primary inbox and within the label you applied to it. If you want to move them from one label to another, try any of these options:
Use the Move to button
Skip the inbox
1. Use the Move to button
This is the fastest option for moving multiple emails to a label in Gmail. Here’s what you need to do:
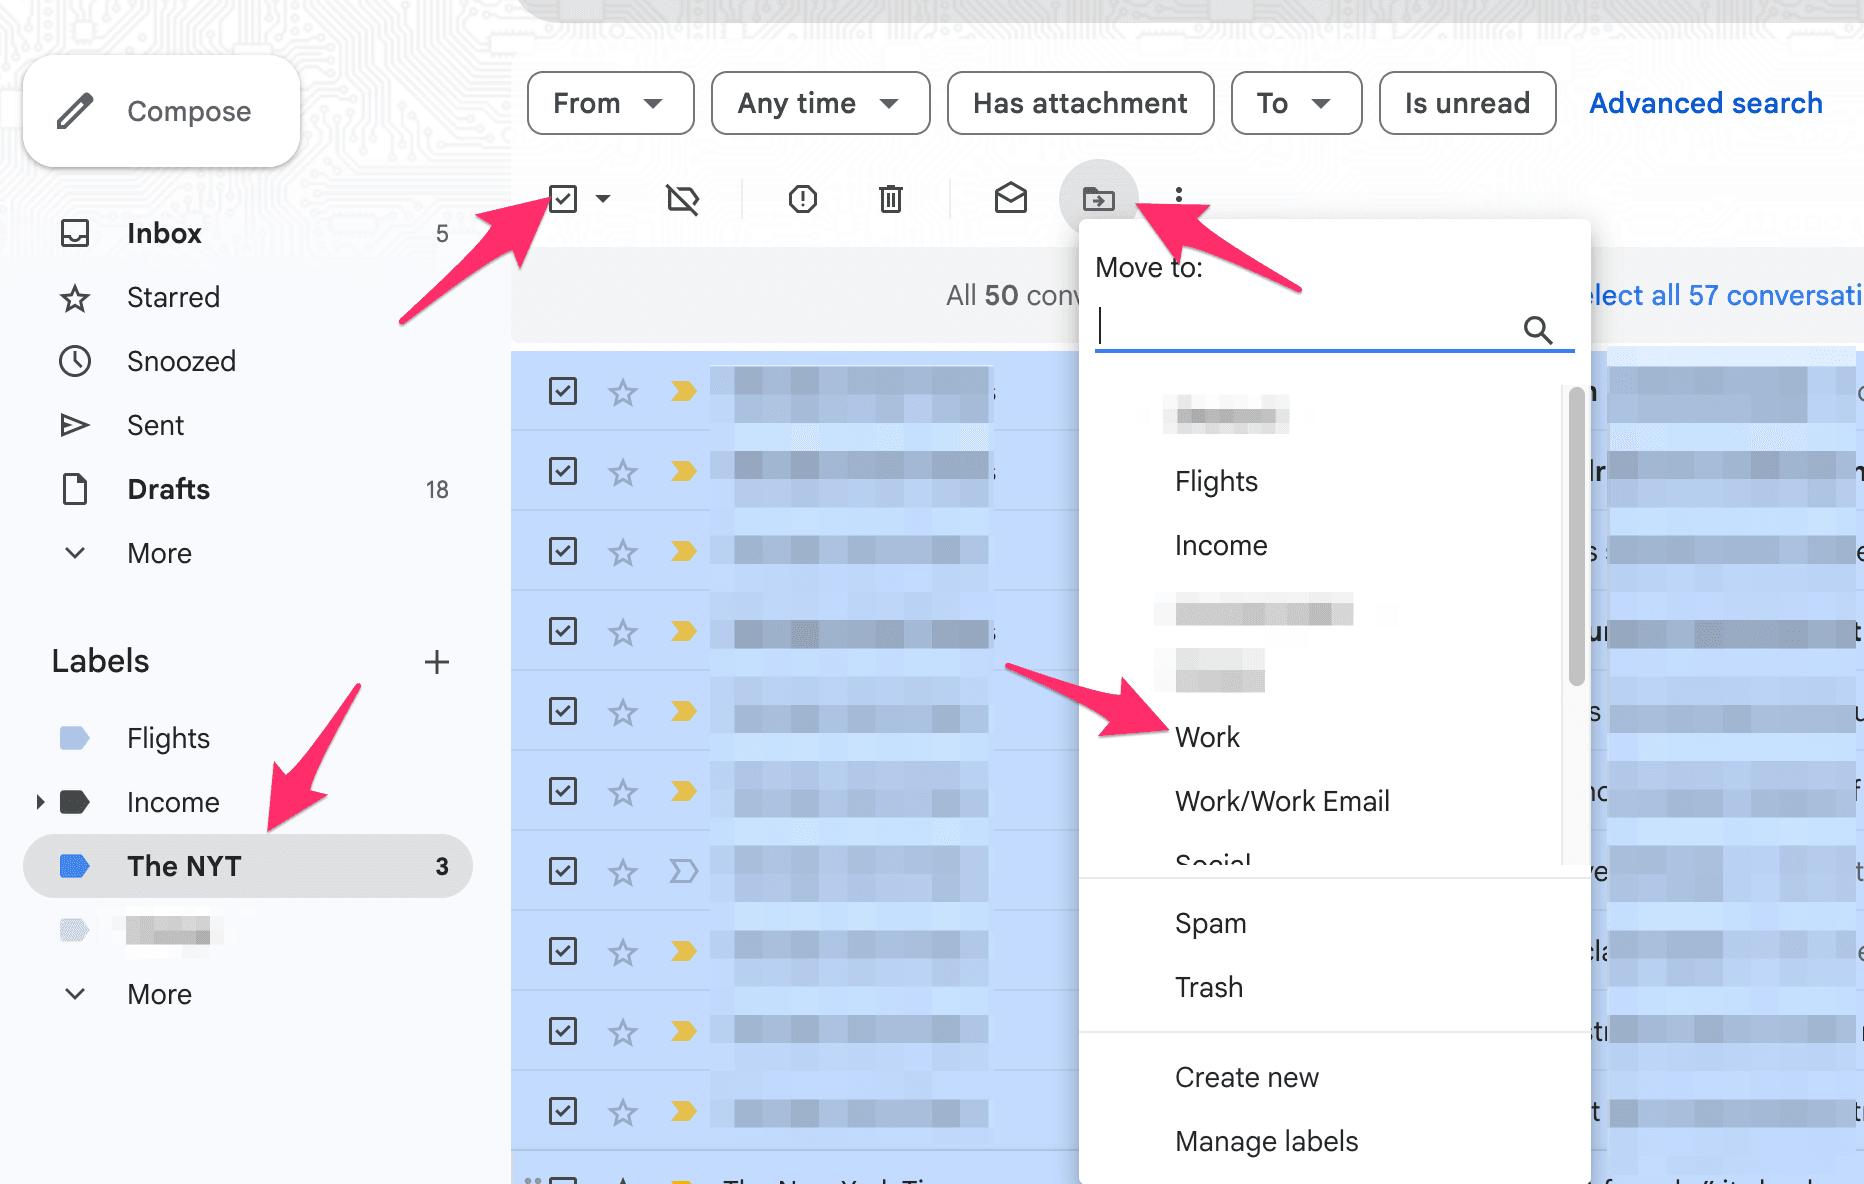
Open Gmail and navigate to the left sidebar
Click on the label you want to transfer emails from, then navigate to the email list
Select the ones you want to move to a new label or click the check box at the top of the list to select all the items in the label
At the top of the list, navigate slightly to the right and click the Move to icon
Transfer the emails by selecting the new location
2. Skip the inbox
Use the Skip the inbox rule to move incoming emails from your primary inbox. Gmail will bypass your inbox and place the email within your desired label alone. Here’s what to do:
Begin with the steps on how to apply Gmail labels automatically
In the Apply the label section, select Skip the inbox in addition to the other criteria for your labels
Complete the process to save changes
Once this rule is set, all emails that match your criteria will skip your inbox and be placed within the assigned label. You can also find the email in your Archive (the All Mail category).
How to label all emails from one sender in Gmail
Gmail’s advanced search feature makes it easy to label emails from specific categories. To label emails from a sender, run a search to identify all the sender’s emails, and then apply the tag. Follow these steps:
Step 1: Click the three-slider icon at the top of the home screen
Step 2: Type the sender’s name or email address in the From field, then click Search
Step 3: In the email list that appears, click the check box at the top to select all the emails from the sender
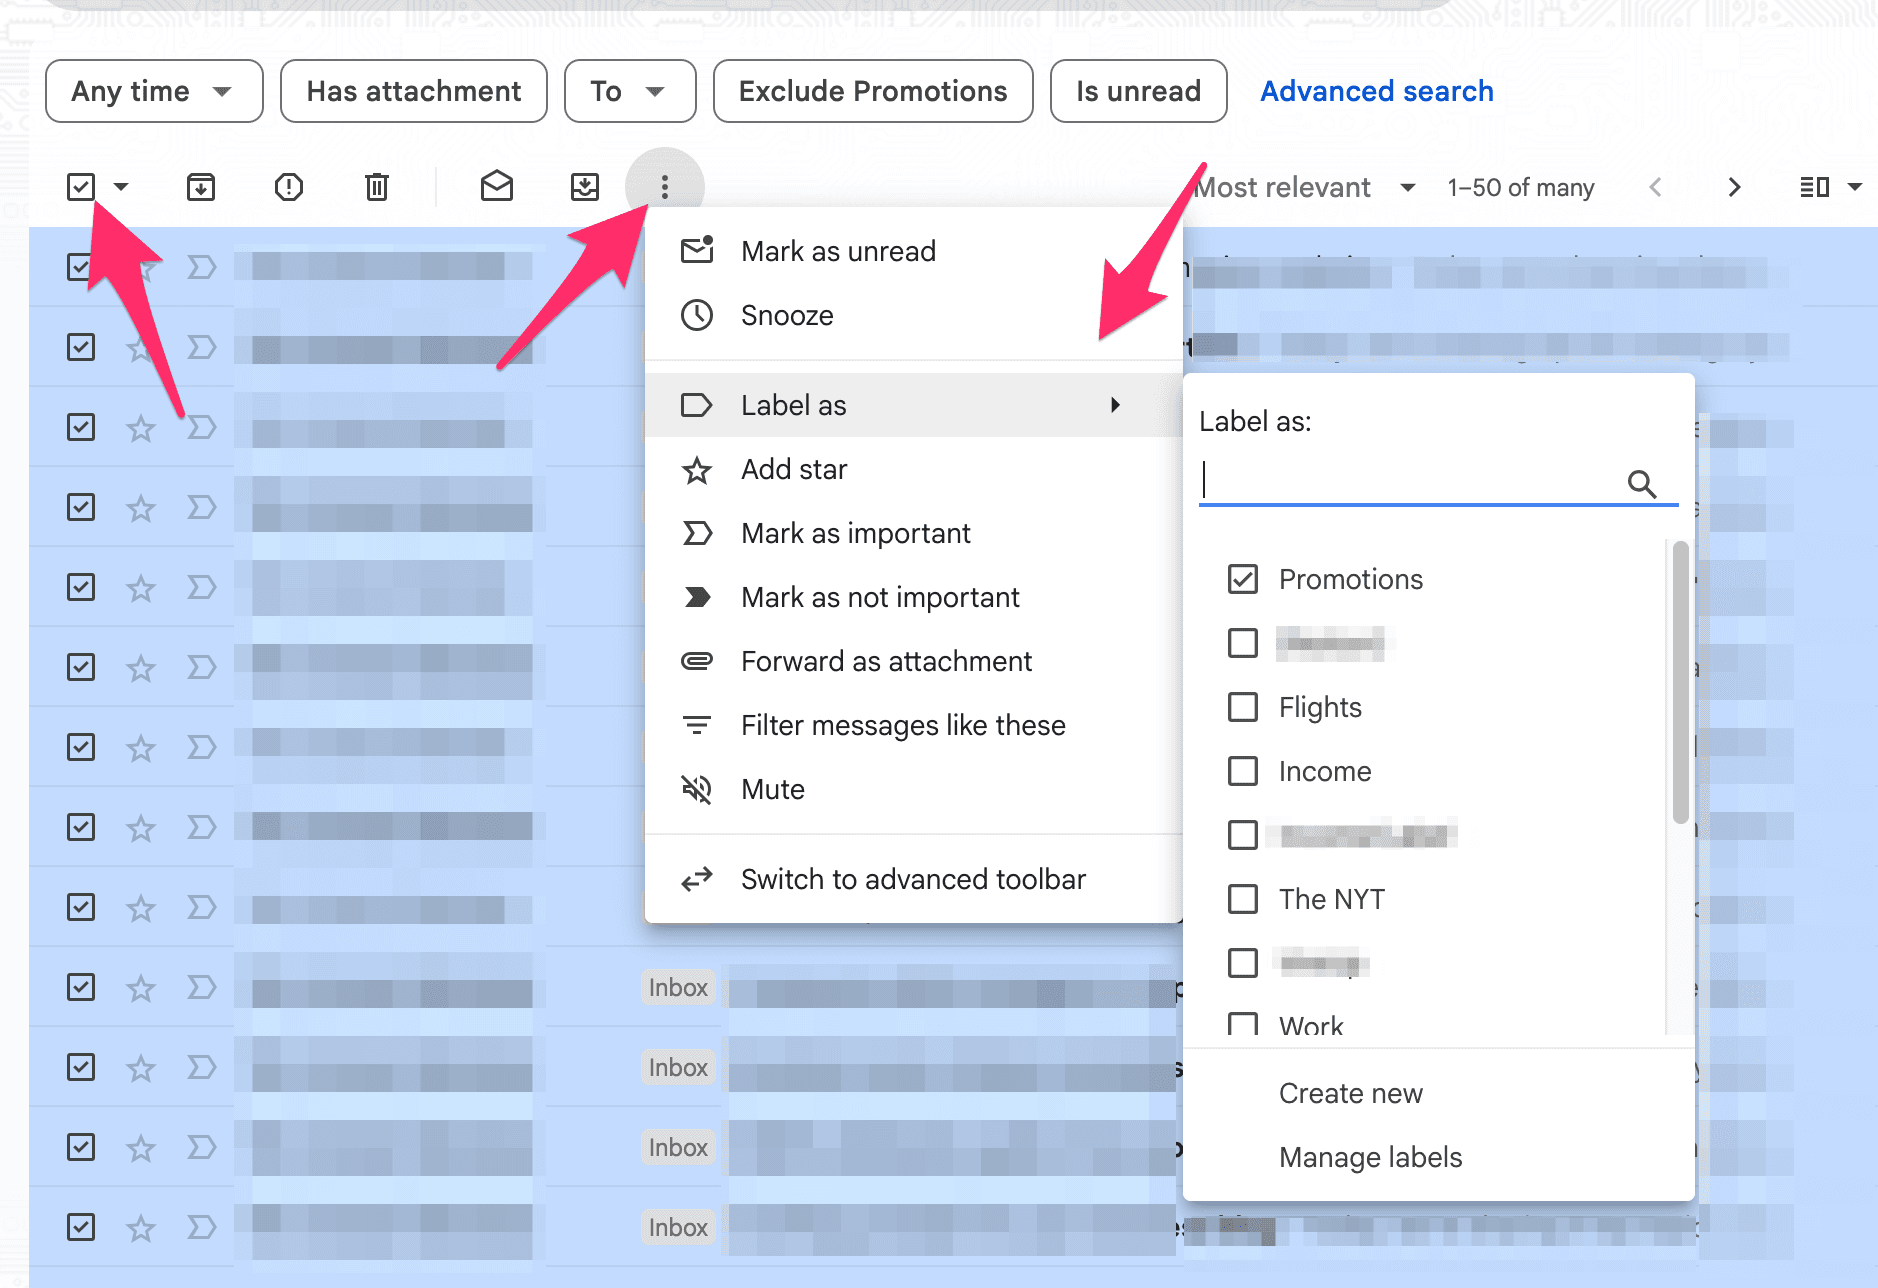
Step 4: Click the three-dot icon at the top of the list and select Label as
Step 5: Choose your preferred label or create a new one from the pop-up menu
To automate this label, do the following:
Click the three-slider icon and enter the sender’s name
Click Create filter > Apply the label [Choose the label] > click Create filter again
Once this process is complete, the label will be applied to all incoming emails from this sender.
Can you auto-label emails in the Gmail mobile app?
Unfortunately, you can’t create filters in the Gmail mobile app. Since auto-labeling is done through filters, you can only achieve this through the desktop version.
Once you’ve created the labels on your computer, you can manually assign them to an email via the mobile app. Here’s what you need to do based on your device:
iOS | Android |
Open the Gmail app Open the email you want to label Tap the ellipsis icon in the top right Tap Label Add or remove labels by checking or unchecking the boxes Tap the check mark to apply changes | Open the Gmail app Open the email you want to label Tap the ellipsis icon in the top right Tap Change labels Select the labels you want to add or remove Tap OK to complete |
How to manage your auto-label in Gmail
Gmail label management crucial for extensive inbox organization. Auto-label management keeps your inbox running smoothly and filters working as they should. It also shows you when some labels become obsolete, faulty, or need an update.
Managing your auto-labels mainly involves modifying or deleting them. Here’s how to do both:
Open Gmail and click on the gear or Settings icon
Select See all settings
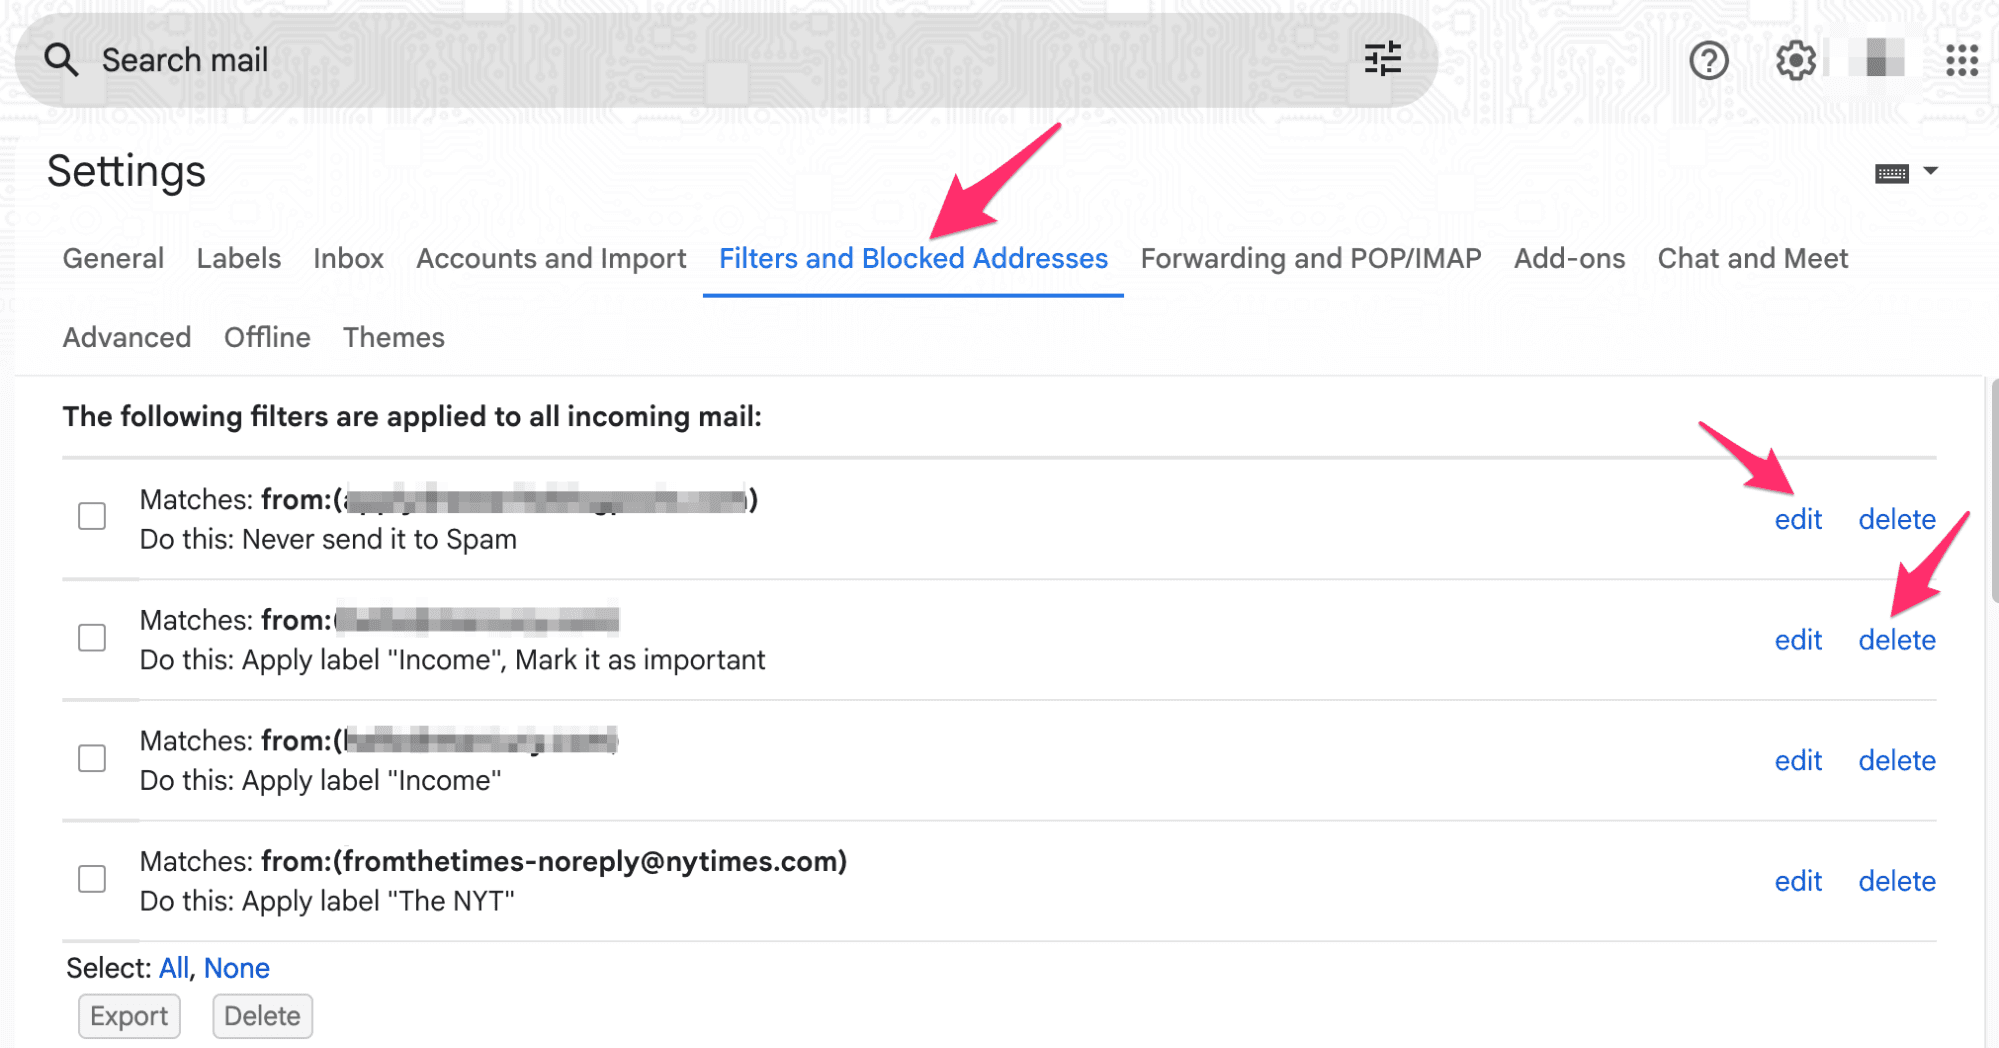
Click the Filters and Blocked Addresses tab
To delete a filter, click the Delete option and confirm by clicking OK
To edit a filter, click Edit, update your preferences, and click Continue
Select Update filter
Keep reading: Find out how to delete unwanted Gmail labels when they become obsolete.
What are the limitations of using Gmail labels for inbox organization?
Gmail labels get the job done, unless you’re a power user or professional managing a high volume of emails and complex workflows.
Some common limitations users have noted include:
Manual effort is required to maintain an organized labeling system, and the learning curve for using filters and labels can be steep.
Gmail doesn’t always “learn” from user actions. One user pointed out that Gmail does not auto-categorize their calendar invite responses, leading to repeated manual labeling.
Relying solely on labels and filters can also be cumbersome as your needs and priorities evolve. Even after setting up your filters, you still need to make frequent adjustments to them to remain effective. You also need to monitor your spam folder to ensure crucial emails don’t get misclassified and end up there.
If you want a more intuitive and automated solution that goes beyond the generic capabilities of labels, Notion Mail offers a compelling alternative.
Notion Mail: A simplified way to manage your email
Notion Mail is an AI-first email client that streamlines workflows by automating much of the manual work involved in traditional email management. It allows you to organize your inbox with better precision and less effort. Here’s how you can achieve this through Notion Mail’s core features:
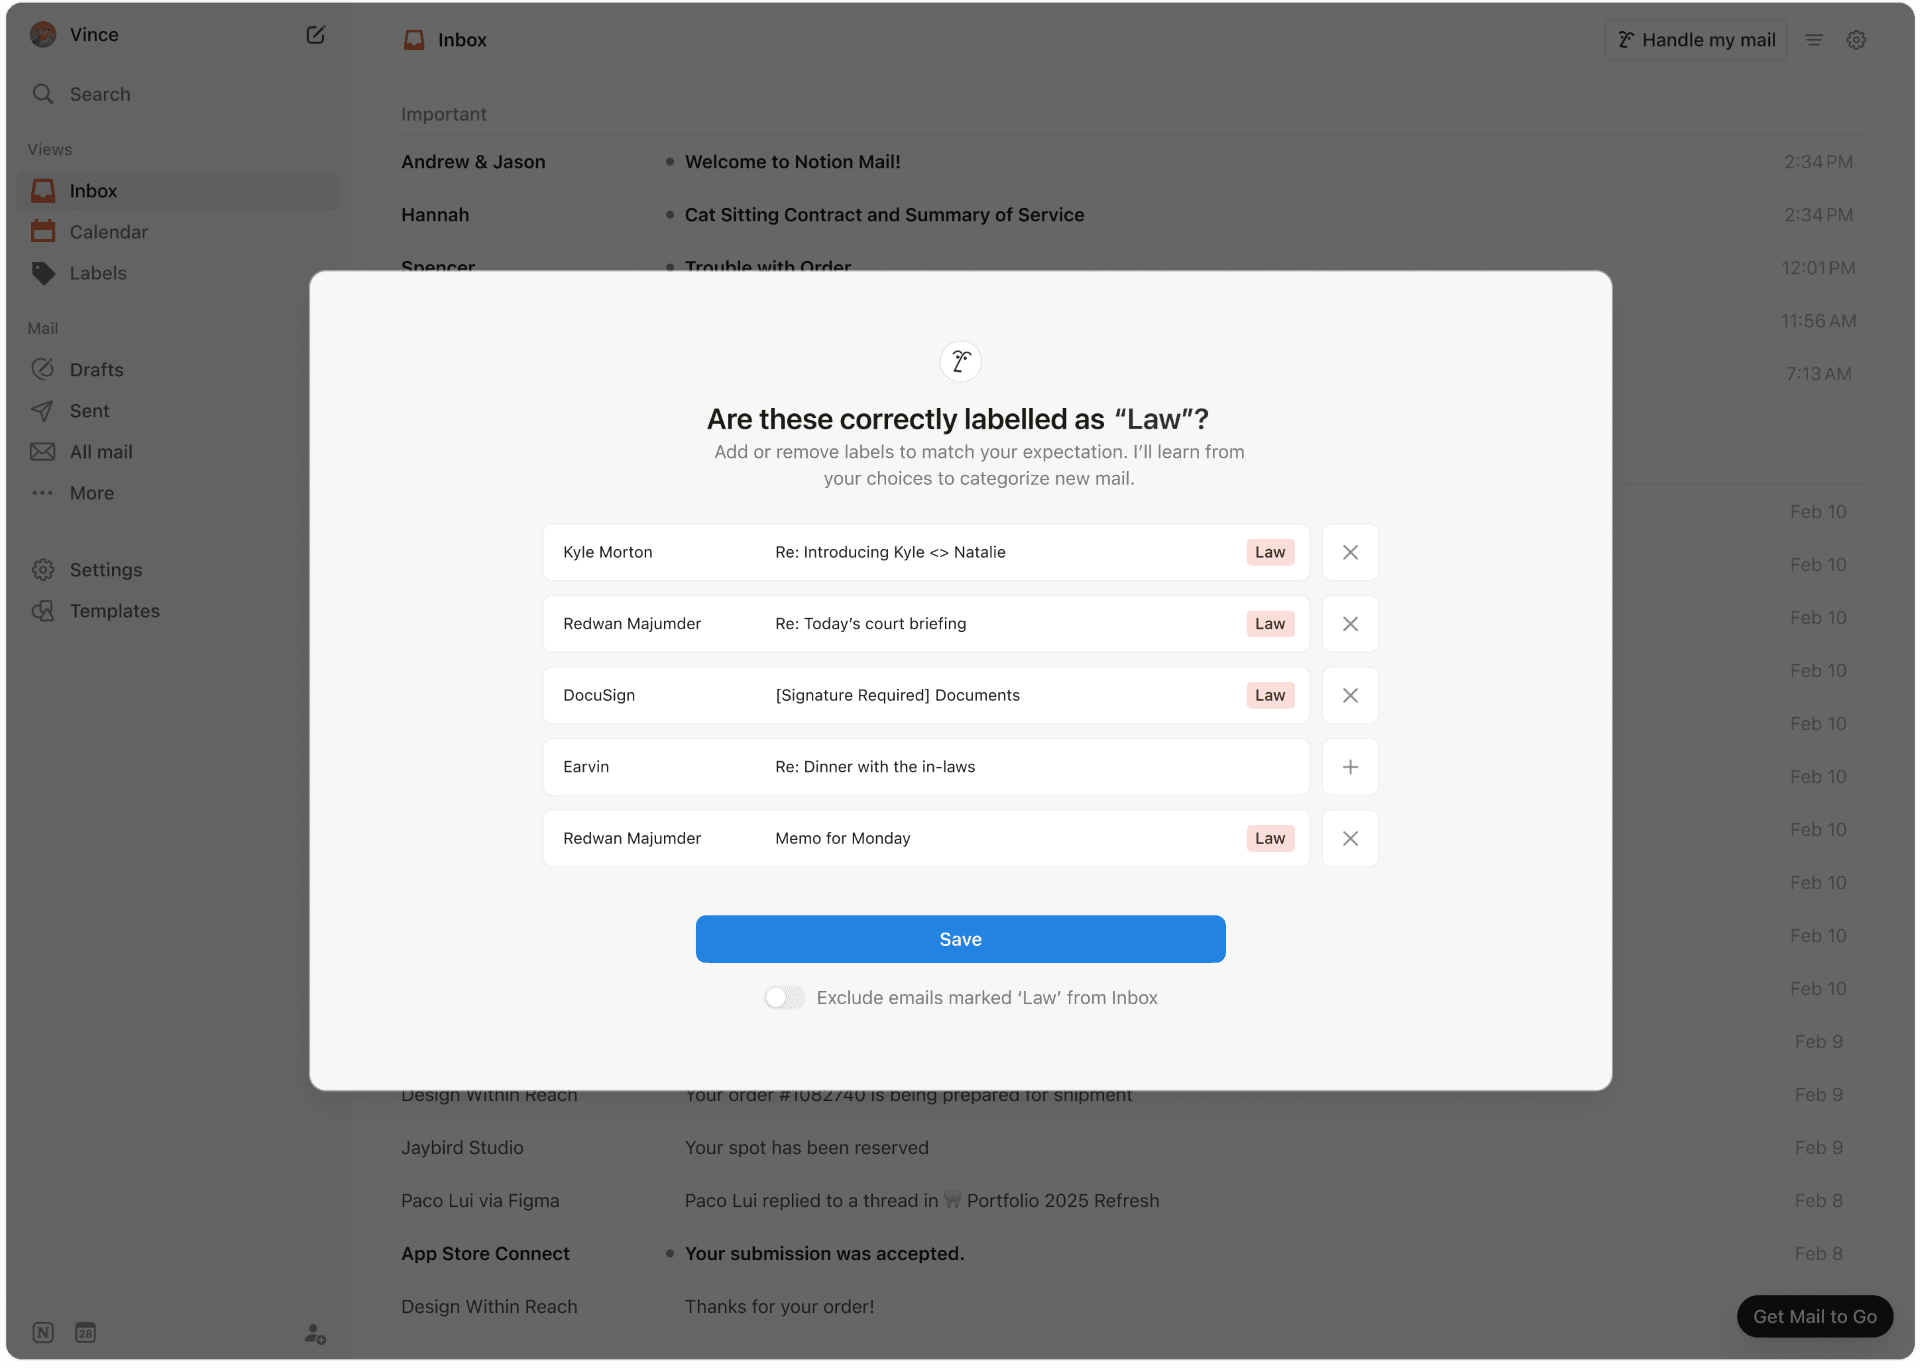
Use AI auto labeling for advanced automated categorization: Instead of creating complex filter rules, leverage the power of AI through natural, simple prompts to show Notion Mail how to categorize your incoming emails. You can use a prompt like Label all emails with ‘order,’ and all your orders will automatically have your preferred label—no manual configuration needed.
Build inboxes within your inbox: Use Notion Mail’s custom views feature to create tailored inbox views based on labels, sender, project, and other criteria. This helps segment your inbox into a focused workspace so you can prioritize and manage your specific tasks.
From your interactions, Notion Mail learns to auto-sort and prioritize important messages to support your day. In addition to its advanced auto-labeling features, the platform also offers:
Advanced AI-writing assistance to help you respond to and draft new emails
Automated scheduling and follow-up emails
Email summaries for easier processing
Keyboard shortcuts and other productivity tools
Notion Mail currently works as a Gmail client, so use your Gmail or Google account to sign up.
Get started with Notion Mail
Notion Mail is free to use and available on iOS, Android, and Windows devices, and offers the Notion ecosystem upon signing up. It is also fully integrated with your Notion Calendar for seamless meeting scheduling directly within your email.
To get started, visit the signup page. If you’re interested in exploring more AI automation, you can also get the Notion AI add-on.
Bonus read: Want to take your Gmail organization to the next level? Learn more using our guides and tutorials:
