Database-automatiseringen
Oeps! Het lijkt erop dat je advertentieblokkering het afspelen van de video verhindert.
Bekijk het op YouTube

Verhoog de efficiëntie door je meest vervelende taken te automatiseren 🔁
Ga naar Veelgestelde vragenDatabase automations are sequences of actions that happen any time a specific change to a database occurs. Automations consist of both triggers (the events that initiate the automation) and actions (the effect of the automation). Database automations are meant to help save you time and simplify your work, and can be very basic or more complex depending on your needs.
Database-automatiseringen kunnen bijvoorbeeld worden gebruikt voor:
Toewijzen van taken aan bepaalde personen wanneer de status verandert.
Sending a Slack notification to a channel when a page is added to a database.

Opmerking:
Database-automatiseringen zijn volledig beschikbaar voor klanten met betaalde abonnementen. Gebruikers met een gratis abonnement kunnen automatiseringen maken voor Slack-meldingen. Ze kunnen automatiseringen die al opgenomen zijn in sjablonen wel gebruiken, maar niet bewerken.
Database-automatiseringen kunnen worden gemaakt, bewerkt en verwijderd door iedereen die volledige toegang heeft. Slack-automatiseringen zijn de enige uitzondering hierop. Deze kunnen alleen worden bewerkt door de ontwerper van de automatisering.
Als je automatisering gericht is op een andere database, heb je minimaal de machtiging
Kan bewerkennodig voor die database. Met andere woorden: met de automatiseringen die je maakt, kan alleen content worden bewerkt die je ook handmatig kunt bewerken.
Database automations are available on paid plans on all platforms.
Database automations can be created, edited, or deleted by paid plan users who have full access to the database.
However, Slack automations can only be edited by the automation creator.
Free Plan users can create Slack notification automations, but no other kinds of automations.
Free Plan users can use existing automations in templates, but they won't be able to edit them.
To create a database automation:
Click
⚡at the top of a database →New automation.Give your database automation a name if you’d like.
Select
New triggerto create a trigger. Then selectAdd triggerto create more triggers. Learn more about the types of triggers below →Select
New actionto create an action. Then selectAdd actionto create more actions. Learn more about the types of actions below →Select
Create.

Wist je dat je ook een eigenschap van het type Knop aan je database kunt toevoegen? Met één klik op de knop kun je acties laten uitvoeren in je database. Hier vind je meer informatie →
Automations can have one trigger or multiple triggers. When you set up an automation, you can decide whether the automation will take place When any of these occur or When all of these occur.
Note: If you have multiple is edited triggers that must all occur for your automation to take place, those triggers need to happen within a small window of about three seconds. If they don’t, your automation may not be triggered properly. To avoid this, you can:
Create separate automations for each trigger.
Use a more specific trigger than
is edited, likeis set toorcontains.
You can choose from three types of triggers:
Page addedmeans your automation will be triggered when a new page is added to your database.Property editedmeans your automation will be triggered when a specific property from your database is edited. For name, person, number, text, select, and relation properties, you can choose what kinds of edits made to that property will trigger an automation. For example, you might have a list of contacts in a Notion database and set up an automation where the trigger is a phone number starting with the numbers 732, and the action is that person’s state being set to New Jersey.Every {frequency}means your automation will be recurring. The trigger will happen repeatedly based on the frequency you set. You can set your automation to repeat every day, week, month, and so on. You can also set a time that the automation will be triggered, the date that the automation trigger will begin and end, and the timezone.Note: The
Every {frequency}trigger works with all automation actions except forEdit property.
You can have more than one condition for your trigger so that two or more things must be true for the automation to occur. Note that a recurring trigger (like one that you set to repeat every week, month, etc.) can’t be paired with another type of trigger.
Note: If you’d like your automation to add or edit pages and databases, make sure that you have permission to edit those pages and databases. Additionally, make sure edited pages are available are not Private or Shared. Otherwise, your automation won’t work.
Automations can take one action or multiple actions. You can choose from a variety of actions:
Edit propertywill edit the properties of pages in the database you are currently in. For multi-select, people, and relation properties, you can add or remove individual values instead of adding or removing all values at once. For example, you might have a task database where if the task name contains the word “blog”, your name is added to the people property, even if there are other people already assigned to that task.Pagina toevoegen aanvoegt een pagina toe aan een bepaalde database en bewerkt de eigenschappen van die pagina.Pagina's bewerken inbewerkt pagina's en eigenschappen in een database.Melding versturen naarverstuurt een melding naar bepaalde mensen in je Notion-workspace. De melding kan worden verstuurd naar maximaal 20 personen in je workspace, of personen die zijn gekoppeld aan een bepaalde eigenschap Persoon in je database. Voeg eventueel een bericht toe aan de melding.Send mail towill send an email from your Gmail account to one or more recipients. Learn more about this below.Send webhookwill send an HTTP POST requests to the specified URL. Learn more in this article →Send Slack notification towill send a notification to the Slack channel you want. Learn more about Notion's Slack integration here →Define variableswill allow you to create a custom variable using mentions and formulas. You can then use this variable in other database automation actions. Learn more about this below.

Get more inspiration for using database workflows in this guide →
Send mail to
Note:
You need a Gmail account to use this automation.
Once someone has linked their Gmail account to an automation, only they will be able to edit the automation. Others will only be able to use the automation.
Emails sent using this automation may take up to two minutes to arrive in your recipient’s inbox.
Be mindful of Gmail’s limits for how many recipients a message can have, or how many emails you can send in a day.
The Send mail to action for a database automation will send an email from your Gmail account to one or more email addresses when a trigger occurs. This is helpful if you want to send an email to someone to remind them to complete their past-due task, or to update your team on the status of all of your open projects.
To set up an automation to send an email:
Click
⚡at the top of a database, then selectNew automationor an existing automation.Select
New actionorAdd action→Send mail to….If your Notion account is already tied to a Gmail account, you’ll see your email address next to
Send mail from. If you want to use another Gmail account for this automation, click on your email address →Add Gmail Account.You can set up various parts of your email:
To: This could be a person property (likeWhoever triggeredorPage creator), a person in your workspace, or a specific email address. This email address can be external — it doesn’t have to belong to someone in your workspace or your organization.Select
CC/BCCnext to theTofield to optionally CC or BCC other people.
Subject: Enter a subject for your email. Select@in theSubjectfield if you want your subject to contain a property from your trigger page, a time or date, a person or group in your workspace, or a link to a page in your workspace. Select∑in theSubjectfield if you want to create a formula for your subject.Message: Enter a message for your email. Select@in theMessagefield if you want your message to contain a property from your trigger page, a time or date, a person or group in your workspace, or a link to a page in your workspace. Select∑in theMessagefield if you want to create a formula for your message.Send with display name: This optional display name will appear next to your email when your recipient receives it. Select@in the display name field if you want your display name to contain a property from your trigger page, a time or date, a person or group in your workspace, or a link to a page in your workspace. Select∑in the display name field if you want to create a formula for your display name.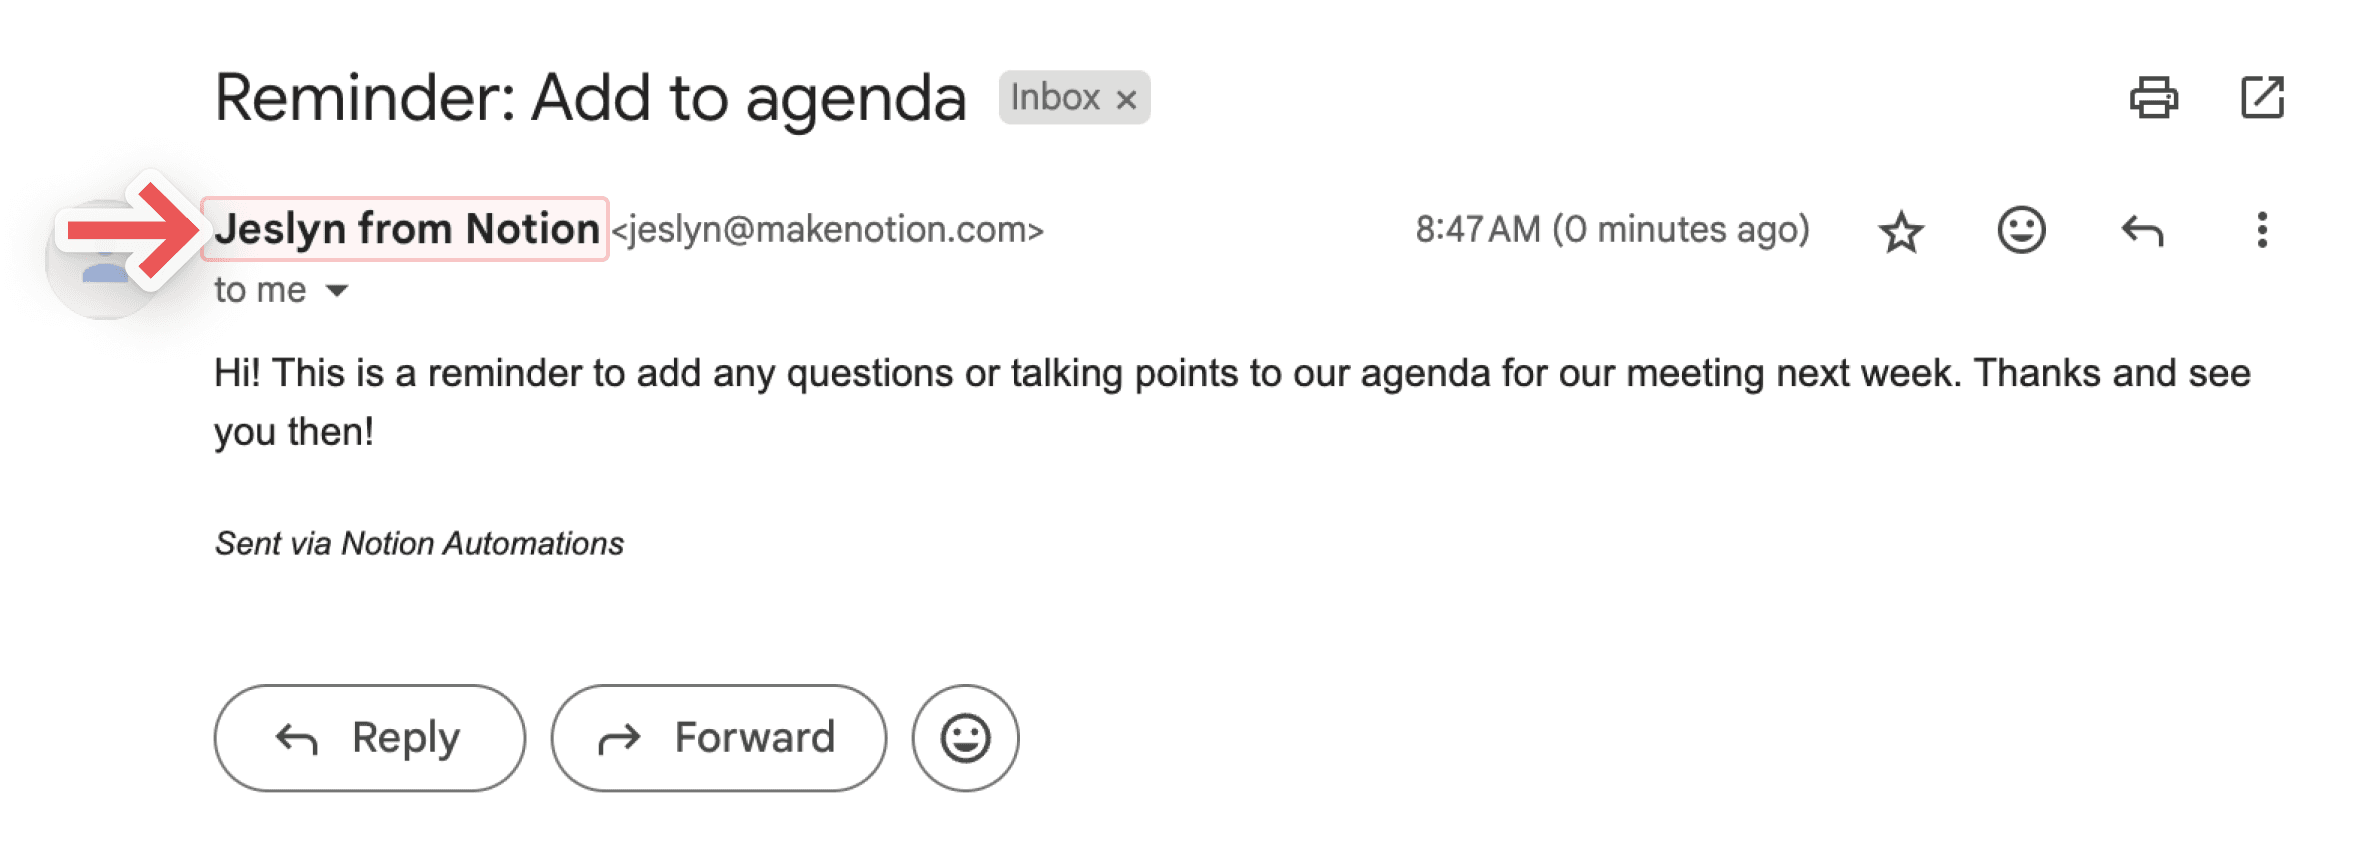
Send replies to: If you want replies to your email to be sent to someone other than the email address you used to send it, you can use this optional setting to send the reply to a person property, or a person in your workspace.
Define variables
You can define a custom variable with mentions and formulas. You can then use this variable in other database automation actions. To define a variable:
Click
⚡at the top of a database, then selectNew automationor an existing automation.Select
New actionorAdd action→Define variables.Click on
Variable 1to give the variable a name, edit the formula, or duplicate it. You can also selectAdd variable.Select
@or∑in the variable field to define your variables.You can use these variables in additional automation actions.
Let’s look at an example of when and how you’d create a custom variable. Let’s say you want to set an automation where when a parent task is marked as complete, all of its sub-tasks are automatically marked as complete.
Click
⚡at the top of a database, then selectNew automationor an existing automation.Select the trigger as
Status set to Complete.Select
New actionorAdd action→Define variables.Select
∑in the field belowVariable 1.In the window that opens, select
Trigger pagein the list of properties to the left.Put a period right after
Trigger pagein your formula, so that your formula readsTrigger page.. Once you do this, you’ll see the trigger page’s properties in the list of properties to the left.Select
Sub-item. Your formula should now readTrigger page.Sub-item.Saveyour formula. Now, your custom variable is defined as the sub-items of the page that triggers your automation, or in other words, the page that is marked as complete.Now, in your database automation settings, select
Add action.Select
Edit pages in....Open the
Select databasedropdown and selectVariable 1. This means that the automation will edit pages associated with variable 1, or in other words, sub-items associated with the page that is marked as complete.Open the
Edit a propertydropdown and selectStatus.Open the
Selectdropdown and selectComplete.Selecteer
Opslaan.
The next time you mark a parent item that has sub-items as complete, you should see all of the sub-items’ statuses change to complete too!
Note:
At this time, mentions and formulas can only be used in database automation actions, not triggers.
Formulas can’t be used when sending Slack notifications.
You can use mentions and formulas in your database automation actions to make your automations work better for you. For example:
You might want to mention the date in the name of a new page created in your database.
You might want to set up a database automation to send a notification to someone that mentions a specific page.
You might want to automatically send a message to someone when a ticket has been resolved, and use a formula in that message that calculates the time it took to complete the ticket.
To include a mention or formula in a database automation action:
Click
⚡at the top of a database, then selectNew automationor an existing automation.Select
New actionorAdd action. Find the action you want and select it.As you set up the automation action, select
@in the field if you want to mention a date, person, page, or a property from the trigger page in your database. Select∑in the field if you want to create a formula.Select
Savewhen you’re done.
To make sure your automation is working properly, we’ll help you understand where your automation is invalid.
If your automation runs into any errors while you’re setting it up:
You’ll see information about where and what those errors are as you’re building or editing the automation.
You won’t be able to save the automation until you make the required corrections.
If your automation has worked before but runs into an error, the automation will be paused and you’ll get a notification. This situation might occur when:
A database that your automation is adding to or editing is missing.
A database property that your automation is editing is missing.
A third-party connection, like to Gmail or Slack, is no longer valid or needs to be authenticated.
You can click on the notification to go directly to the broken automation and fix it so it can be used again.
Once your automation is fixed, you’ll need to turn it on, or un-pause it, manually. To do this:
Open the database that your automation is tied to and select
•••→Automations.Hover over the automation that you’ve just fixed and select
•••.Toggle on
Active.
To see and manage all of the existing automations for a database:
Klik op
⚡boven aan een database.Plaats de muisaanwijzer op de automatisering en klik vervolgens op
•••.Selecteer
Bewerken,PauzerenofVerwijderen.
Veelgestelde vragen
Hoe vaak wordt de database gecontroleerd op wijzigingen in eigenschappen?
Hoe vaak wordt de database gecontroleerd op wijzigingen in eigenschappen?
Het activeren van database-automatiseringen neemt drie seconden in beslag. Binnen deze drie seconden kan een gebruiker een trigger verwijderen en wijzigingen wissen zonder dat een eigenschap van de automatisering wordt gewijzigd.
Werken automatiseringen op pagina's in de hele database of op pagina's in een databaseweergave?
Werken automatiseringen op pagina's in de hele database of op pagina's in een databaseweergave?
Beide opties zijn mogelijk. Tijdens het maken van de automatisering kun je aangeven of deze van toepassing moet zijn op de hele database of op een bepaalde weergave. Als de filters in deze weergave worden aangepast, wordt de automatisering toegepast op de bijgewerkte lijst met pagina's.
Kunnen gasten met volledige toegang tot een database automatiseringen maken?
Kunnen gasten met volledige toegang tot een database automatiseringen maken?
Nee.
Why isn’t my database automation triggering?
Why isn’t my database automation triggering?
If your database automation isn’t triggering, it could be because:
The automation is set to be triggered by another automation. Automations can’t currently trigger other automations. Try using a different, non-automated trigger instead.
The page no longer matches a view’s filters after it’s edited. Automations only run if the page still matches the view when the trigger occurs.
The database is locked.