SAML SSO
Notion מספקת פונקציונליות של Single Sign-On (SSO) עבור לקוחות בתוכנית Business ותוכנית Enterprise כדי לגשת לאפליקציה דרך מקור אימות יחיד. הדבר מאפשר למנהלי IT לנהל טוב יותר את הגישה של הצוות ולשמור על המידע מאובטח יותר.
מעבר לשאלות הנפוצות
הערה: תכונה זו זמינה רק למשתמשים בתוכנית Business או בתוכנית Enterprise.
באמצעות SSO, באפשרותכם לייעל את ניהול המשתמשים במערכות השונות, ולבטל את הצורך של משתמשי הקצה לזכור ולנהל סיסמאות מרובות על ידי כך שתאפשרו להם להיכנס דרך נקודת גישה אחת וליהנות מחוויה חלקה בין אפליקציות מרובות.
כדי להשתמש ב-SSO עם Notion:
סביבת העבודה שלכם חייבת להיות בתוכנית Business או בתוכנית Enterprise.
ספק הזהות (IdP) שלכם חייב לתמוך בתקן SAML 2.0. ראו הוראות להגדרת ספק זהות עבור אפליקציות ספציפיות כאן →
בעל סביבת עבודה חייב להגדיר SAML SSO עבור סביבת עבודה ב-Notion.
לפחות דומיין אחד חייב לעבור אימות על ידי בעל סביבת עבודה. למידע נוסף על אימות דומיין →
הערה: רק חברי סביבת עבודה יכולים להשתמש ב-SAML SSO כדי להתחבר. אורח/ת שהוזמנו לדפים בסביבת עבודה של Notion עם SAML מופעל אינם יכולים להתחבר באמצעות SAML SSO. במקום זאת, עליהם להשתמש בשיטת התחברות אחרת, כגון שם המשתמש והסיסמה שלהם או התחברות באמצעות Google או Apple.
תוכנית Business
כדי להגדיר SAML SSO עבור סביבת עבודה בתוכנית Business, בעל סביבת העבודה יכול:
עברו אל
הגדרות→כללי.במקטע
דומיינים מורשים של אימייל, הסירו את כל דומייני האימייל.בחרו בכרטיסייה
זהותבתוךהגדרות.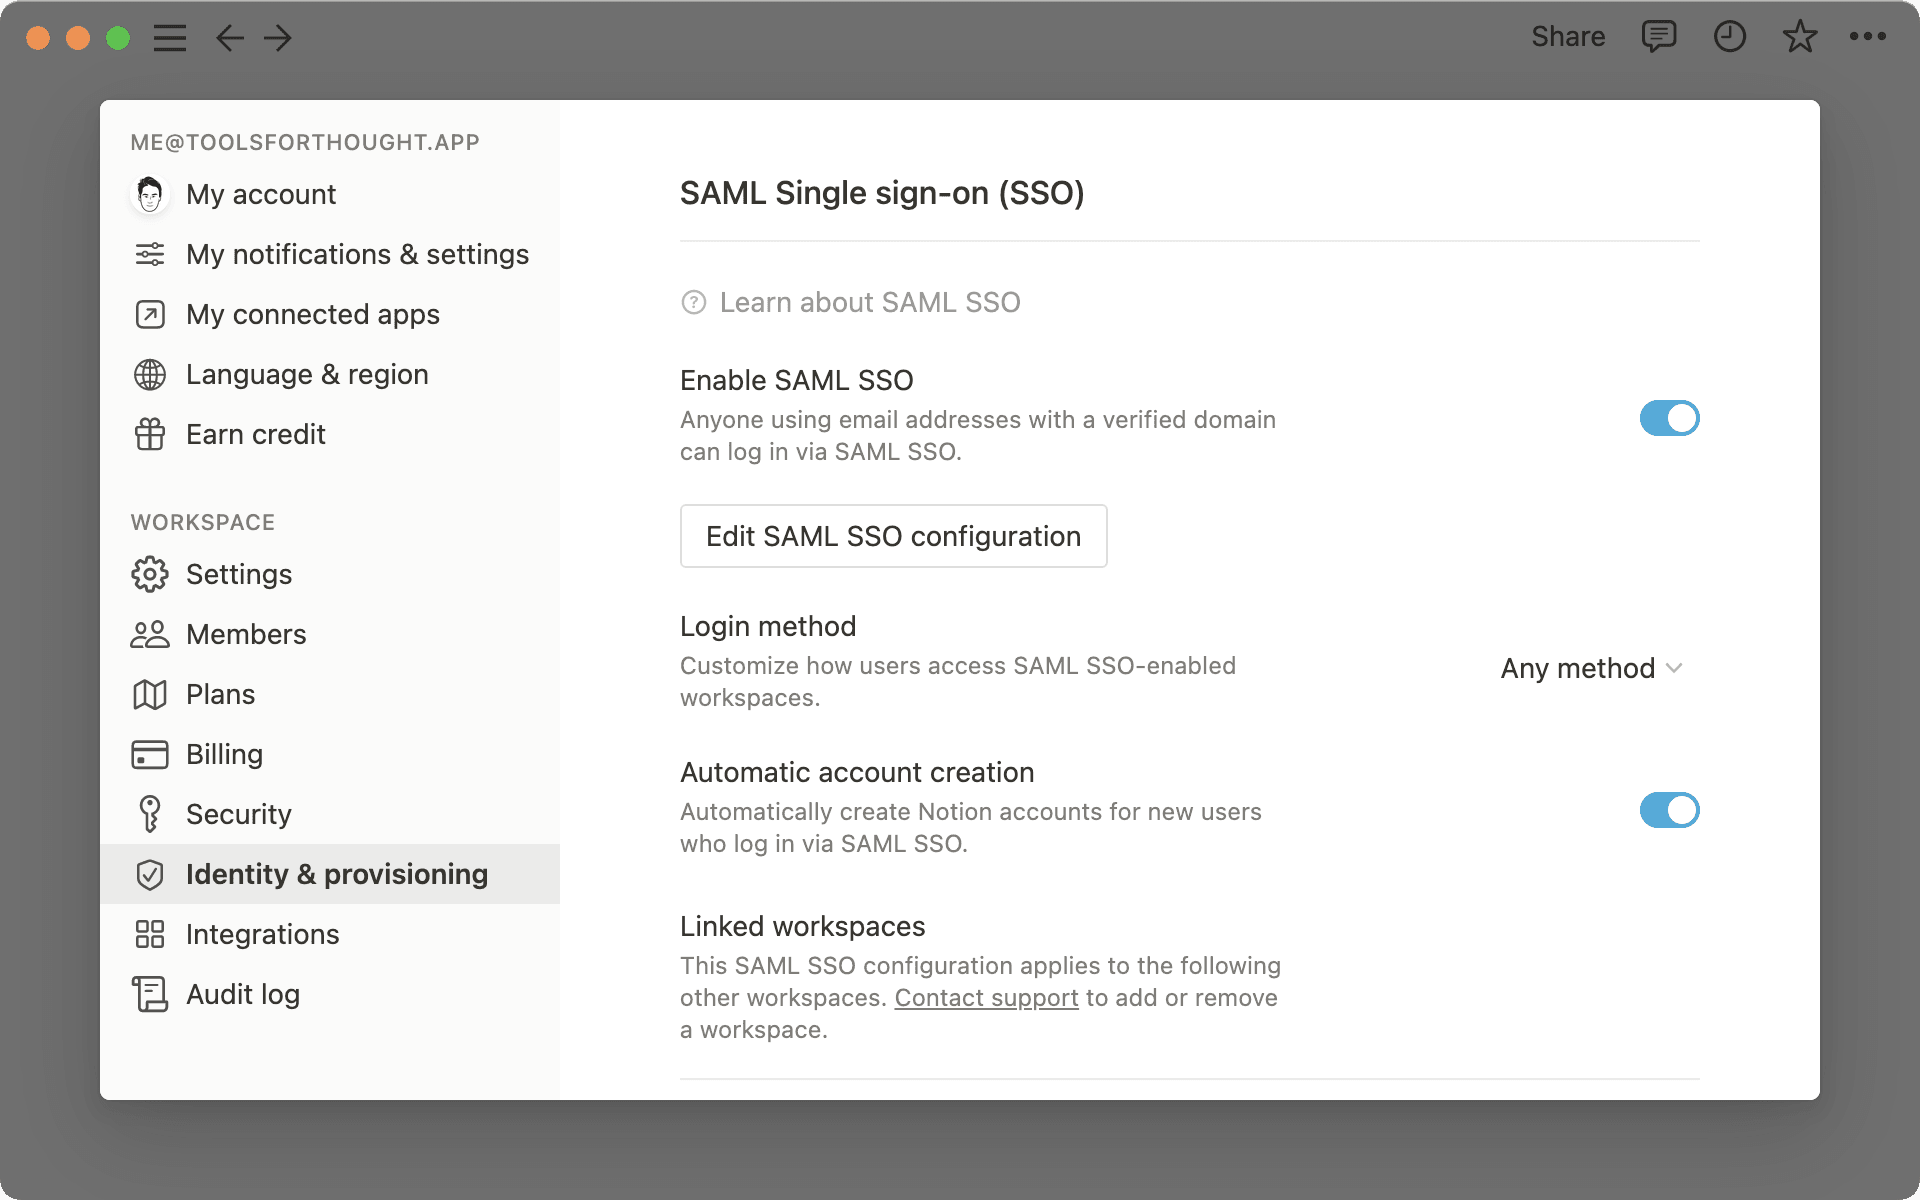
אמתו דומיין אחד או יותר. ראו הוראות לאימות דומיין כאן →
הפעילו את
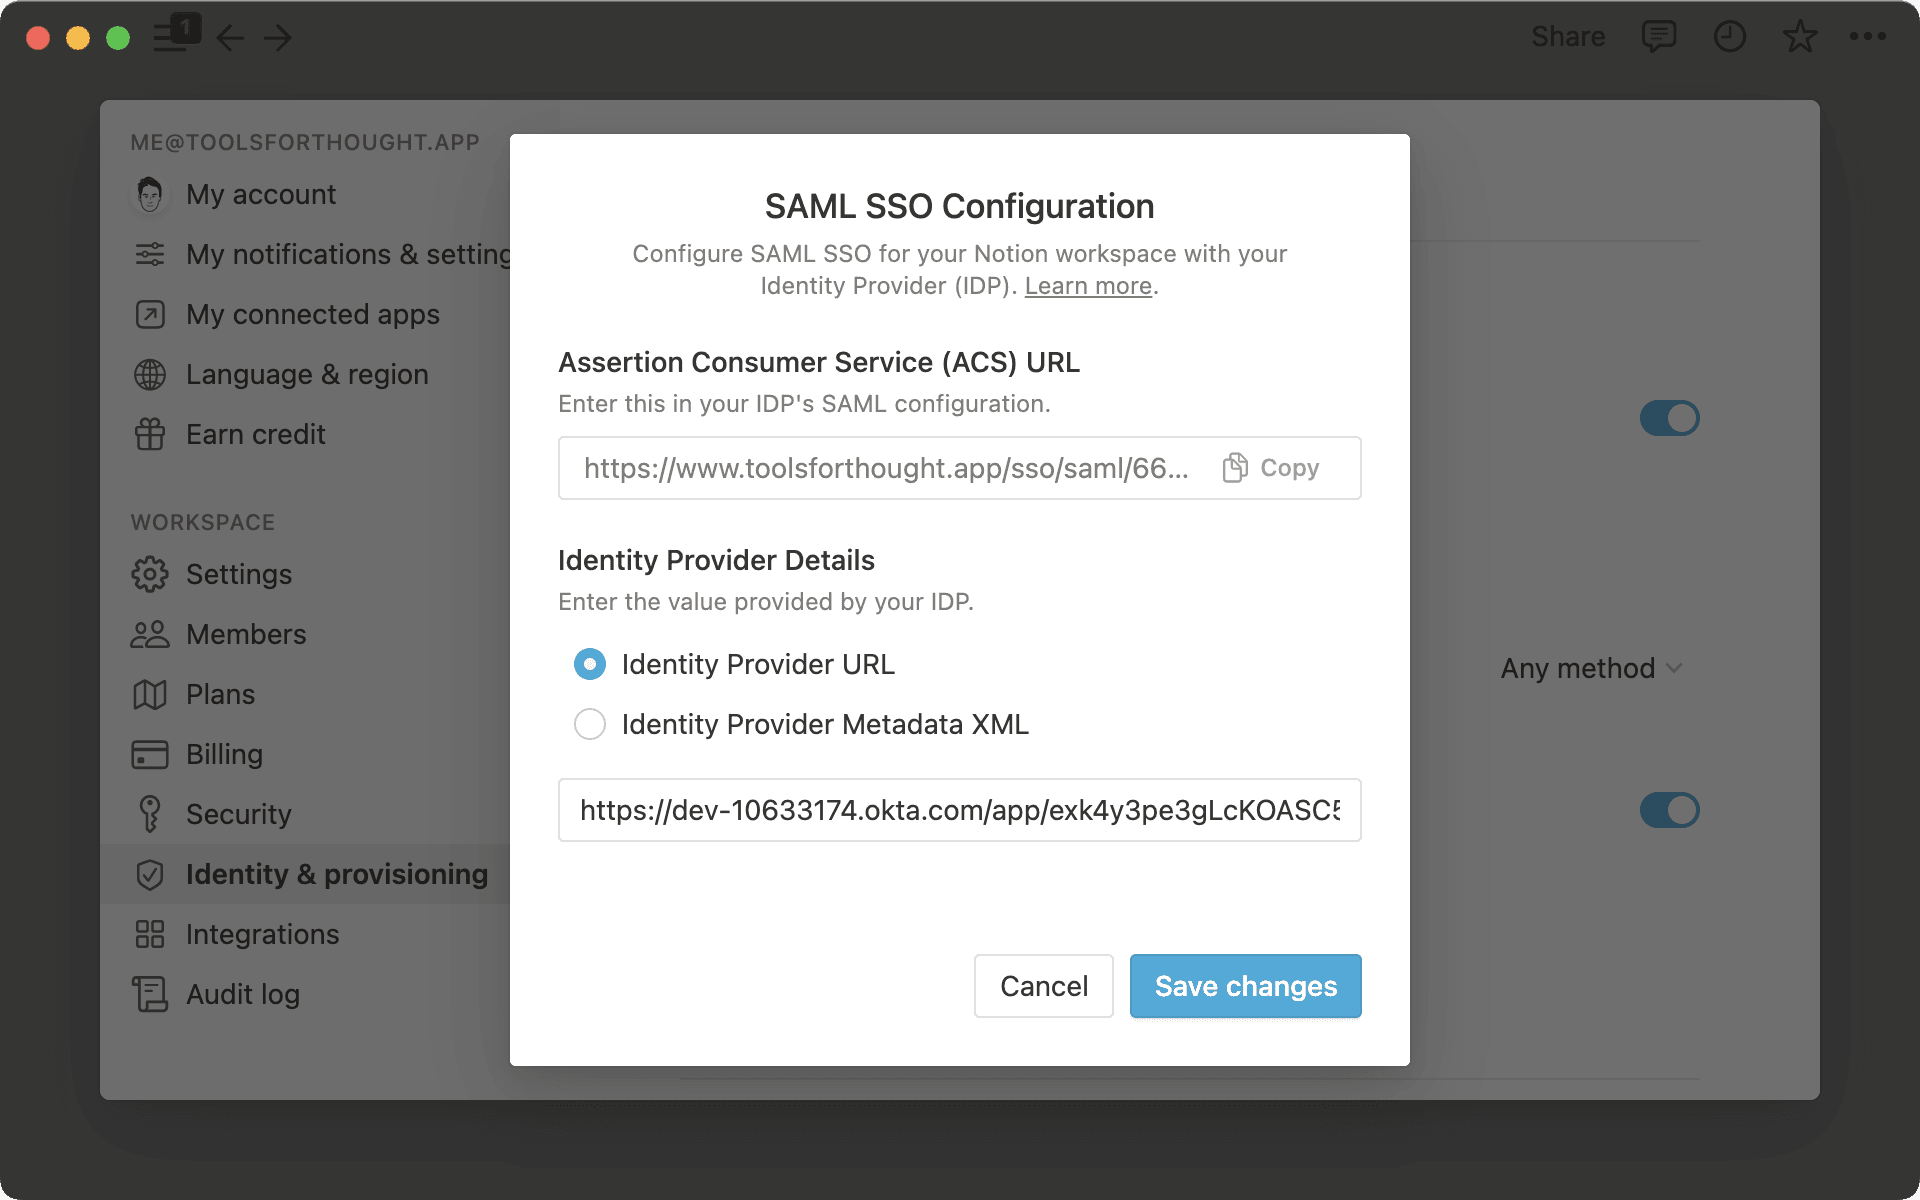
אפשר SAML SSOוהחלון 'תצורת SAML SSO' יופיע באופן אוטומטי וינחה אתכם להשלים את ההגדרה.החלונית SAML SSO Configuration מחולקת לשני חלקים:
יש להזין את ה-
Assertion Consumer Service (ACS) URLבפורטל ספק הזהות (IdP) שלך.ה-
Identity Provider Detailsהוא שדה שבו עליך לספק כתובת URL של IdP או XML של מטא-נתוני IdP.
בחר כיצד אנשים מתחברים והאם ייווצרו עבורם חשבונות חדשים, ולאחר מכן בחר ב-
Save & enable. באפשרותך לבצע את כל הבחירות הללו לפני השמירה. אין צורך לשמור תחילה ולפתוח את ההגדרות שוב.
הערה: סביבת עבודה בתוכנית Business משתמשת בתצורה אחת של SAML. אם אתם זקוקים ליותר מספק זהות אחד, עליכם לשדרג לתוכנית Enterprise.
תוכנית Enterprise
בעלי ארגון בתוכנית Enterprise יכולים לנהל SAML SSO עבור כל סביבת עבודה בארגון שלהם. בארגון יכולה להיות יותר מתצורת SAML אחת, כך שקבוצות שונות של אנשים יכולות להיכנס באמצעות ספקי זהות שונים. זה מועיל כאשר יחידות עסקיות, צוותי IT אזוריים או חברות שרכשתם מחזיקים כל אחד בספק משלו.
הערה: ארגון יכול לכלול עד 25 תצורות SAML. אין הגבלה על מספר הדומיינים שניתן לאמת.
כדי להוסיף תצורת SAML חדשה:
פתחו את בורר סביבת העבודה ובחרו ב-
ניהול ארגון. ייתכן שתצטרכו לבחור ב-הגדרת ארגוןתחילה אם עדיין לא עשיתם זאת. למידע נוסף על בקרות ברמת הארגון כאן →בלשונית
Generalבהגדרות הארגון שלכם, לחצו עלSAML configurations. תראו את כל תצורות ה-SAML שיש לארגון שלכם.בחרו ב-
Create configurationותנו לה שם שהצוות שלכם יזהה, כמו היחידה העסקית או הספק שאליו היא שייכת.בחרו ב-
Enable SAML SSO for loginכדי להגדיר זאת כאפשרות כניסה עבור דומייני האימייל שנבחרו.הגדירו את ה-
Login methodעבור האנשים שתצורה זו מכסה. בחרו ב-Any methodכדי לאפשר למשתמשים להיכנס עם SAML זה כאפשרות כניסה נוספת, או ב-Only SAML SSOשמחייב משתמשים להיכנס עם SAML זה בלבד.בחרו ב-
Automatic account creationכדי ליצור חשבונות באופן אוטומטי עבור משתמשי SAML SSO חדשים שנרשמים באמצעות אחד מדומייני האימייל שנבחרו.בחרו דומיין אימייל מאומת אחד או יותר עבור התצורה. הוספת דומיין מאומת פירושה שכל משתמש שנכנס עם דומיין זה יוכל להשתמש ב-SAML זה. יש לאמת דומיין לפני שניתן להוסיף אותו. ראו הוראות לאימות דומיין כאן →
העתיקו את ה-
Assertion Consumer Service (ACS) URLעבור תצורה זו והוסיפו אותו בספק הזהות שלכם. לכל תצורה יש כתובת ACS URL משלה, לכן תנו לכל ספק אפליקציה משלו בצד שלו.העתיקו את ה-
SAML SSO Entity IDעבור תצורה זו והוסיפו אותו לספק הזהות שלכם.בחרו אם להוסיף את פרטי הספק שלכם באמצעות כתובת URL של מטא-נתוני IdP או באמצעות XML של מטא-נתוני IdP.
יש להדביק את כתובת ה-URL מה-IDP שלכם, ולאחר מכן לשמור.
הערה: אם הארגון שלכם כבר משתמש ב-SAML SSO, הגדרה זו עוברת כתצורה הראשונה שלכם. הדומיינים המאומתים שלכם נשארים משויכים אליה, ואף אחד לא צריך להיכנס שוב.
כך נראה תהליך ההתחברות
מה שאנשים רואים תלוי בכמה הגדרות משתמשות בדומיין האימייל שלהם.
הגדרה אחת משתמשת בדומיין שלך: אתה עובר ישירות לספק הזהות.
יותר מהגדרה אחת משתמשת בדומיין שלך: אתה בוחר ספק מתוך רשימה. Notion מסמנת את זה שבו השתמשת לאחרונה.
אף הגדרה לא משתמשת בדומיין שלך: אתה מתחבר בדרך הרגילה, כמו באמצעות קוד שנשלח לאימייל שלך.
אם הגדרה נדרשת עבור הדומיין שלך, אתה עובר ישירות לאותו ספק ולא רואה את הרשימה, גם אם ישנן מספר אפשרויות SAML SSO. בעלי ארגון ובעלי סביבת עבודה עדיין יכולים להתחבר באמצעות אימייל וסיסמה אם ספק אינו פועל.
לאחר שתשלים את תצורת ה-SAML SSO עבור סביבת עבודה, חברים יוכלו להתחבר באמצעות SAML SSO בנוסף לשיטות התחברות אחרות, כגון שם משתמש וסיסמה או אימות Google.
באפשרותך לבחור זאת בעת הגדרת SAML בפעם הראשונה, באותה שמירה. באפשרותך גם לשנות זאת מאוחר יותר.
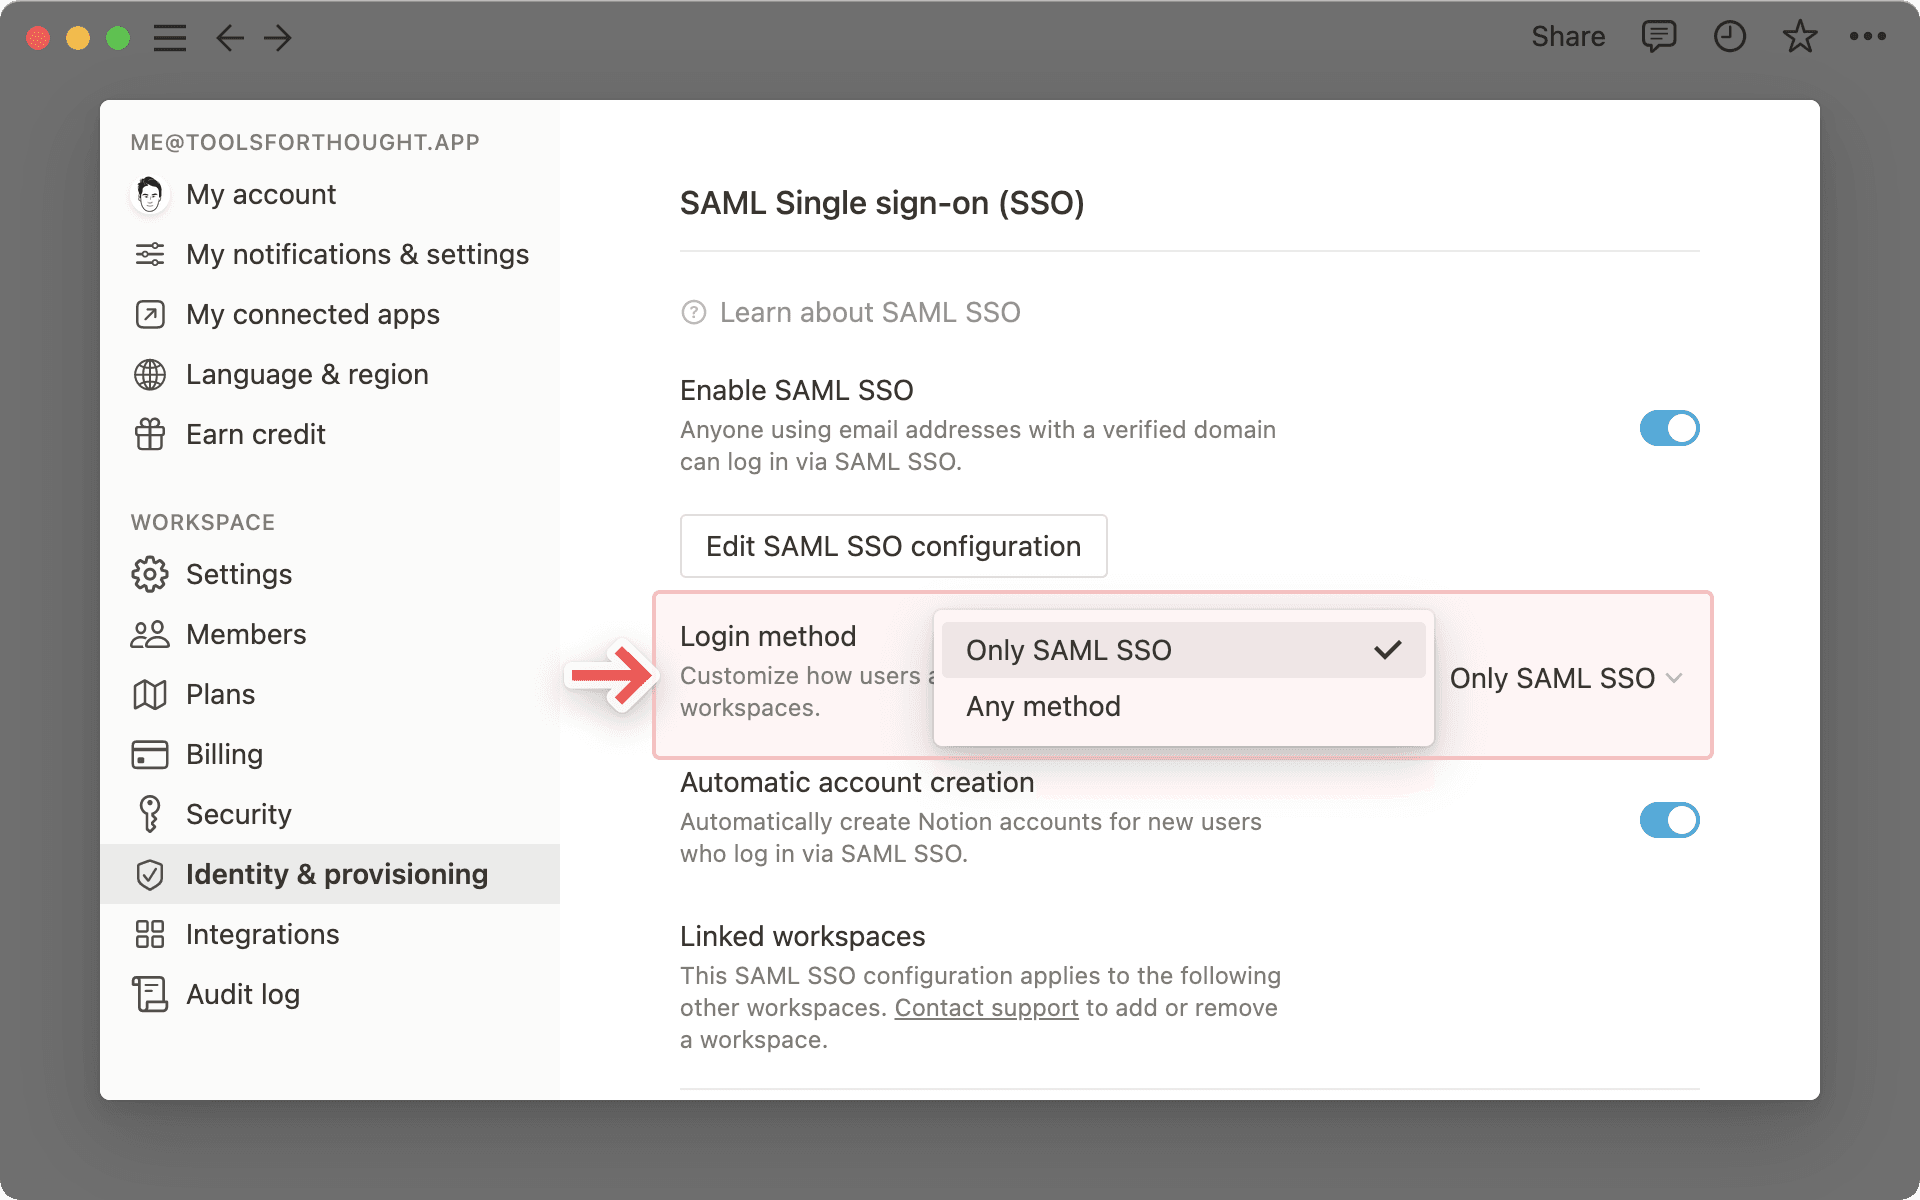
אם ברצונך להבטיח שחבר/ה יוכל/תוכל להתחבר באמצעות SAML SSO בלבד וללא כל שיטה אחרת, עבור אל הגדרות ה-SAML SSO שלך ועדכן את שיטת ההתחברות ל-Only SAML SSO. ברגע שזה יקרה, משתמשי סביבת העבודה ינותקו ויידרשו להתחבר מחדש באמצעות SAML SSO. SAML SSO ייאכף רק עבור חבר/ה המשתמש/ת בדומיין המאומת שלך.
בתוכנית Enterprise, אתם מגדירים זאת עבור כל תצורה. הגדרת Login method ל-Only SAML SSO חלה על הדומיינים בתצורה זו ואינה משפיעה על התצורות האחרות שלכם. דומיין יכול להיות חלק ממספר תצורות, אך רק אחת מהן יכולה להיות נדרשת בכל פעם.
בתוכנית Business, זה ייראה כך:
בתוכנית Enterprise, זה ייראה כך:
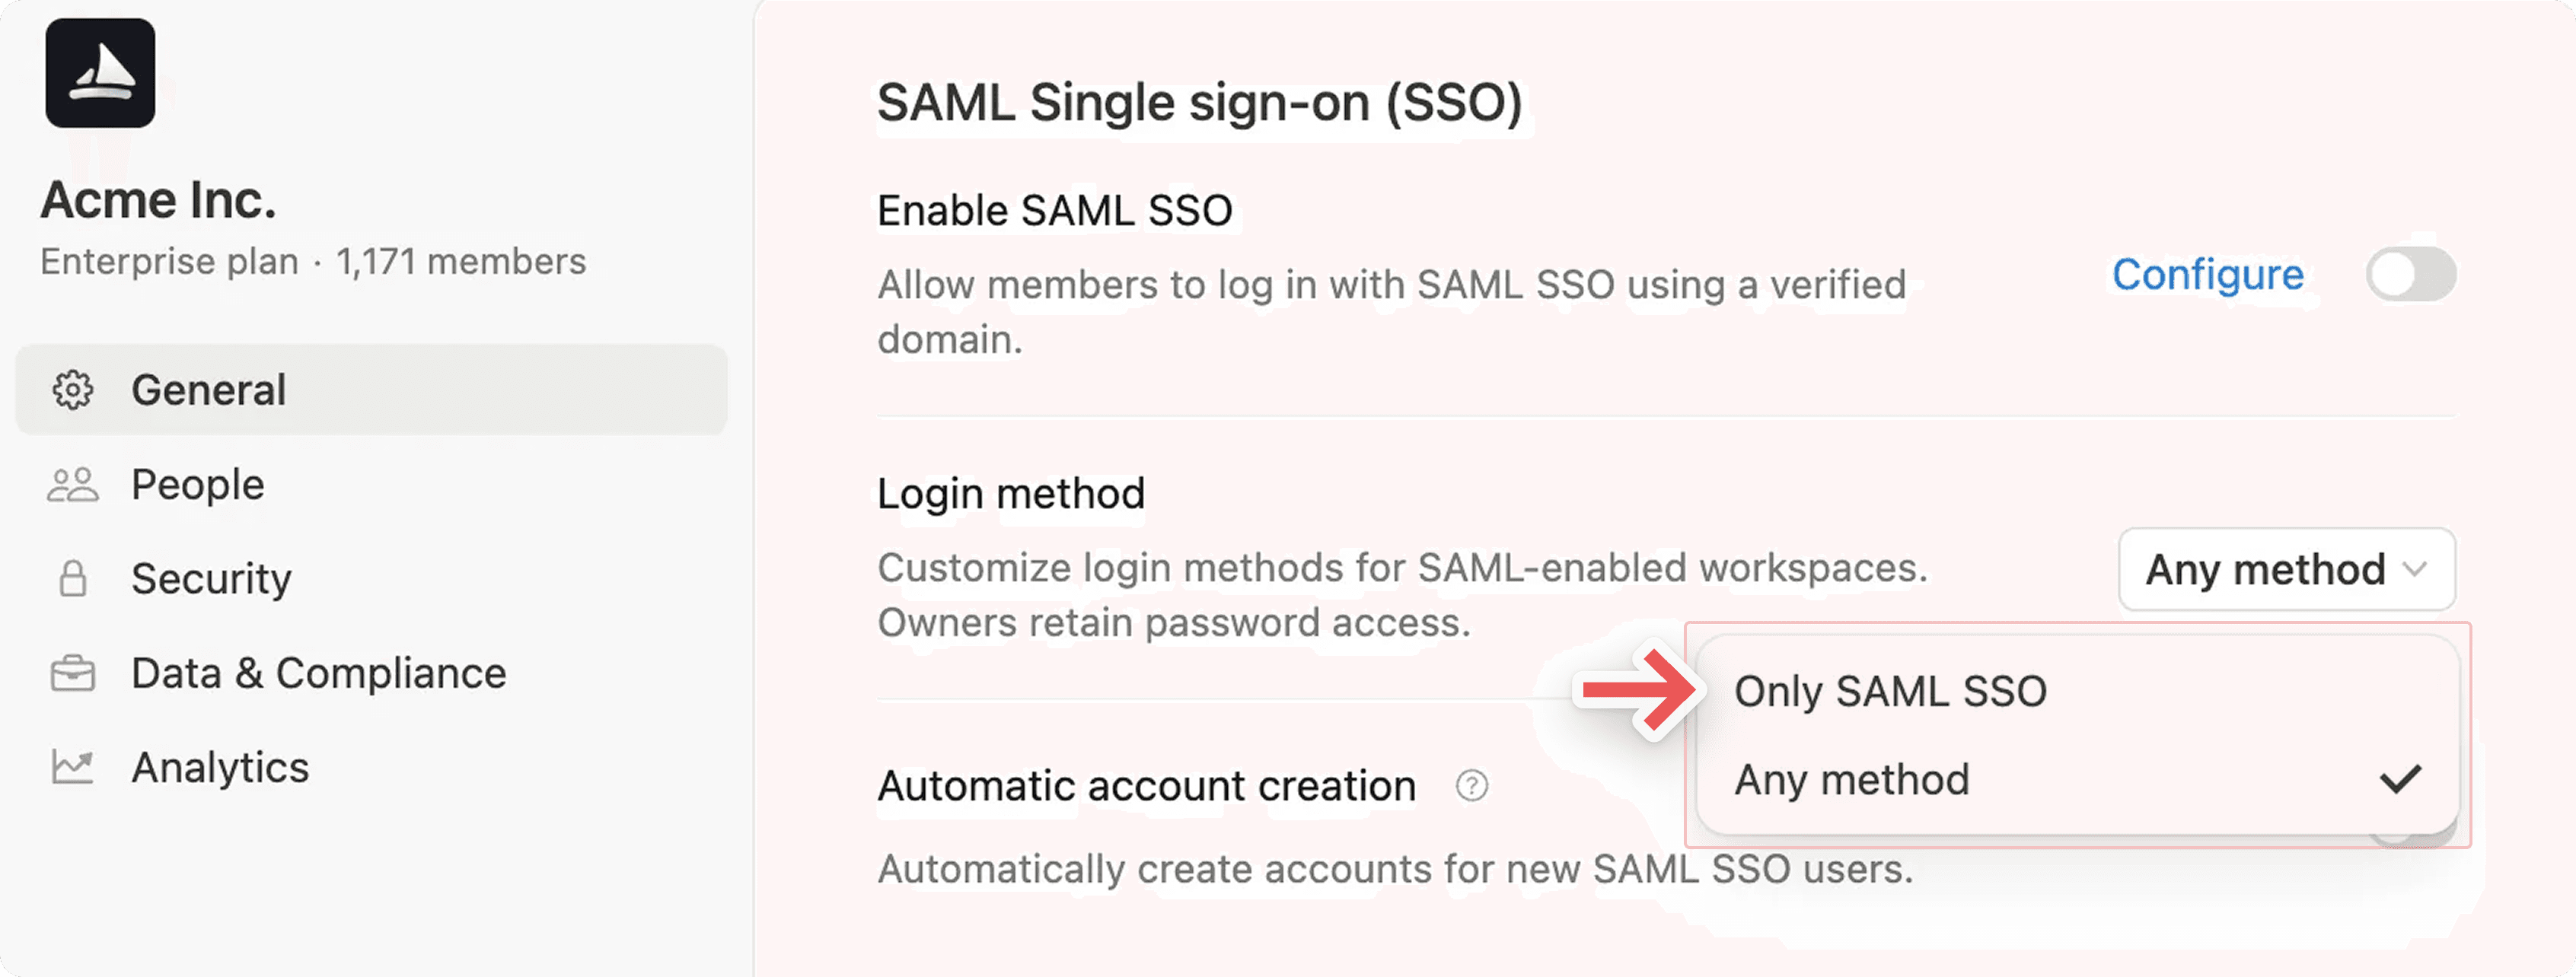
מעקף SSO
במקרה של הרצה שנכשלה ב-IdP או ב-SAML, משתמשים מסוימים יוכלו לעקוף את ה-SAML SSO באמצעות פרטי האימייל והסיסמה שלהם. הם יוכלו להתחבר ולהשבית או לעדכן את התצורה שלהם.
אם תצורת SAML מנוהלת ברמת הארגון, רק בעלי הארגון יוכלו לעקוף את ה-SSO.
אם תצורת SAML מנוהלת ברמת סביבת העבודה, רק בעלי סביבת העבודה יוכלו לעקוף את ה-SSO.
זה עובד באותו אופן כאשר לארגון שלכם יש יותר מתצורה אחת. בעל ארגון יכול להיכנס עם אימייל וסיסמה, ולאחר מכן לתקן, לכבות או להפסיק לדרוש את התצורה שגורמת לבעיה.
הערה: לפני שתוכלו לאשר חיבור עבור שאר סביבת העבודה שלכם, עליכם או על מנהל אחר להתקין אותו תחילה! רק חיבורים שכבר מותקנים בסביבת העבודה יופיעו ברשימה הנפתחת + חיבור מאושר.
הרשאת SAML ברמת סביבת העבודה מאפשרת לארגונים לדרוש SAML SSO עבור גישה לסביבת עבודה, ללא קשר לדומיין האימייל של המשתמש. הדבר מאפשר שיתוף פעולה חיצוני בטוח יותר בסביבת העבודה שלך.
כדי להפעיל הרשאת SAML ברמת סביבת העבודה:
פתחו את בורר סביבת העבודה ובחרו ב-
ניהול ארגון. ייתכן שתצטרכו לבחור ב-הגדרת ארגוןתחילה אם עדיין לא עשיתם זאת. למידע נוסף על בקרות ברמת הארגון כאן →בלשונית
Generalבהגדרות הארגון שלכם, בחרו ב-SAML configurations.ברשימת סביבות העבודה, בחרו איזו תצורת SAML נדרשת לכל סביבת עבודה. אתם יכולים להשאיר סביבת עבודה ללא תצורה.
הערה: לפני ההפעלה, ודא שכל החבר/ה מוספים לספק הזהות (IdP) שלך כדי למנוע נעילה מקרית מסביבת העבודה.
כאשר תכונה זו מופעלת, חבר/ה בסביבות העבודה המושפעות שטרם עבר/ה אימות מול ה-IdP של הארגון שלך ייתקל/תיתקל במסך אימות נוסף. הוא/היא יצטרך/תצטרך לעבור דרך SAML SSO כדי להמשיך לצפות בסביבות העבודה של הארגון שלך.
אם סביבת עבודה דורשת תצורה ספציפית, משתמשים שטרם נכנסו עם ספק זה יתבקשו לעשות זאת כשיפתחו את סביבת העבודה. Notion מחזירה אותם לסביבת העבודה לאחר השלמת התהליך. משתמשים העובדים בשתי סביבות עבודה שדורשות ספקים שונים עשויים להתבקש להיכנס לכל אחת מהן.

Notion תומכת בהקצאת "בדיוק בזמן" (JIT) בעת שימוש ב-SAML SSO. הדבר מאפשר לאדם המתחבר באמצעות SAML SSO להצטרף לסביבת עבודה באופן אוטומטי כחבר. באפשרותך להפעיל זאת בעת הגדרת SAML, באותה שמירה.
כדי להפעיל הקצאת "בדיוק בזמן" (JIT) אם אתה בתוכנית Business, עבור אל Settings→Identity וודא ש-Automatic account creation מופעלת.
כדי להפעיל הקצאת "בדיוק בזמן" (JIT) אם אתה בתוכנית Enterprise, עבור אל הגדרות הארגון שלך → General וודא ש-Automatic account creation מופעלת.
בתוכנית Enterprise, אתם יכולים להפעיל או לכבות את Automatic account creation עבור כל תצורה. סביבת העבודה שאליה מתווספים אנשים חדשים מוגדרת עבור כל הארגון, כך שהיא זהה ללא קשר לספק שבו השתמשו. העניקו לאנשים גישה לסביבות עבודה אחרות כפי שהייתם עושים בדרך כלל.
הערה: איננו ממליצים להפעיל הקצאה בזמן אמת (Just-in Time) אם אתם משתמשים ב-SCIM. קיום של \"דומיין אימייל מורשה\" מאפשר למשתמשים בדומיין זה להצטרף לסביבת העבודה, כך שעלולה להיווצר אי-התאמה בין החברות בספקי הזהות שלהם לבין Notion.

למידע נוסף
סביבות עבודה בתוכנית Business משתמשות בתצורה אחת. תוכניות Enterprise מאפשרות יותר מתצורה אחת של SAML.
ארגון יכול לכלול עד 25 תצורות. אין הגבלה על דומיינים מאומתים.
דומיין מאומת יכול להיות חלק ממספר תצורות, אך רק אחת מהן יכולה להיות נדרשת בכל פעם.
דומיין אב אינו מכסה את תת-הדומיינים שלו. אמתו כל דומיין ותת-דומיין שברצונכם לשלוח לספק, ולאחר מכן הוסיפו אותו לתצורה.
דומיין אימייל יכול להשתייך לארגון Notion אחד בלבד. שני ארגונים אינם יכולים לחלוק אותו.
רק בעלי ארגון, ומנהלים שכבר מנהלים SAML, יכולים להוסיף או לשנות תצורות. חברים אינם יכולים.
שאלות נפוצות
מדוע איני יכול להפעיל SAML SSO?
מדוע איני יכול להפעיל SAML SSO?
הסיבה הנפוצה ביותר היא שטרם אימתת את הבעלות על דומיין. אם זה המקרה, תבחין שאין דומיינים המפורטים בסעיף אימות דומיין אימייל או שהדומיין ממתין לאימות.
לשלבים הבאים, עיין בהוראות שלנו כיצד להשלים את אימות הדומיין כאן →
מדוע איני יכול לערוך את הגדרות ה-SAML SSO שלי?
מדוע איני יכול לערוך את הגדרות ה-SAML SSO שלי?
ייתכן שאתה מנסה לשנות את הדומיינים המאומתים או את תצורת ה-SSO מסביבת עבודה מקושרת שכבר משויכת לתצורת SSO אחרת.
בסביבות עבודה מקושרות, כל הגדרות ניהול הדומיין ותצורת ה-SSO הן לקריאה בלבד. כדי לשנות את תצורת ה-SSO או להסיר סביבת עבודה זו מתצורת ה-SSO, עליך להיות בעל גישה לסביבת העבודה הראשית. ניתן למצוא את שם סביבת העבודה הראשית בראש הכרטיסייה זהות והקצאה בהגדרות שלך.
מדוע עלי לאמת דומיין כדי להפעיל SSO?
מדוע עלי לאמת דומיין כדי להפעיל SSO?
אנו מבקשים שבעלות על דומיין האימייל תאומת כדי להבטיח שרק בעל הדומיין יוכל להתאים אישית את האופן שבו המשתמשים שלו מתחברים ל-Notion.
אני נתקל בבעיות בהגדרת SSO.
אני נתקל בבעיות בהגדרת SSO.
ניתן להשתמש בכתובת URL במקום ב-XML.
מומלץ לבדוק את תהליך ההגדרה עם חשבון בדיקה לפני החלתו על המשתמשים.
אם אף אחת מהאפשרויות הללו לא מסייעת, יש לפנות לתמיכה בכתובת
מדוע עלי להסיר דומיינים של אימייל מהגדרת "דומיינים מורשים לאימייל" לפני הגדרת SAML SSO עבור סביבת העבודה שלי?
מדוע עלי להסיר דומיינים של אימייל מהגדרת "דומיינים מורשים לאימייל" לפני הגדרת SAML SSO עבור סביבת העבודה שלי?
ההגדרה דומיין מורשה לאימייל מאפשרת למשתמשים עם הדומיינים שנבחרו לגשת לסביבת העבודה שלך מבלי לעבור הקצאה דרך ה-IdP שלך. כדי להבטיח שרק משתמשים שהוקצו דרך ה-IdP שלך יוכלו לגשת לסביבת העבודה התומכת ב-SAML שלך, יש לבצע השבתה לתכונה על ידי הסרת כל כתובות האימייל מרשימת ה-דומיין מורשה לאימייל.
האם אוכל עדיין להיכנס ל-Notion אם ספק הזהות (IdP) שלי אינו זמין?
האם אוכל עדיין להיכנס ל-Notion אם ספק הזהות (IdP) שלי אינו זמין?
כן, גם כאשר SAML נאכף, לבעלי סביבת עבודה יש אפשרות להיכנס באמצעות אימייל. בעל סביבת עבודה יכול לשנות את הגדרת ה-SAML כדי לבצע השבתה של Enforce SAML כך שמשתמשים יוכלו להיכנס שוב באמצעות אימייל.
כיצד אוכל לאפשר למנהלי מערכת של סביבות עבודה אחרות בהגדרת ה-SAML שלי ליצור סביבות עבודה חדשות?
כיצד אוכל לאפשר למנהלי מערכת של סביבות עבודה אחרות בהגדרת ה-SAML שלי ליצור סביבות עבודה חדשות?
רק מנהלי המערכת של סביבת העבודה הראשית שלך יוכלו ליצור סביבות עבודה חדשות באמצעות הדומיין/ים המאומת/ים שלך. במידה ויש צורך, ניתן לפנות לצוות התמיכה שלנו ([email protected]) כדי להעביר את סביבת העבודה הראשית של SAML לסביבת עבודה מקושרת אחרת בהגדרת ה-SAML שלך.
האם עליי לשמור את הגדרות ה-SAML שלי פעמיים?
האם עליי לשמור את הגדרות ה-SAML שלי פעמיים?
לא. באפשרותך להוסיף את פרטי ספק הזהות שלך, לבחור כיצד אנשים מתחברים, ולהחליט אם ייווצרו חשבונות חדשים, ולאחר מכן לשמור פעם אחת. הכל נכנס לתוקף יחד.
האם כל אחד מהצוותים שלנו יכול להשתמש בספק זהות משלו?
האם כל אחד מהצוותים שלנו יכול להשתמש בספק זהות משלו?
כן, אם אתם בתוכנית Enterprise. בעל ארגון יכול להוסיף תצורה עבור כל ספק ולבחור באילו דומיינים מאומתים של אימייל להשתמש בה.
האם ניתן לדרוש שני ספקים עבור אותו דומיין דואר אלקטרוני?
האם ניתן לדרוש שני ספקים עבור אותו דומיין דואר אלקטרוני?
לא. דומיין יכול להיות חלק ממספר תצורות, אך רק אחת מהן יכולה להיות נדרשת בכל פעם.