How to manage subscriptions in Gmail: A step-by-step guide
It’s so easy to fall into the subscription trap. Maybe you signed up for that 15% off, or you absentmindedly ticked “yes” to some weekly newsletter—and now your inbox is flooded with emails you don’t really read or want.
The good news? You no longer have to unsubscribe from each sender one by one. In March 2025, Google started rolling out the Manage subscriptions feature, which gives you a clear view of your subscriptions and allows you to unsubscribe quickly from those you no longer want.
Want to learn how to manage subscriptions in Gmail? This guide will walk you through the process, step by step. We’ll also share a couple of handy tips on how to keep your inbox clean and organized.
How to manage email subscriptions in Gmail
Gmail’s manage subscriptions feature shows all your active subscriptions in one place, so you can review them with ease. On top of that, it allows you to see how often each sender emails you within the same dashboard.
What makes it even better is that you can unsubscribe from multiple senders at once—just sift through the list and remove the ones you no longer want. When you unsubscribe, Gmail will remove you from all of that sender’s mailing lists.
Before you go on an unsubscribing spree, here’s what you should keep in mind:
Prior to hitting unsubscribe, it might be a good idea to review a couple of messages from the sender to ensure that you don’t want to receive their emails.
If you block someone, it doesn’t unsubscribe you from their mailing list but sends their future emails to your Spam folder.
After you unsubscribe, it takes a few days for the sender to remove you from their mailing list, so you could still receive their emails in the meantime.
Now, let’s see how to manage Gmail subscriptions on desktop, iPhone or iPad, and Android.
Manage Gmail subscriptions on the desktop
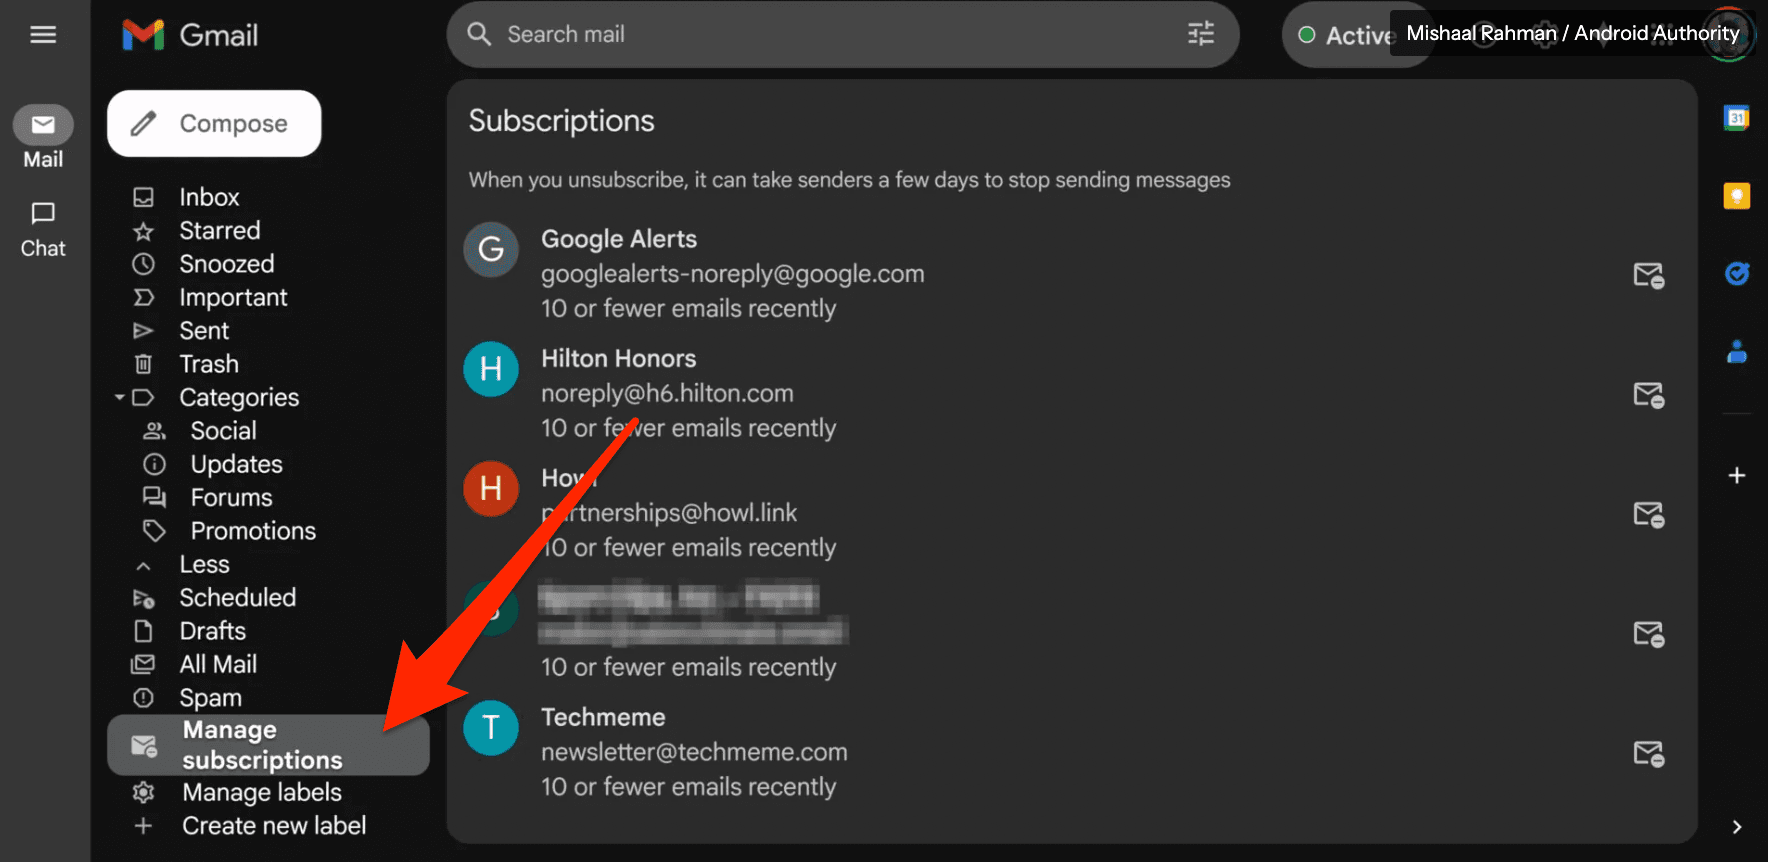
To find this feature on the desktop, follow these steps:
Go to Gmail
Click the hamburger menu on the left, that is, the option More
Select Manage subscriptions (between Spam and Manage labels)
You can revise all the emails from a single sender by simply clicking on their name or avatar.
If you want to unsubscribe, on the right, next to the sender’s recent email count, click Unsubscribe. You may see a pop-up asking you to be directed to the sender’s website. In that case, select Go to website to unsubscribe.
As mentioned above, it takes some time until the sender removes you from the list. So, if you want to stop receiving emails immediately, block the sender. To do so, once you get directed to their website, choose the option Block instead.
Manage Gmail subscriptions on iOS and Android
If you’d like to manage subscriptions in Gmail straight from your iPhone, iPad, or Android device, here’s what you've got to do:
Open your Gmail app
Click More from the left navigation bar
Tap Manage subscriptions
You can also unsubscribe from senders using the Gmail app. Just follow the same steps as for the desktop version.
What if Gmail's “Manage subscription” doesn’t show?
Since Gmail is rolling out the “Manage subscriptions” feature gradually, you might not access it yet.
In the meantime, you’ll have to unsubscribe manually by clicking Unsubscribe next to the sender’s name or at the bottom of the email. Another solution is to use an automation tool that can streamline the process, which we’ll discuss later in the text.
How to organize and declutter your Gmail inbox: 5 helpful tips
If your inbox is starting to feel overwhelming with constant emails and a chaotic inbox, it might be time for some revising and reorganizing. We’ve rounded up five useful tips to help you declutter your inbox:
Delete or archive old emails
Block spam emails
Organize your emails with labels and folders
Sort incoming emails with filters
Automate inbox management
1. Delete or archive old emails
Tone down the visual noise by deleting or archiving old emails. This way, it will be easier to find important messages without getting lost in decade-old emails. Another bonus is that removing old emails can free up your Gmail storage.
If even the thought of going through hundreds of emails sounds annoying, fret not—there’s a simpler solution. You can use a Gmail cleaner app to automate the process and mass-delete emails you no longer need.
Want to keep less important emails but also get them out of your sight? Archive them by clicking the archive button at the top of your screen. You can always find them later in the Archive folder.
Bonus read: Want to know if Gmail keeps all your messages? Head to our blog post to learn what happens to old emails and threads.
2. Block spam emails
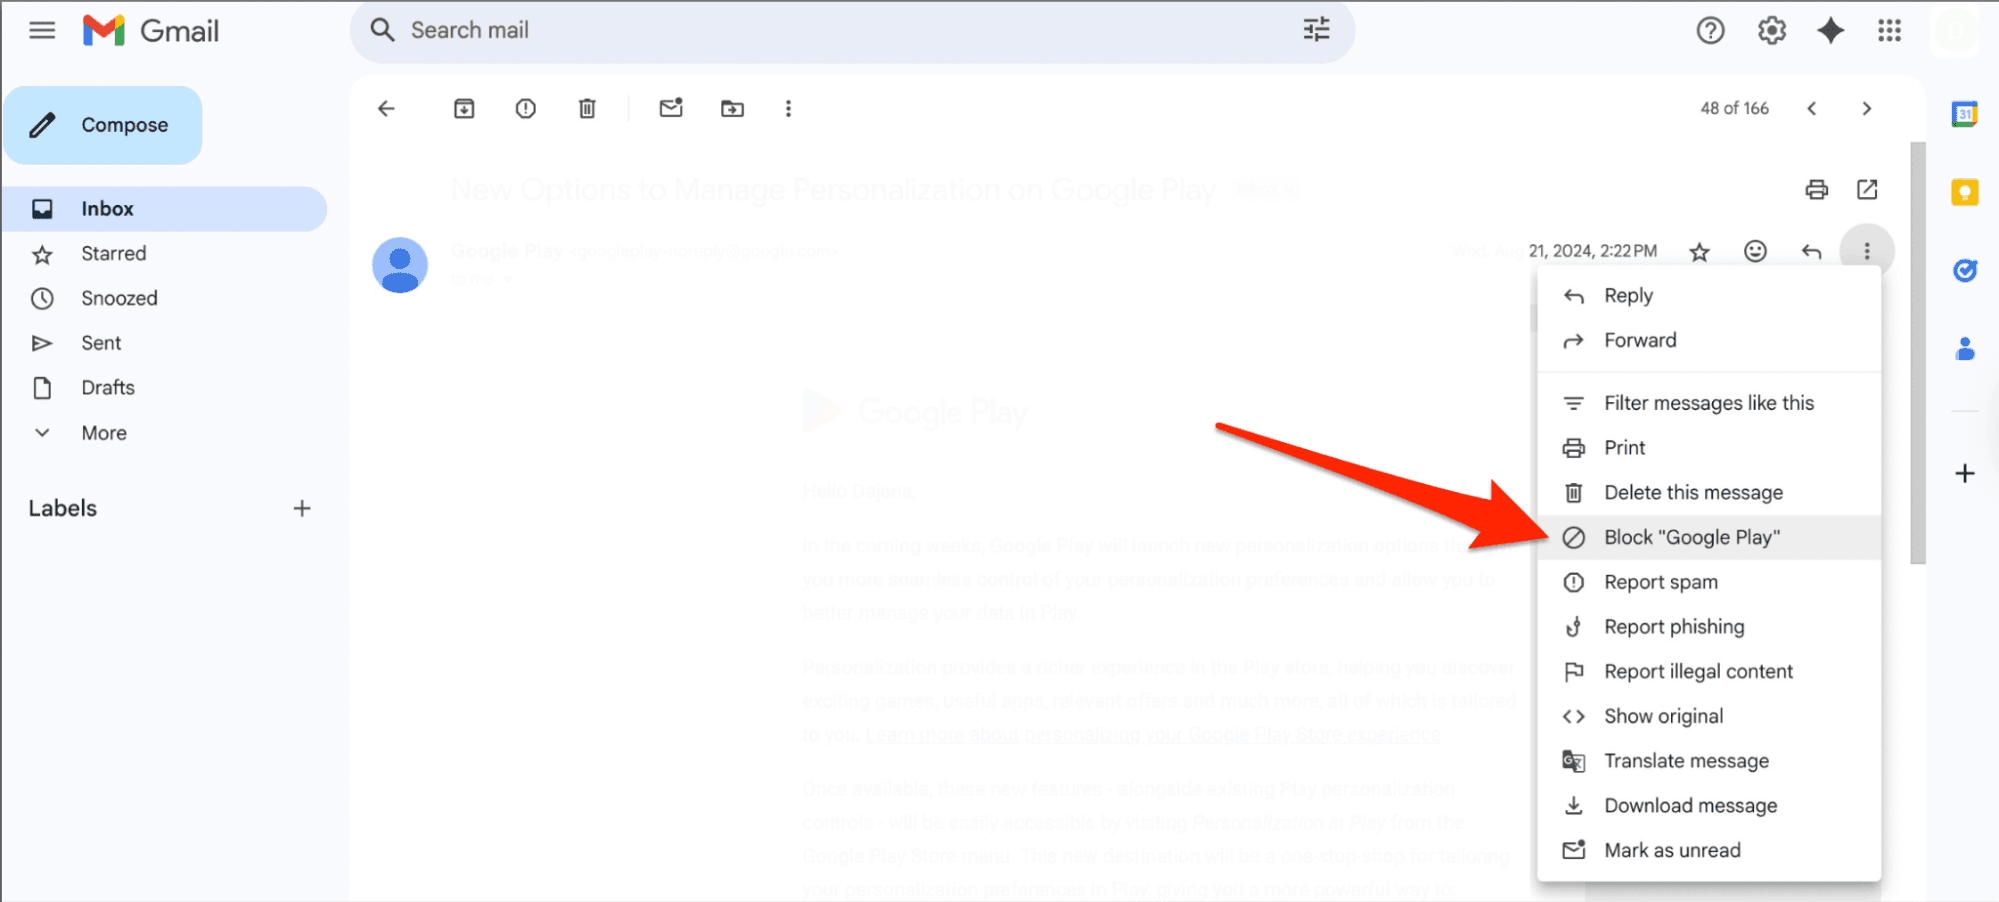
Trim the unwanted emails by blocking the senders and rerouting their emails to Spam. It only takes a couple of seconds, as all you need to do is:
Open the unwanted email
Click More
Select Block [sender’s name]
3. Organize your emails with labels
Using labels can make a world of difference in managing your inbox. While Gmail auto-sorts emails into basic tabs like Primary, Social, and Promotions, you can create customizable labels for even more control.
With labels, you can add tags to your emails that define their context, such as work, travel, and family, making them easier to locate. You can use these labels to tag emails by topic, priority, or focus. One email can have several labels, so you’ll be able to organize your inbox more flexibly. Plus, you can always edit or delete labels when you want to reorganize.
Bonus read: Explore the difference between labels and folders.
4. Sort incoming emails with filters
The previous tips focus on existing emails, so here’s one that helps you organize upcoming ones. Use Gmail filters to categorize incoming emails and set the conditions that will guide Gmail in sorting your future messages.
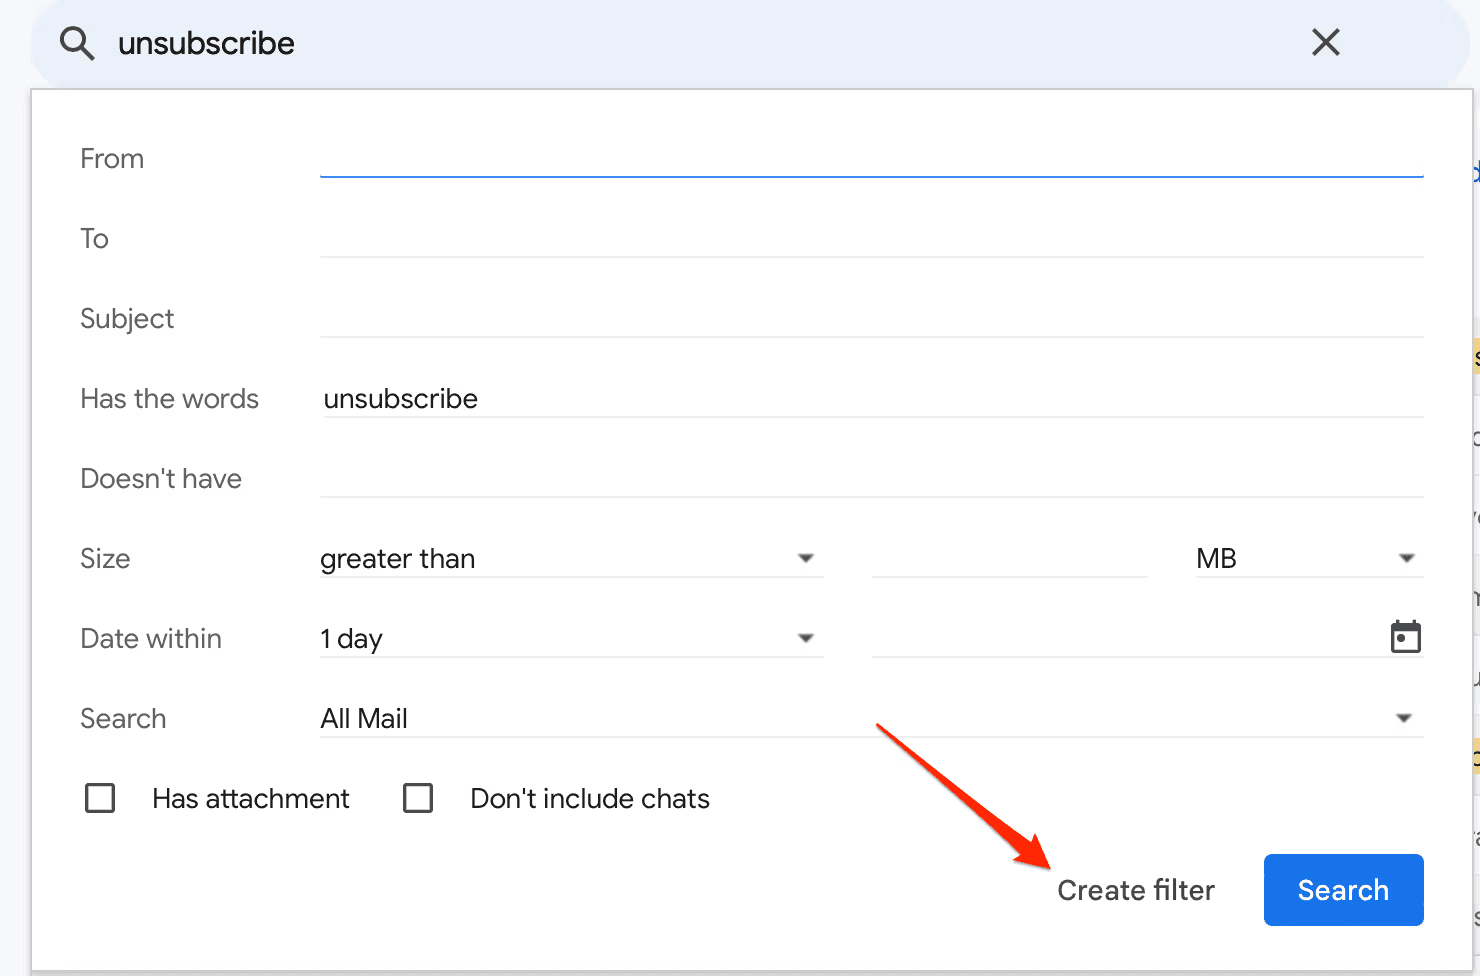
It is a fairly simple process—follow these steps:
Click the three-line filter button in the Gmail search bar
Enter the criteria you want to filter by (such as sender, recipient, subject, etc.)
Click Create filter at the bottom of the pop-up
Select what you want Gmail to do with emails that match your filter
5. Automate inbox management
The easiest way to keep your inbox tidy is to use a Gmail client that streamlines email management. These tools leverage AI to take over mundane and repetitive tasks, such as sorting, replying to emails, and even managing subscriptions.
Instead of filtering and labeling your emails manually, you can use simple prompts to delegate these tasks to an AI-powered Gmail client. From advanced organization features to customizable workflows, these tools pack a ton of time-saving functionalities that can transform how you manage your emails.
If you decide to sign up for an email automation tool, there are some key features you should look for:
Feature | Why it matters |
User-friendly interface | Makes it easy to navigate your inbox without a steep learning curve |
Organization features | Simplifies sorting, labeling, and prioritizing your emails |
AI features | Automates repetitive tasks, such as sorting, replying, and unsubscribing |
Pricing | Comes at a low price or is completely free, without cutting corners on features or usability |
A tool that ticks all those boxes (and then some) is Notion Mail—an exclusive Gmail client. This platform can help you manage your inbox intelligently and automate all the repetitive, tiresome tasks. Besides its array of advanced features, you can use Notion Mail for free forever!
Take control over your inbox with Notion Mail
Notion Mail is a powerful, AI-native email client that transforms your Gmail experience. It can sort, reply, organize, and even schedule meetings, all on your command. You can also enter simple prompts for labeling, archiving, or drafting emails and cut down on busywork.
Starting with email subscriptions, you can use the platform’s one-click unsubscribe feature to remove unwanted senders in no time. So, if you don’t have Gmail’s Manage subscriptions option, Notion Mail will have it covered.
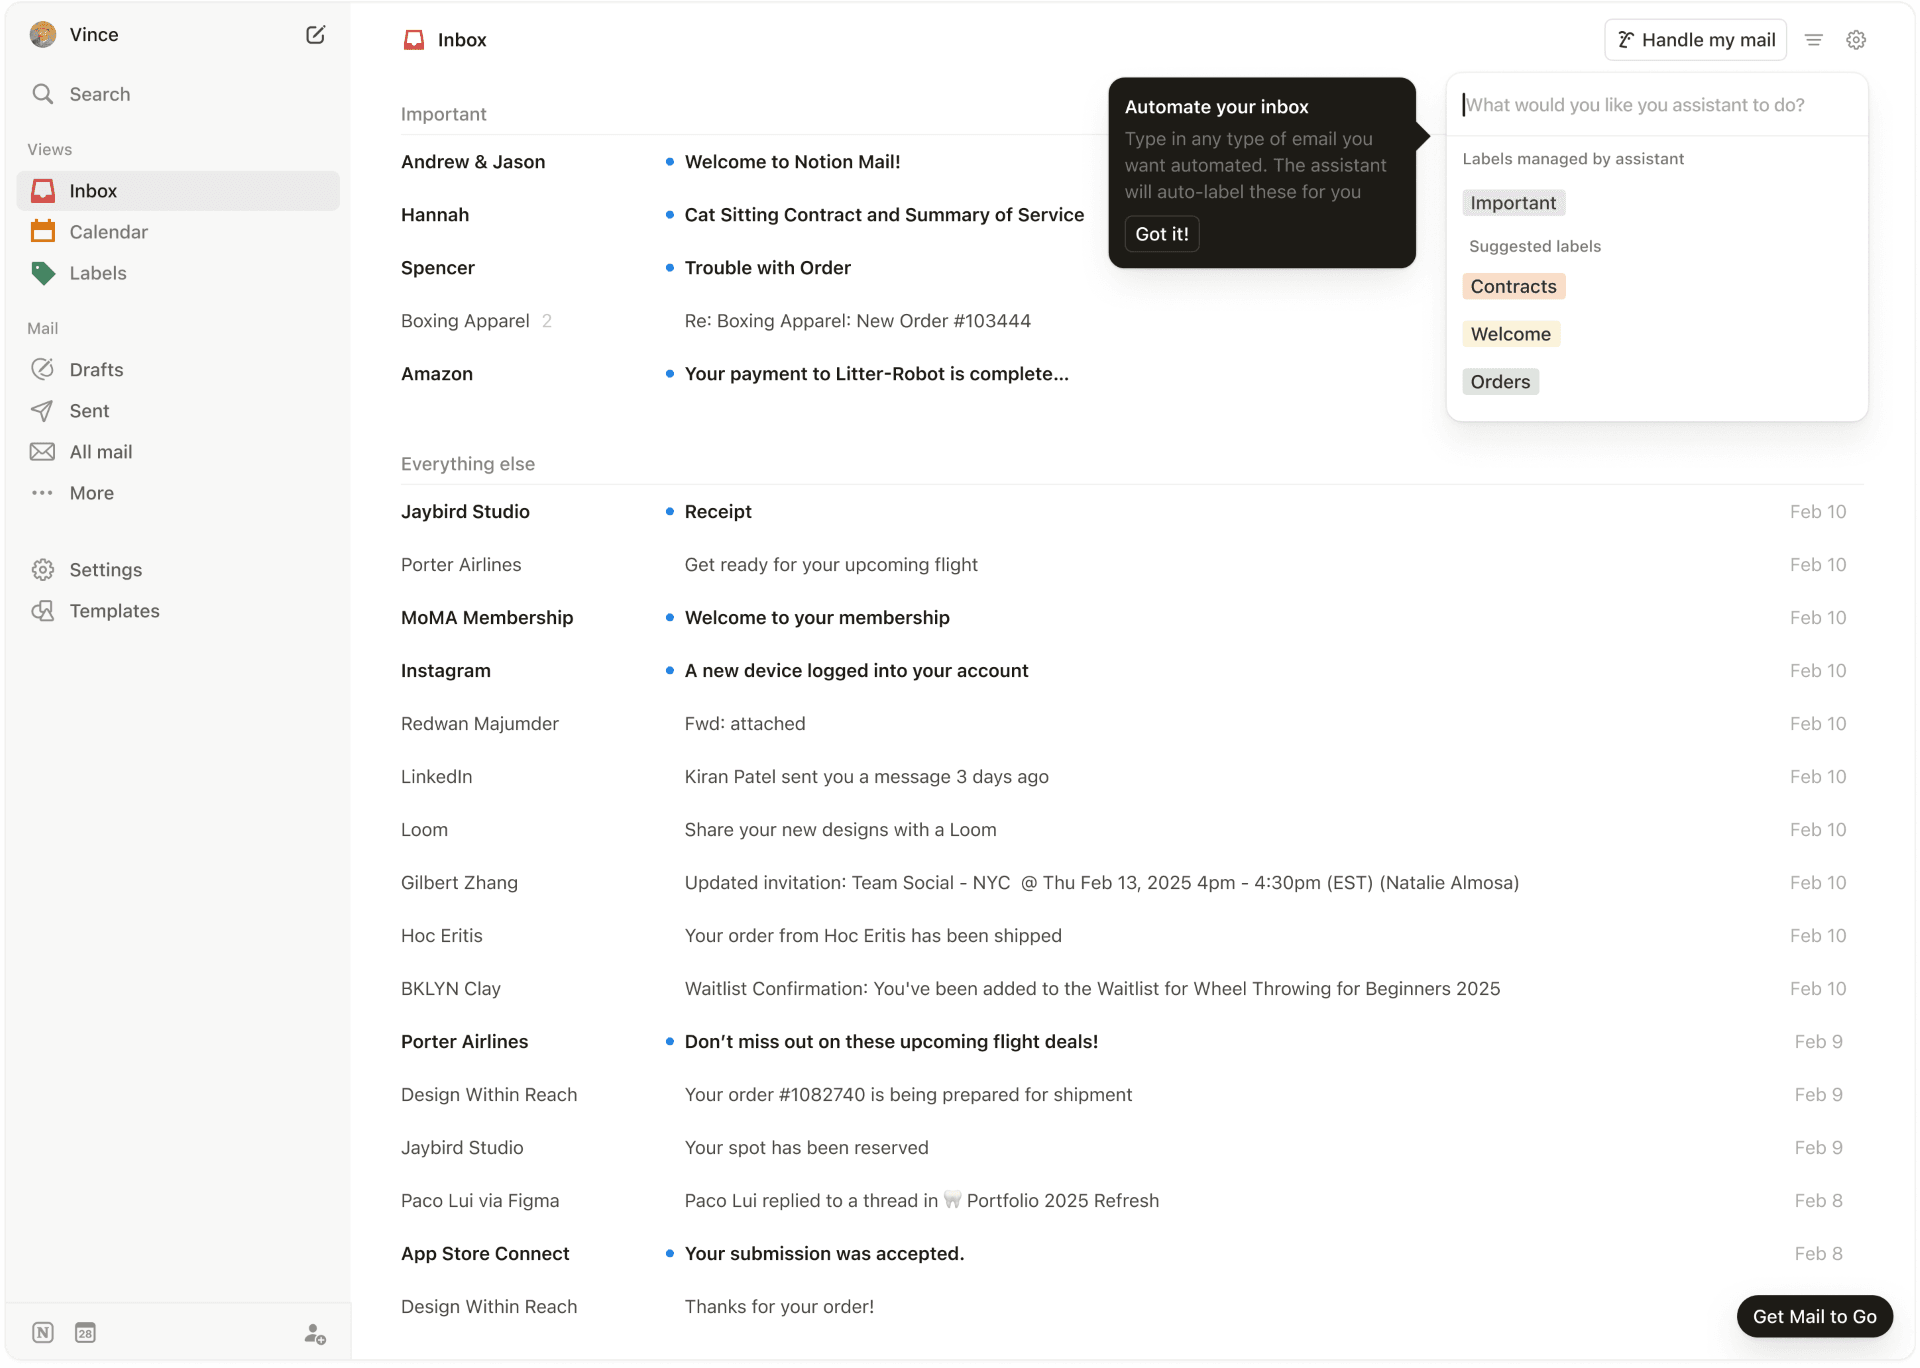
With its AI features, Notion can automate time-consuming tasks and streamline organizing your emails. Here are some of its features you can explore:
Intelligent auto labeling: With the help of AI, Notion Mail can analyze and automatically label your emails.
AI auto-pilot: By using prompts, you can instruct the tool how to label and prioritize your emails.
Customizable views: Notion Mail’s powerful customizable inbox allows you to create “inboxes within an inbox” based on your criteria to suit your workflows.
Scheduling meetings with a click of a button: The platform integrates with Notion Calendar, so you can schedule meetings straight from your email.
AI-powered email drafting: This feature generates first drafts or email replies based on context.
With all these features combined, Notion Mail can be your personal email assistant, allowing you to maintain an organized inbox with minimal effort.
Get started with Notion Mail
Most of Notion Mail’s core features are available for free. All you need to do is connect your Google or Gmail account. If you want to explore more advanced AI features, you can get the Notion AI add-on.
Bonus read: Looking for more ways to keep your Gmail inbox organized? Explore our guides for extra tips and tricks:
